I like to think that I read quite a bit—certainly more than the average person—but in reality, I read anywhere from one to three dozen books a year. When looking for new books, I occasionally purchase books that seem interesting or culturally relevant but are unavailable in a well-formatted, digital version.
Then I begin the arduous task of digitizing the book and creating an e-book version that will last a lot longer than any paper document. When I go about this, I usually spend weeks on each book; I fix typos, I ensure there are no weird errors in the formatting, and I try my best to present the information in the same way that the author intended. I don't modify these books per se (I wouldn't dare add or remove any information), but I do repair them when necessary.
Typically, I'll turn the text into a standard EPUB or into mostly-plain HTML (depending on the use case). These formats are almost universal and will render well on damn near every device on the planet. EPUBs and PDFs are very common in the e-book world, but while PDF is handy, they aren't as easy to edit and have some other issues that I won't dwell on. EPUB on the other hand is HTML + XML all wrapped up in a ZIP file. They're remarkably easy to work with using a piece of software like Sigil and they preserve the text for easy conversion to other formats if needed.
I preserve these books for myself as well as for future generations. If they're out of copyright or somewhat old, I will try my best to get them uploaded to the Internet Archive as I think that site is a great and noble resource. If they are of a more sensitive nature, then they'll get stored in my personal library until I decide if and where I want to share them.
I also strongly believe in open access to information and I feel that piracy of digital goods isn't theft. That being said, I don't think it is right to sell someone else's hard work without inputting a significant amount of effort to transform or repurpose it into an original work. This isn't a complete opinion of mine and I plan to update this article or turn it into a complete essay someday.
Lastly, I have created a new section of this site named after my home library: The Library of HBM. I plan to upload some of the books I have helped to preserve (as well as a lot of other books that I have collected) to this site in some capacity, but I haven't fully decided how I want to share them.
I likely won't host many of these books directly on this site. Instead, you'll probably find them on the Internet Archive, shared via BitTorrent magnet links, or bundled in encrypted .zip files. I'd rather not risk violating NeoCities' content policies by hosting material I don't technically own, but I do plan on sharing my large collection of books somehow. Watch for updates!
The New Flesh is a short but very enjoyable (and quite trippy) musical experience. The entire game takes about 30 minutes to explore, but there is quite a bit to discover; plenty of funny little moments, creepy characters, and some pretty good music. My favorite moment was seeing the rats dancing on the trash cans.
The dithering and pixelated graphics were neat and they added a retro feeling to the game when paired with the simple mechanics and low-poly meshes. The gameplay is straightforward and sparked my curiosity without being too hand-holdy. The end sequence made me rather motion sick, but almost all videogames do that to me nowadays.
It reminded me a lot of those Itch.io indie games that show up at game jams. It seems there was a lot of love put into this game and it shows. Go check it out if you are interested. It's free!
In June of 2025, my poor PT Cruiser suffered a string of systemic failures that culminated in the ol' girl kicking the bucket just before hitting 190K.
In one incredibly long weekend I overheated going up a mountain, got stranded for a few hours, got a brief tow, then drove the rest of the way to my destination once the engine cooled down. Two days spent investigating the issue led me and my mechanic (a close relative of mine) to conclude that it was probably fine. We thought the issue was with my cooling fans or thermostat not functioning properly.
I left my mechanic's house at around 08:00 and didn't get home until 21:00. This drive was only supposed to take 8 hours, but the overheating, getting stranded, and eventually getting towed 125 miles closer to home added up to about 13 hours total.
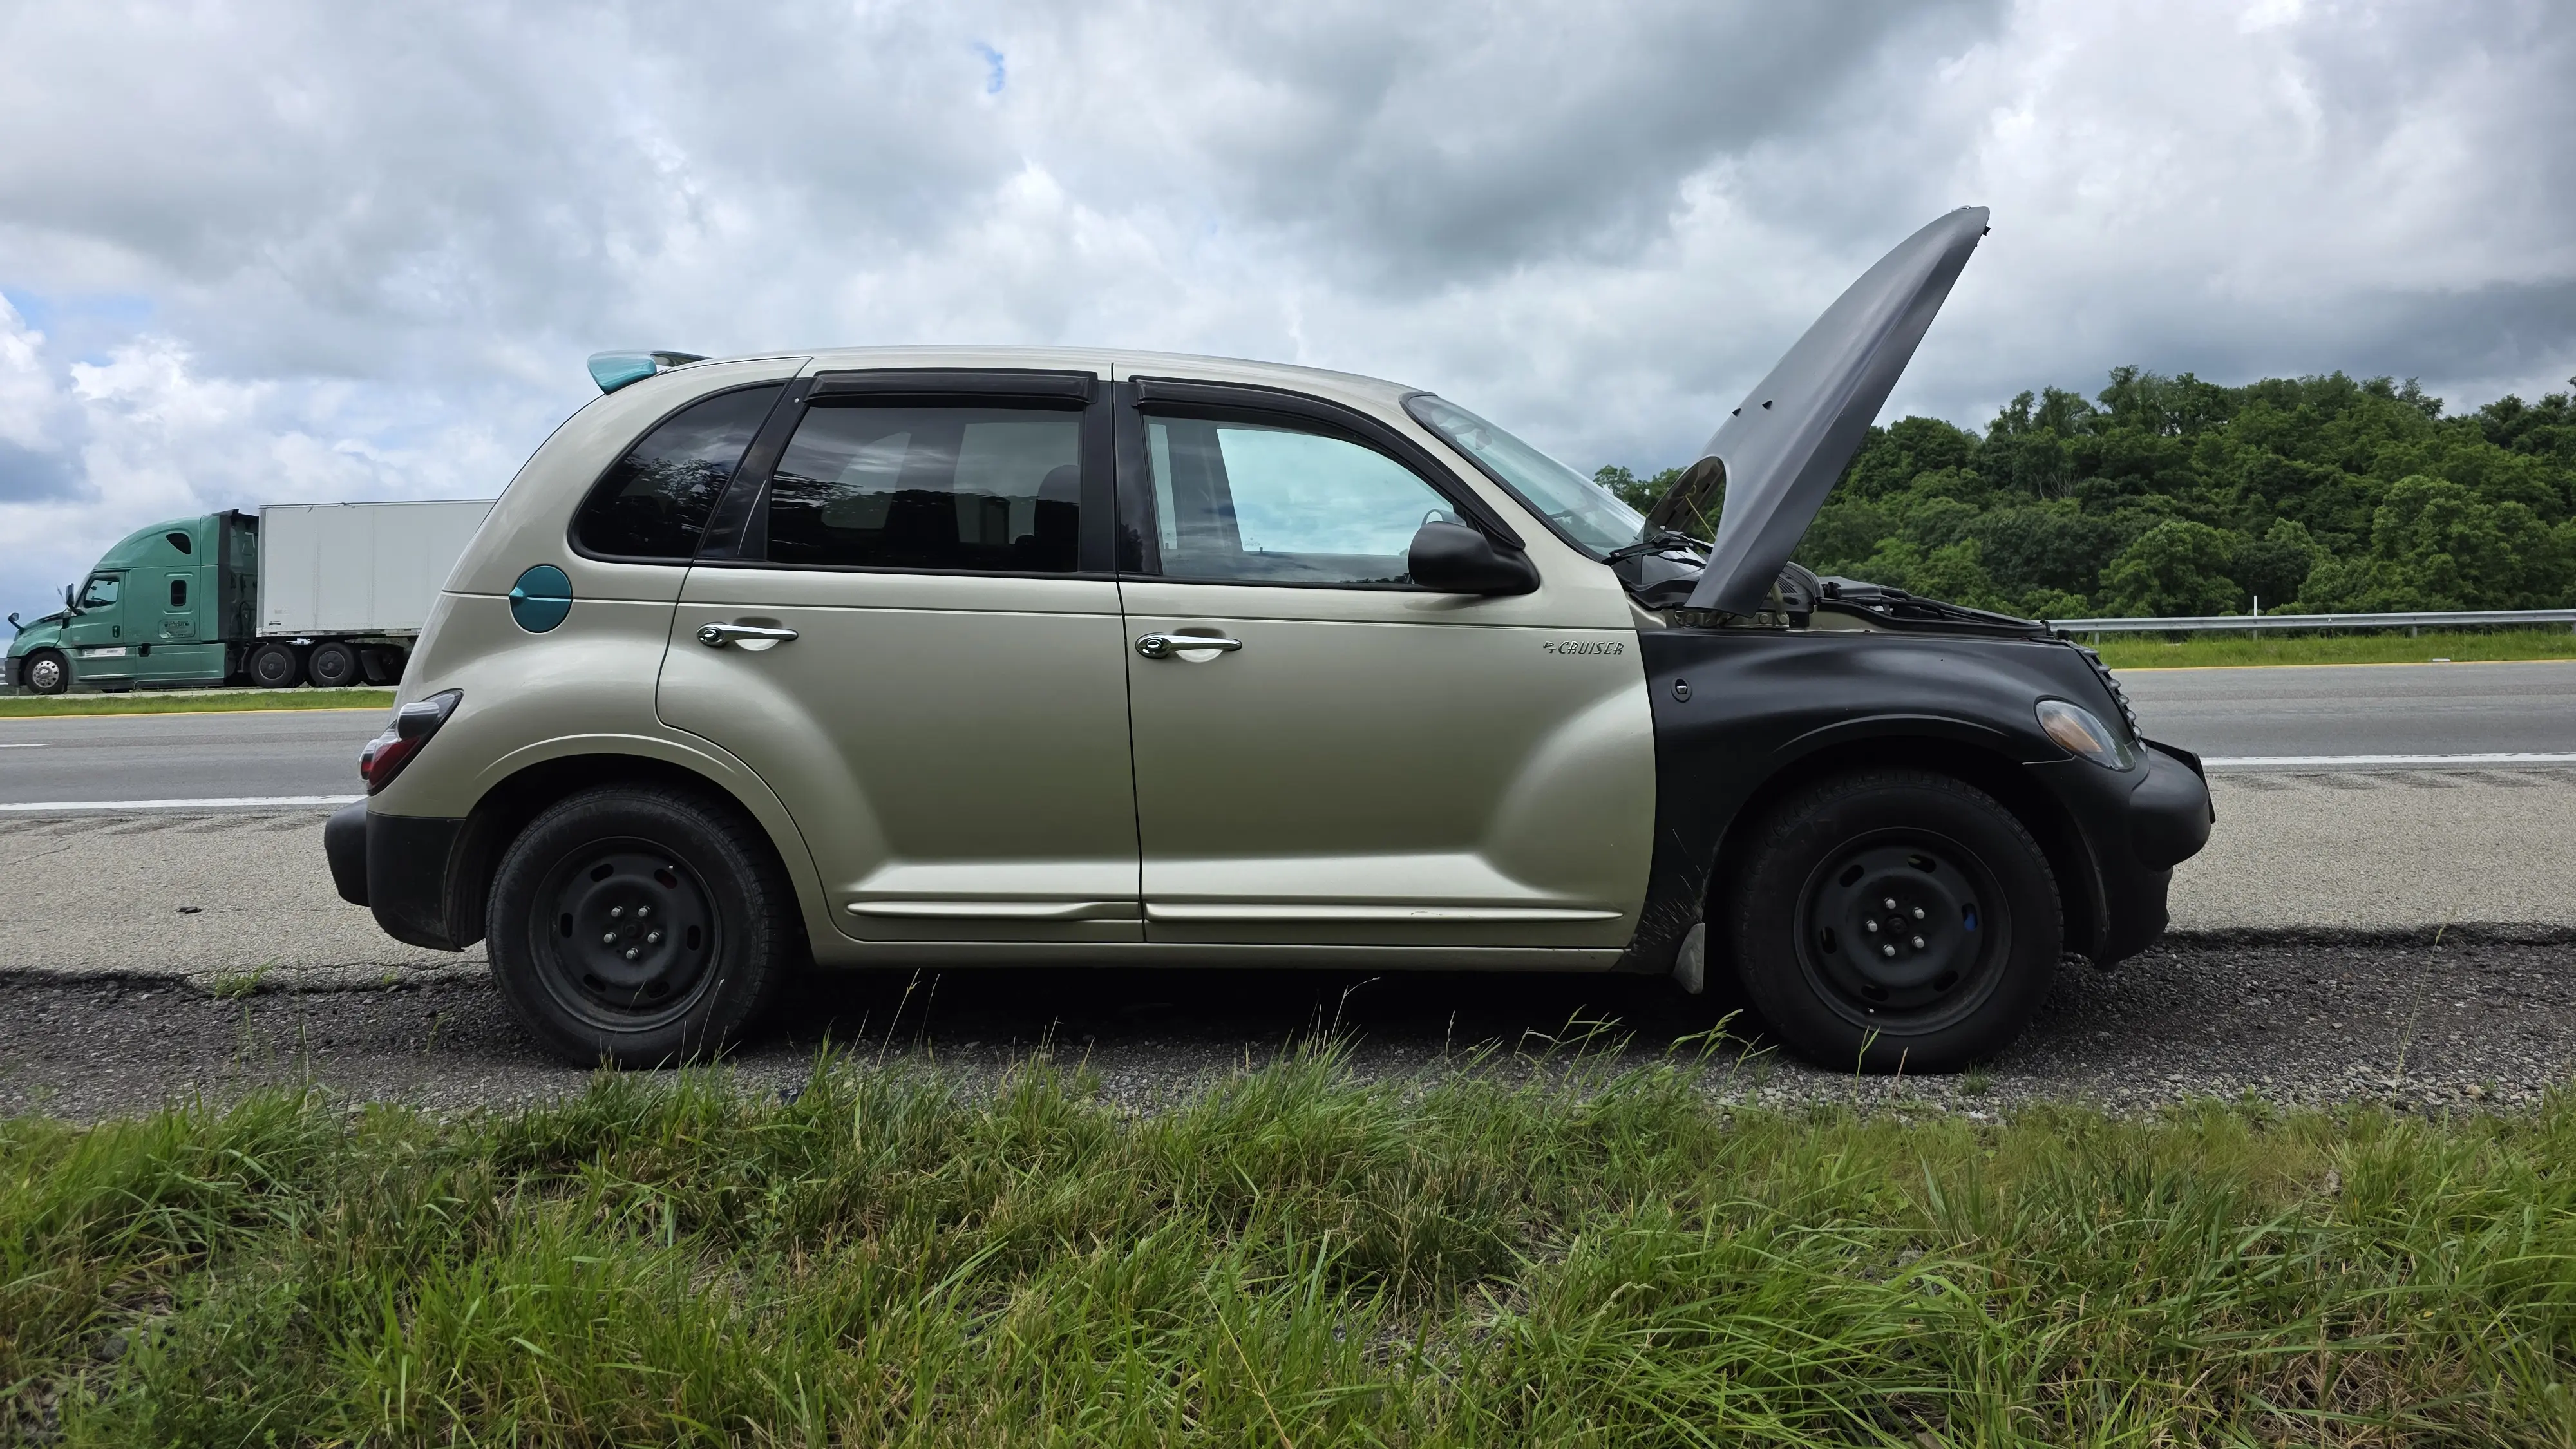
Overheating on the side of the highway
My PT Cruiser was out of commission for about two weeks while I diagnosed, tested, and eventually resolved the overheating problem by replacing the coolant and radiator. I was ecstatic and that car never purred so well and she drove cold as ice for another month or so.
One evening, going about 45 mph on a straight road (downhill even!), the wife and I headed home from the grocery store as the Cruiser just stopped accelerating. No BANG, no grinding, no death knell or warning whatsoever. She slowed to a stop and never drove again.
I called our roommate and he came to the rescue, took us and the groceries back home, and I called a tow truck the next morning. I met the driver on the side of the road (8 miles from my house) and he followed me back to the driveway. He dumped the car, collected the ~$190 I owed him, and I set off to repair the cruiser yet again.
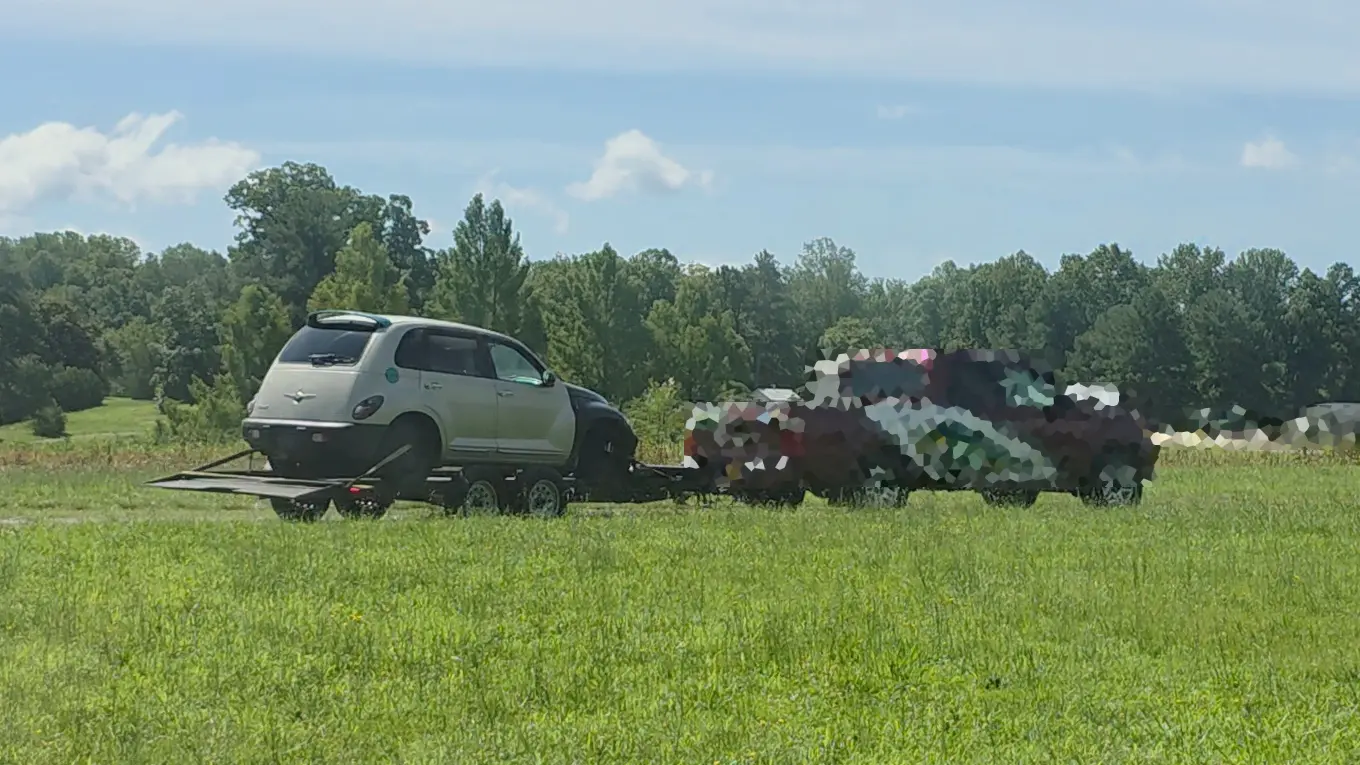
The Cruiser's final sendoff
After discussing it with my mechanic and weighing my options, I decided that this old car wasn't worth the effort and money anymore, so I decided to sell the car to the local car yard where I get a lot of spare parts from. To "give 'er back to God" as it were.
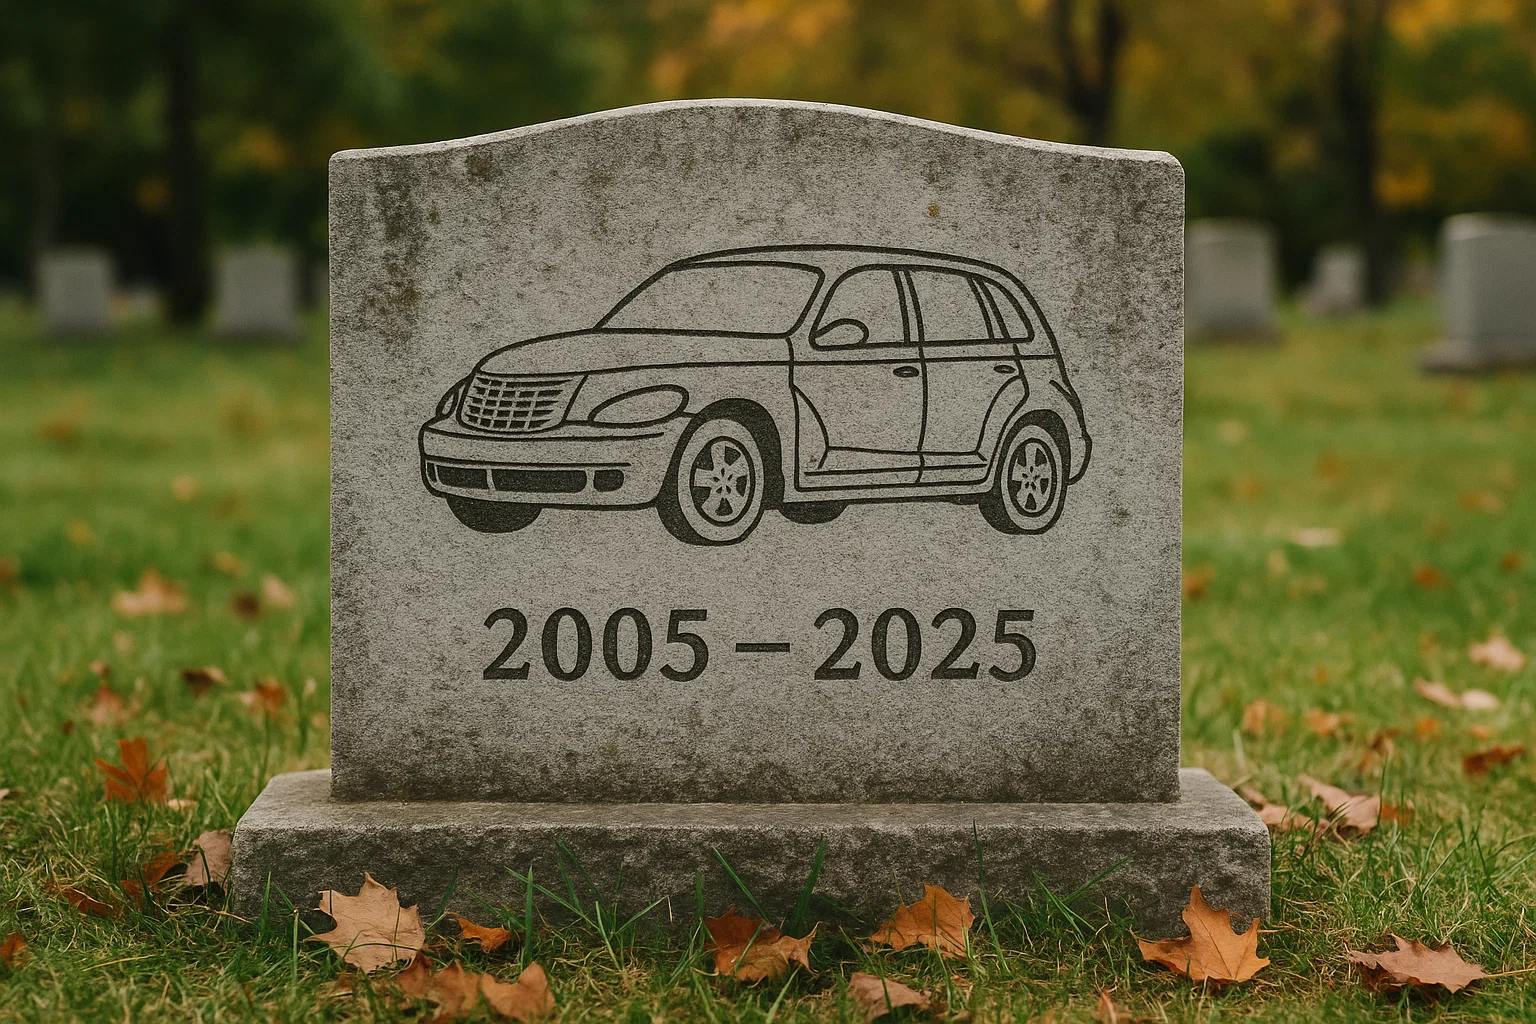
RIP my PT Cruiser
Sidenote: I don't believe the car ever made it to the pickyard, I'm fairly certain it just got sold at auction. What a shame.
With the cruiser gone, the search began for a replacement as I really appreciate having two cars as my wife still works and when her car is acting up, she can then use one of mine as a spare. (This will be important later.)
I started scouring local used car lots, online ads, CarMax, CarFax, Craigslist, AutoTempest, ebay Motors, and even Facebook marketplace, but none had a vehicle worth purchasing. All were too expensive, too damaged, or too far away. I wasn't 100% set on what kind of car I wanted to get yet; I was mostly looking at 2nd Gen Honda CR-Vs and 7th–8th Gen Honda Civics.
A few different listings stuck out to me, both 7th Gen Civics (2001-2005) and both with a host of issues that became obvious as I saw them in person and finally realized why they were listed for so long and so cheap.
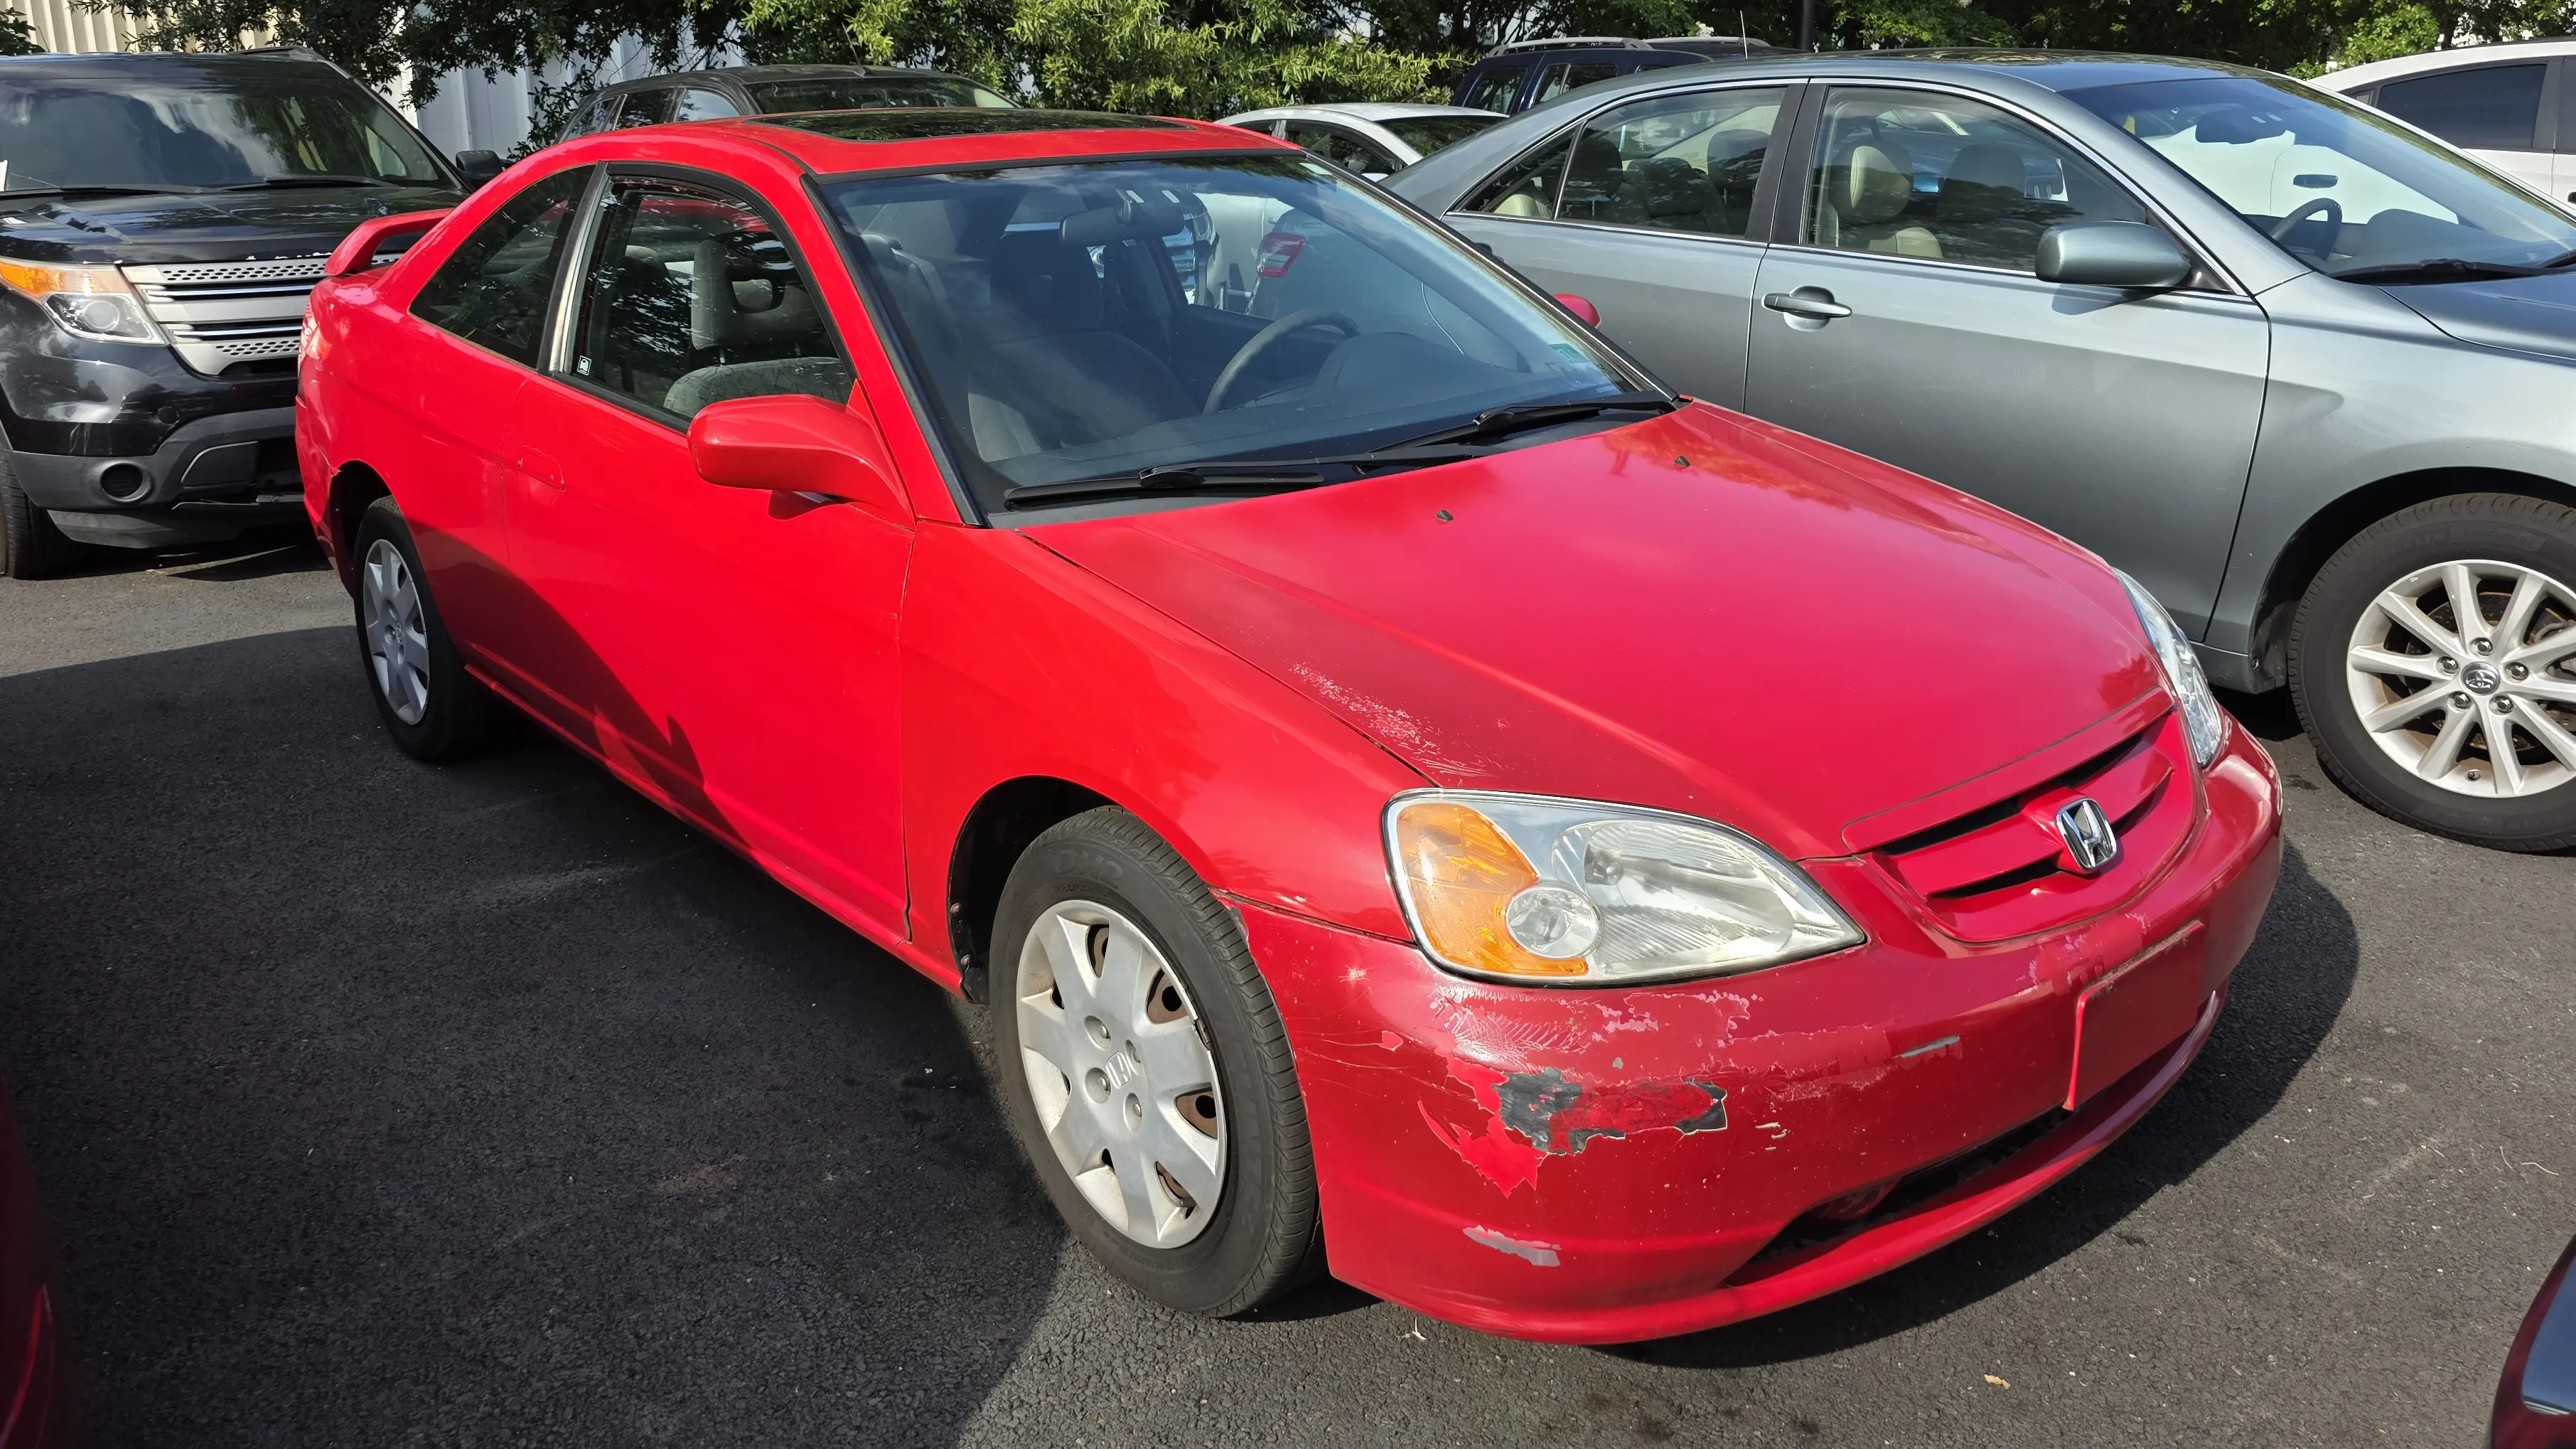
The red Civic coupe
The first was a $4,500 Civic Coupe, bright red, tons of cheap respray and body panel issues. It also threw an engine code for a bad gear ratio which heavily indicates a bad transmission. This was a shame since it only had 120K miles on it. The second was similarly priced, in an ugly tan color, a few dents, but this one actually rand and drove alright. It definitely had an exhaust leak or some kind of aftermarket muffler so it sounded like shit and had cheap, failing tint. I think it only had 160K on the odometer.
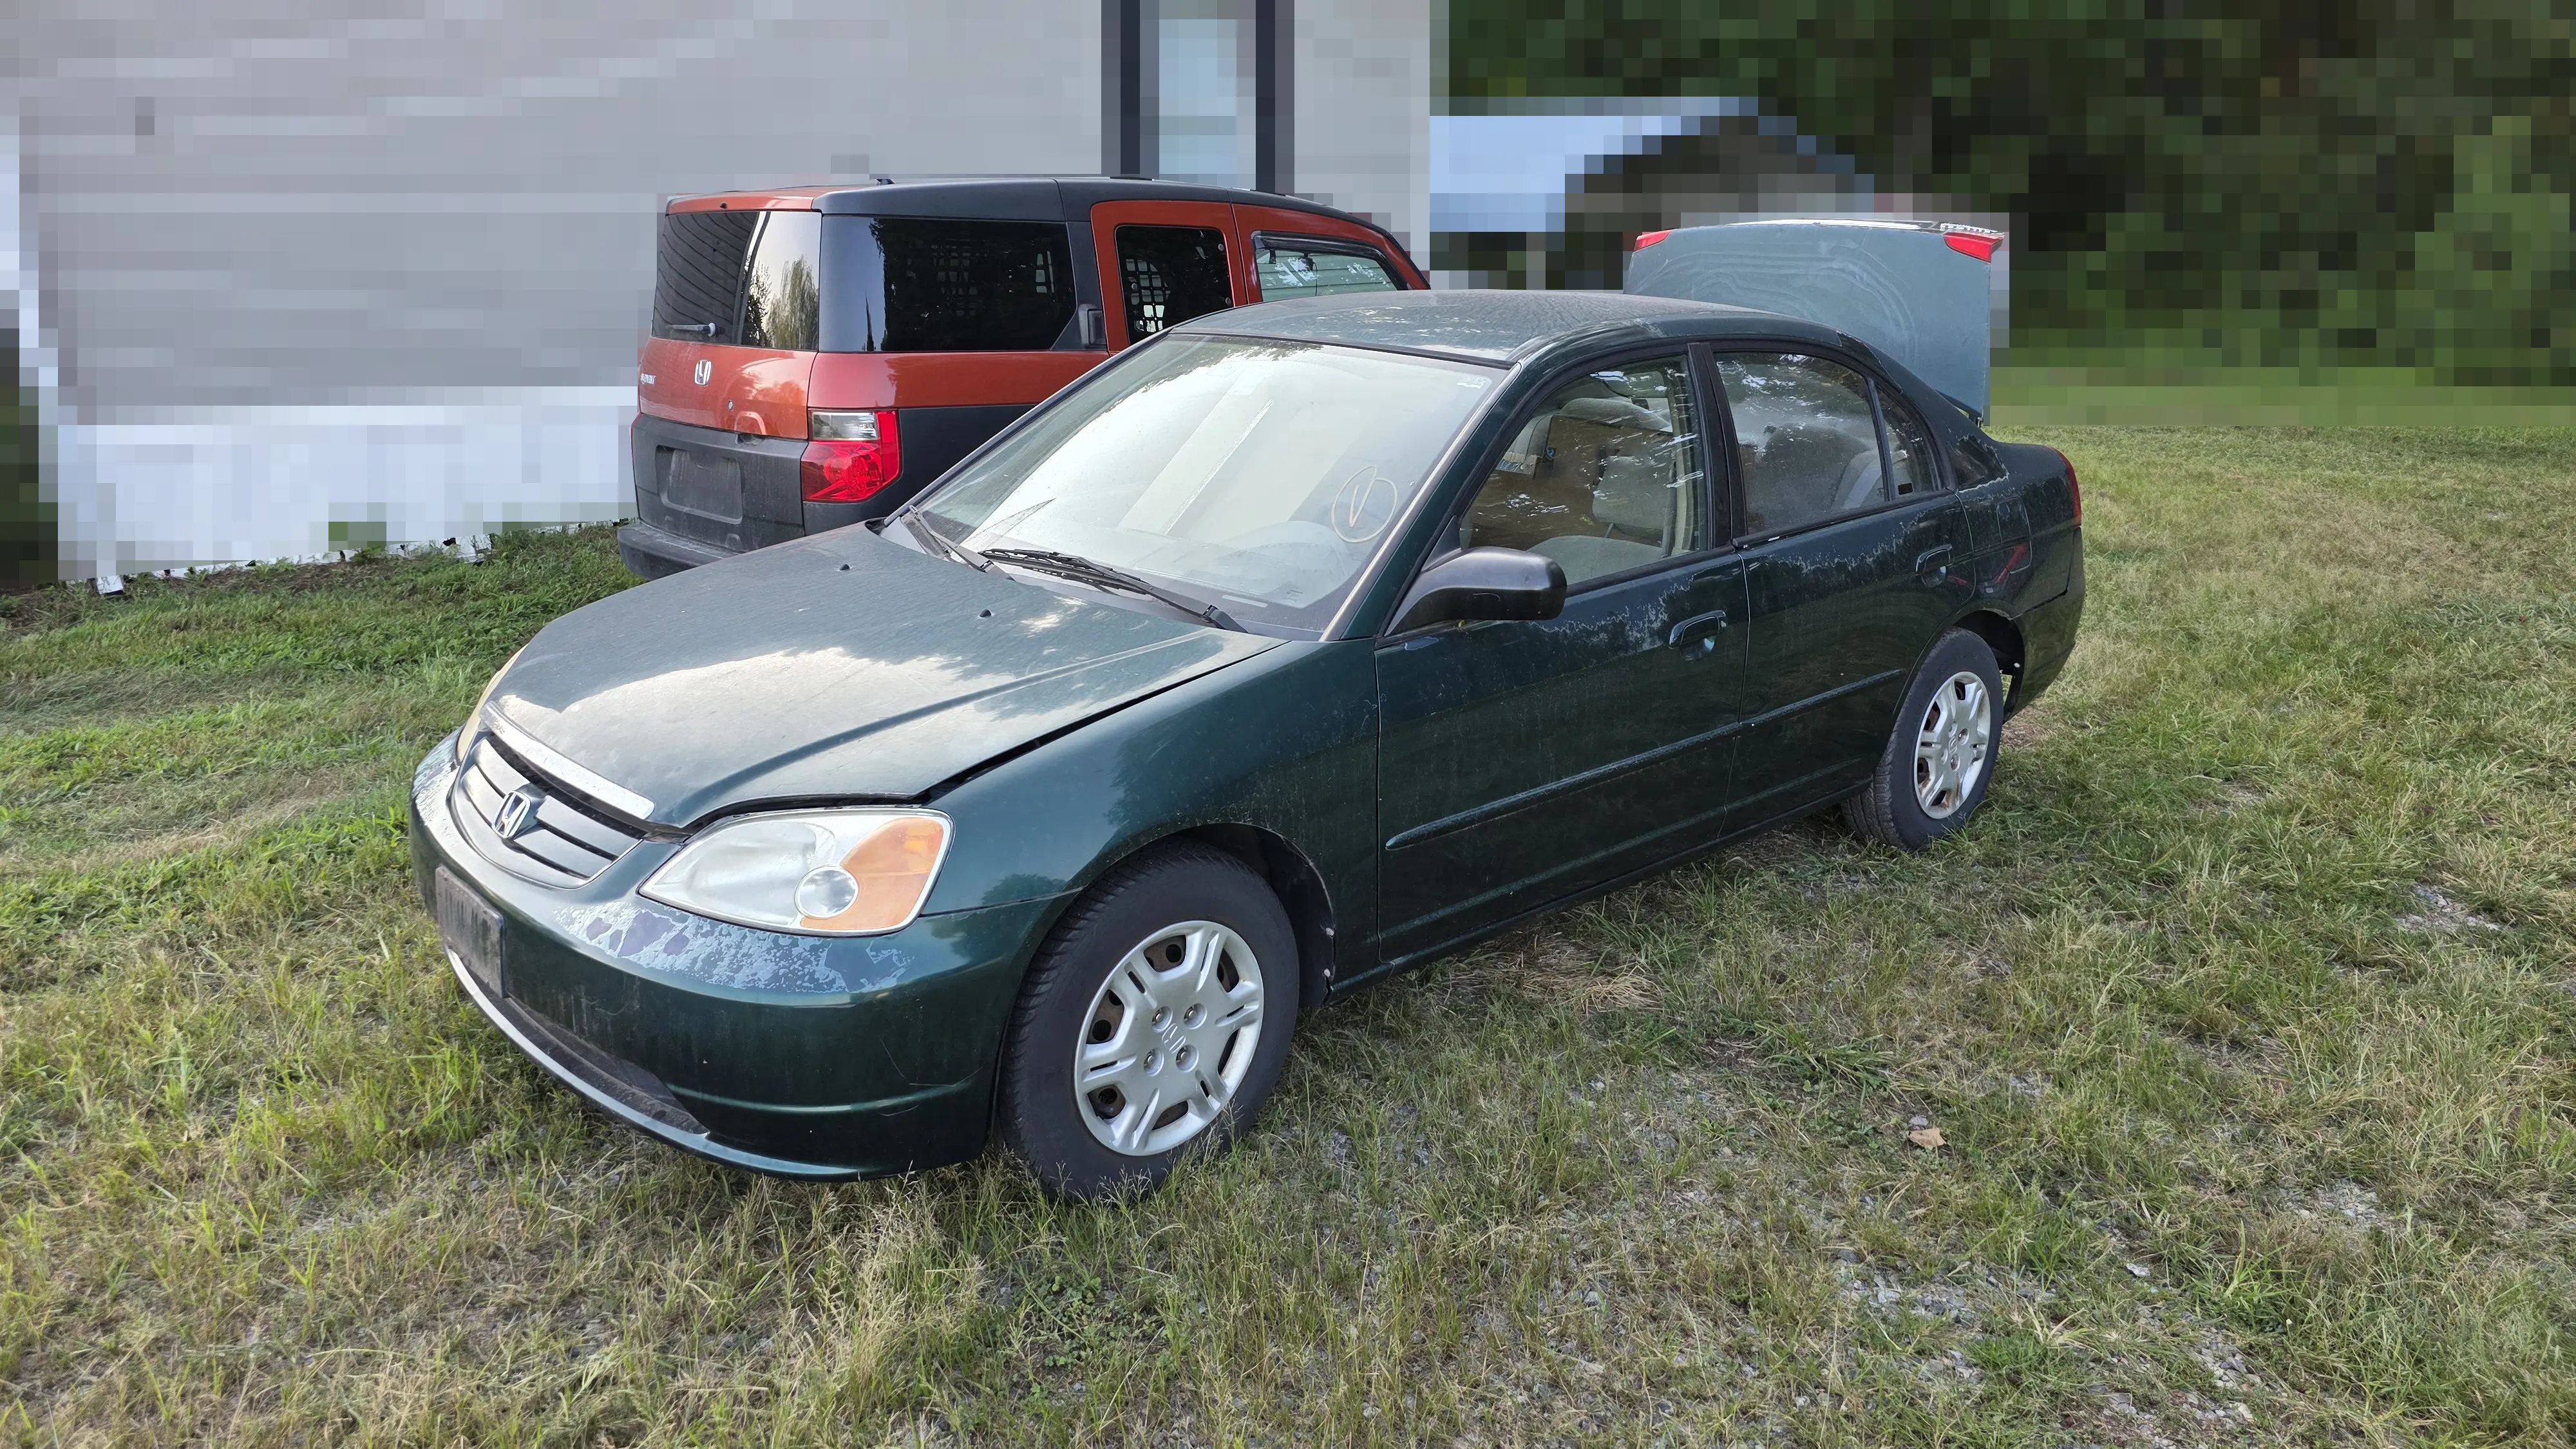
I happened to check AutoBidMaster one afternoon and found a green 2002 Civic Sedan with a surprisingly low number of miles (only 112K!). My curiosity was piqued and I placed a measly $500 bid on the car. The auction listed it as a donated car that would start under its own power (or with a jump), would shift into drive, and move forward. I figured that I would gamble on the car and see if it would be my little emerald in the rough. It was also listed as a donated vehicle, so I hoped that meant that it was just neglected and not a turd.
The paint's clearcoat was heavily damaged, the battery was dead, and the engine seemed to have a minor oil leak. Without seeing the car in person, I just had to rely on fate to see if the car would be worth the effort. The auction closing day finally came and I won the auction with a bid of $1,600. This was not what I ended up paying and only started the laundry list of shenanigans that would end up plaguing me because of this too-good-to-be-true car.
The auction closed, but the purchase hadn't been finalized because the seller had to "approve" my bid. This shady practice is known on AutoBidMaster as an "on approval" auction as opposed to a "pure sale" auction where the final price is whatever the last person bid before the close of the auction. The seller ended up contacting me a few hours later stating that I could win the auction if I increased my bid to $2,000. This was just plain insulting and really goes against the whole point of auctions. I couldn't complain too much since I knew this was a possibility before I bid, but I figured that even $2,000 was worth it if I could secure such a low-mileage Civic.
I declined the offer for $2,000 and retorted with $1,800. He countered with $1,950 and didn't respond to any counters from me. I eventually caved and agreed to the $1,950 and began the purchase process. The purchase price was bad enough, but the $1,200 in fees from AutoBidMaster was really painful to swallow. The site also charged me ~$300 to ship the car from their lot to my house which was only a distance of about 30 miles.
I paid the company the ~$3,500 it ended up costing and a few days later the green meanie was in my driveway and the real torment could finally begin.
The tow truck dropped it off in my roommate's parking spot, so my first order of business was to move the damn thing. This was difficult with a dead battery (which was really dead and wouldn't hold a charge), so I instead opted to lube up the cylinders with some fogging oil through the spark plug holes—as it had been sitting for some time—then attempt to start it with my old Honda Element group 51R battery. It fired right up after much protesting from the stale fuel and slumbering electrical system. I put it in drive, pulled it about 20 feet down the driveway, and parked it. There it would sit for another two weeks.
During all this time, my wife and I started to pack our things and prepare to move from my roommate's house and into a new place on the other side of town. This put a damper on my car repair time which started interfering with my pack-n-move time, all to the chagrin of my dear wife.
Between moving preparations and going to work, my time was limited to get the Civic into good enough shape to make the 30 mile trip to the new house. I had a list of things to do:
Change the oil
I already had the correct oil and filters as I have a similar year Element
All 4 wheels matched and had good tread, which was nice
Once all that was done, I took her on a maiden voyage to the gas station. This is when I noticed the shifting issues. The tranny shifted really hard, a lot harder than it should, even though it was a 20+ year old car. I thought it might be me not putting the right level of fluid in it, but I triple checked it and the fluid level was fine. This was bad news bears indeed.
My mechanic wasn't 100% convinced the tranny was bad as it was throwing some codes for a bad PCM (computer) and some bad shift solenoids. I started on the latter, buying two off of ebay, installed them both, and while those codes went away, the shifting was as bad as ever.
Moving day came and went with the Civic holding its section of the driveway firm. I hadn't driven it far enough to be sure that it could make the 30 mile trip to the new place. After everything else had been moved, the Civic was all that remained. I needed to replace the PCM before it could be moved though. There is apparently a design flaw with this generation of Civic where if the alternator gets loose, it can ground out on the interior of the engine bay and fry the computer. I believe this is what happened to mine. I purchased a replacement PCM on ebay for $45, removed the two immobilizer chips from my old one and soldered them onto the new one. This took about an hour and completely resolved the engine codes for the PCM.
The old immobilizer chip on the new PCM
My wife and I drove down one night and she dropped me off at the (now) old house. She went to see a relative and I went to work replacing the PCM and checking the ATF again and when I determined that the levels were good. I took it for a very short spin and the shifting hadn't gotten better at all. After a few minutes, I decided to just start driving and see how far I could get.
I started off down the road and after a few minutes of it banging around, I threw it in 2nd gear and drove the whole trip at ~35 mph. This annoyed the hell out of the folks behind me on the single-lane roadways that I had to drive down, but I had my hazards on, so oh well.
I parked it in the driveway, locked the doors (with the key, no keyless entry), and there it sat.
A week goes by and my mechanic (who lives a few hundred miles away) said that he had an open weekend, a used tranny for the Civic lined up, and all the tools to do the swap at his house. He just wanted me to be sure that it was the right move since he had to rely on my amateur observations and my lacking vocabulary and therefore couldn't make a very informed judgement call.
I took it to a chain mechanic that was open during the evening and they confirmed that the tranny was bad and needed a rebuild if not a full replacement. I relayed that to my mechanic and he purchased the tranny. Now it was the end of the week and with my slim window of opportunity approaching, I decided to make the eight-hour drive to his house—with the Civic's transmission shifting harder than ever—and hope for the best.
I left the new place at 23:30 as I was too riled up about the upcoming trip to sleep after getting home from work at 17:00. I think I only got three hours of sleep that evening.
The first hour went well. Since it was the dead of night, traffic was light and I wasn't as likely to get in anyone's way while making the trip. I drove the majority of the trip in Drive, but some areas were limited to 2nd as the tranny didn't like low speeds.
The next few hours were pretty calm, but I was getting very tired as the night wore on and the dawn approached. A few close calls with dozing off, a weird sound I heard in traffic (that turned out to be my fender liner scraping against my tire, I later cut it off at a gas station), and a clunky-ass-drivetrain were the biggest worries from the trip. By 08:00 on Saturday, I was in the driveway of my mechanic's house. I then proceeded to go upstairs and crash for six hours in his spare bedroom.
A foggy view from the early morning drive
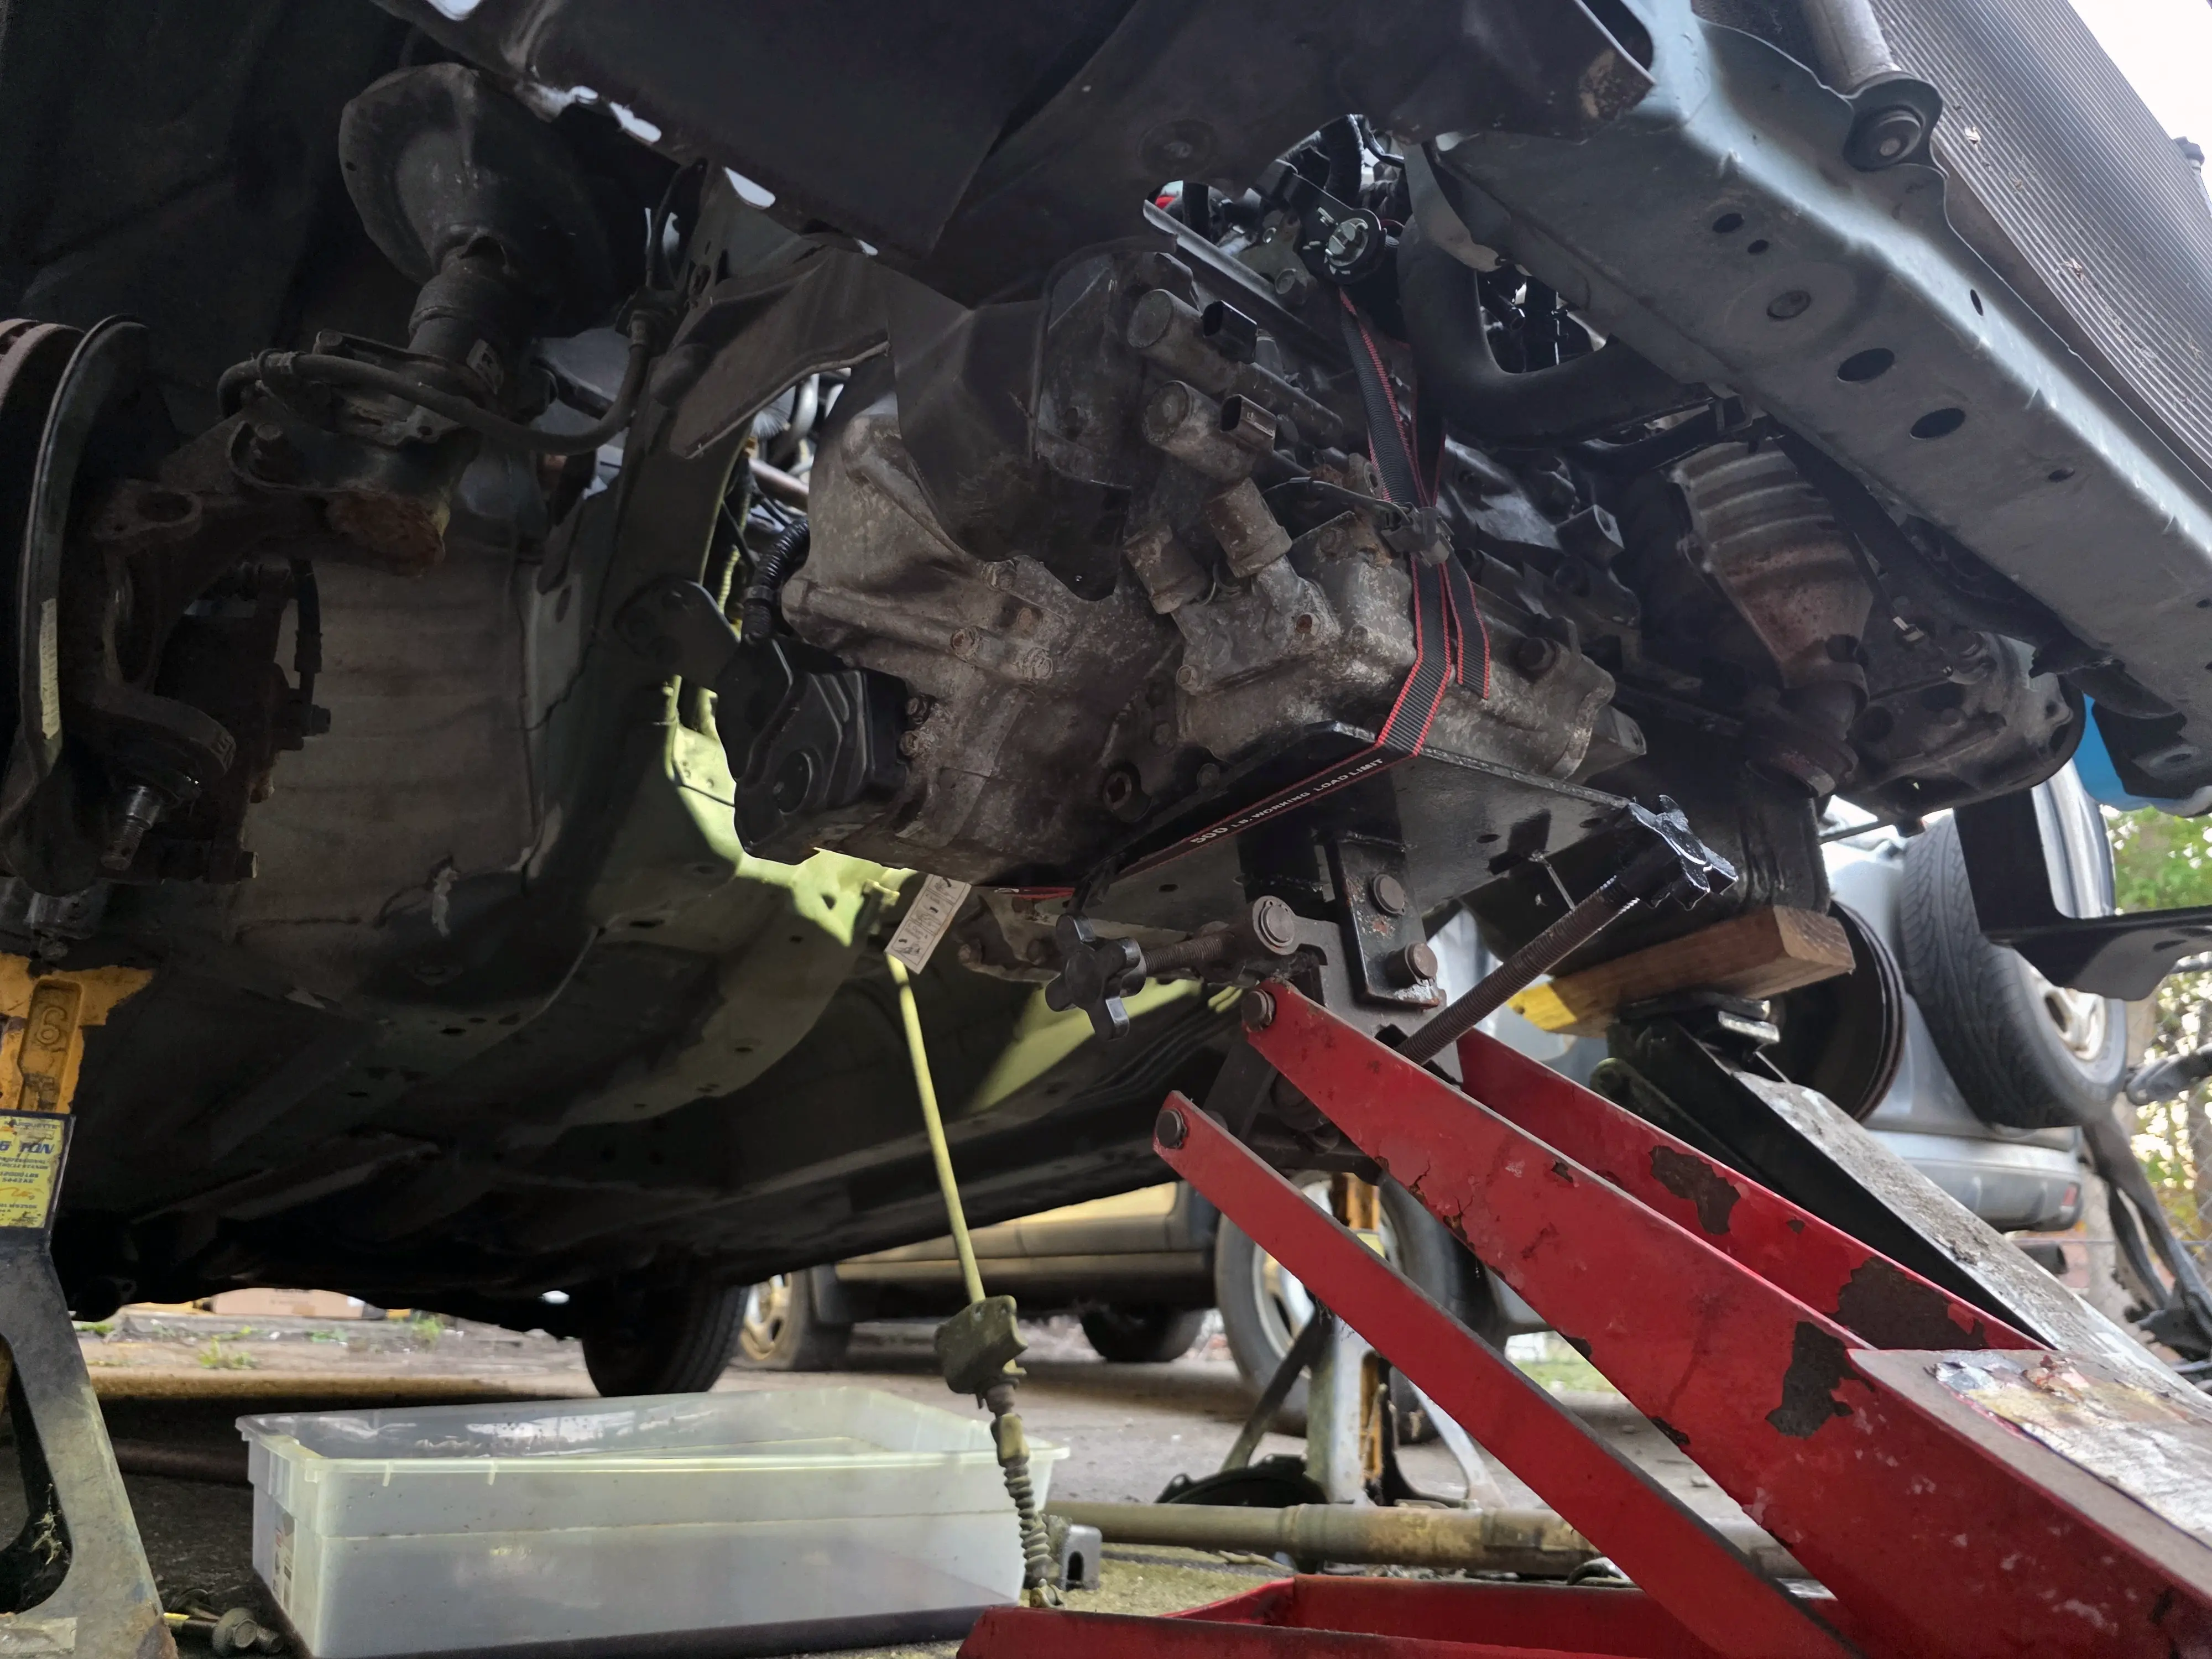
The afternoon rolled around and as I got out of bed, I see the Civic in his backyard now and he confirms that the tranny is bad (and worse than he expected!) and that he can definitely replace it with me over the next two days. We got to work, raised the car on jack stands, removed the undercarriage, dropped the old tranny, and popped in the new one by 22:00 that night.
Lifting the new transmission into place
Sunday morning, we put the subframe back on, replaced the headlights (I brought them with me), cleaned up the mess, and went to the store to get some ATF and cotter pins. We filled the fluid, felt the gears, and took it for a successful test drive. We celebrated with a big dinner that he and his wife cooked up. I went to bed around midnight and left for home at 09:00 the next morning, but with pockets about $460 lighter after the tranny and ATF.
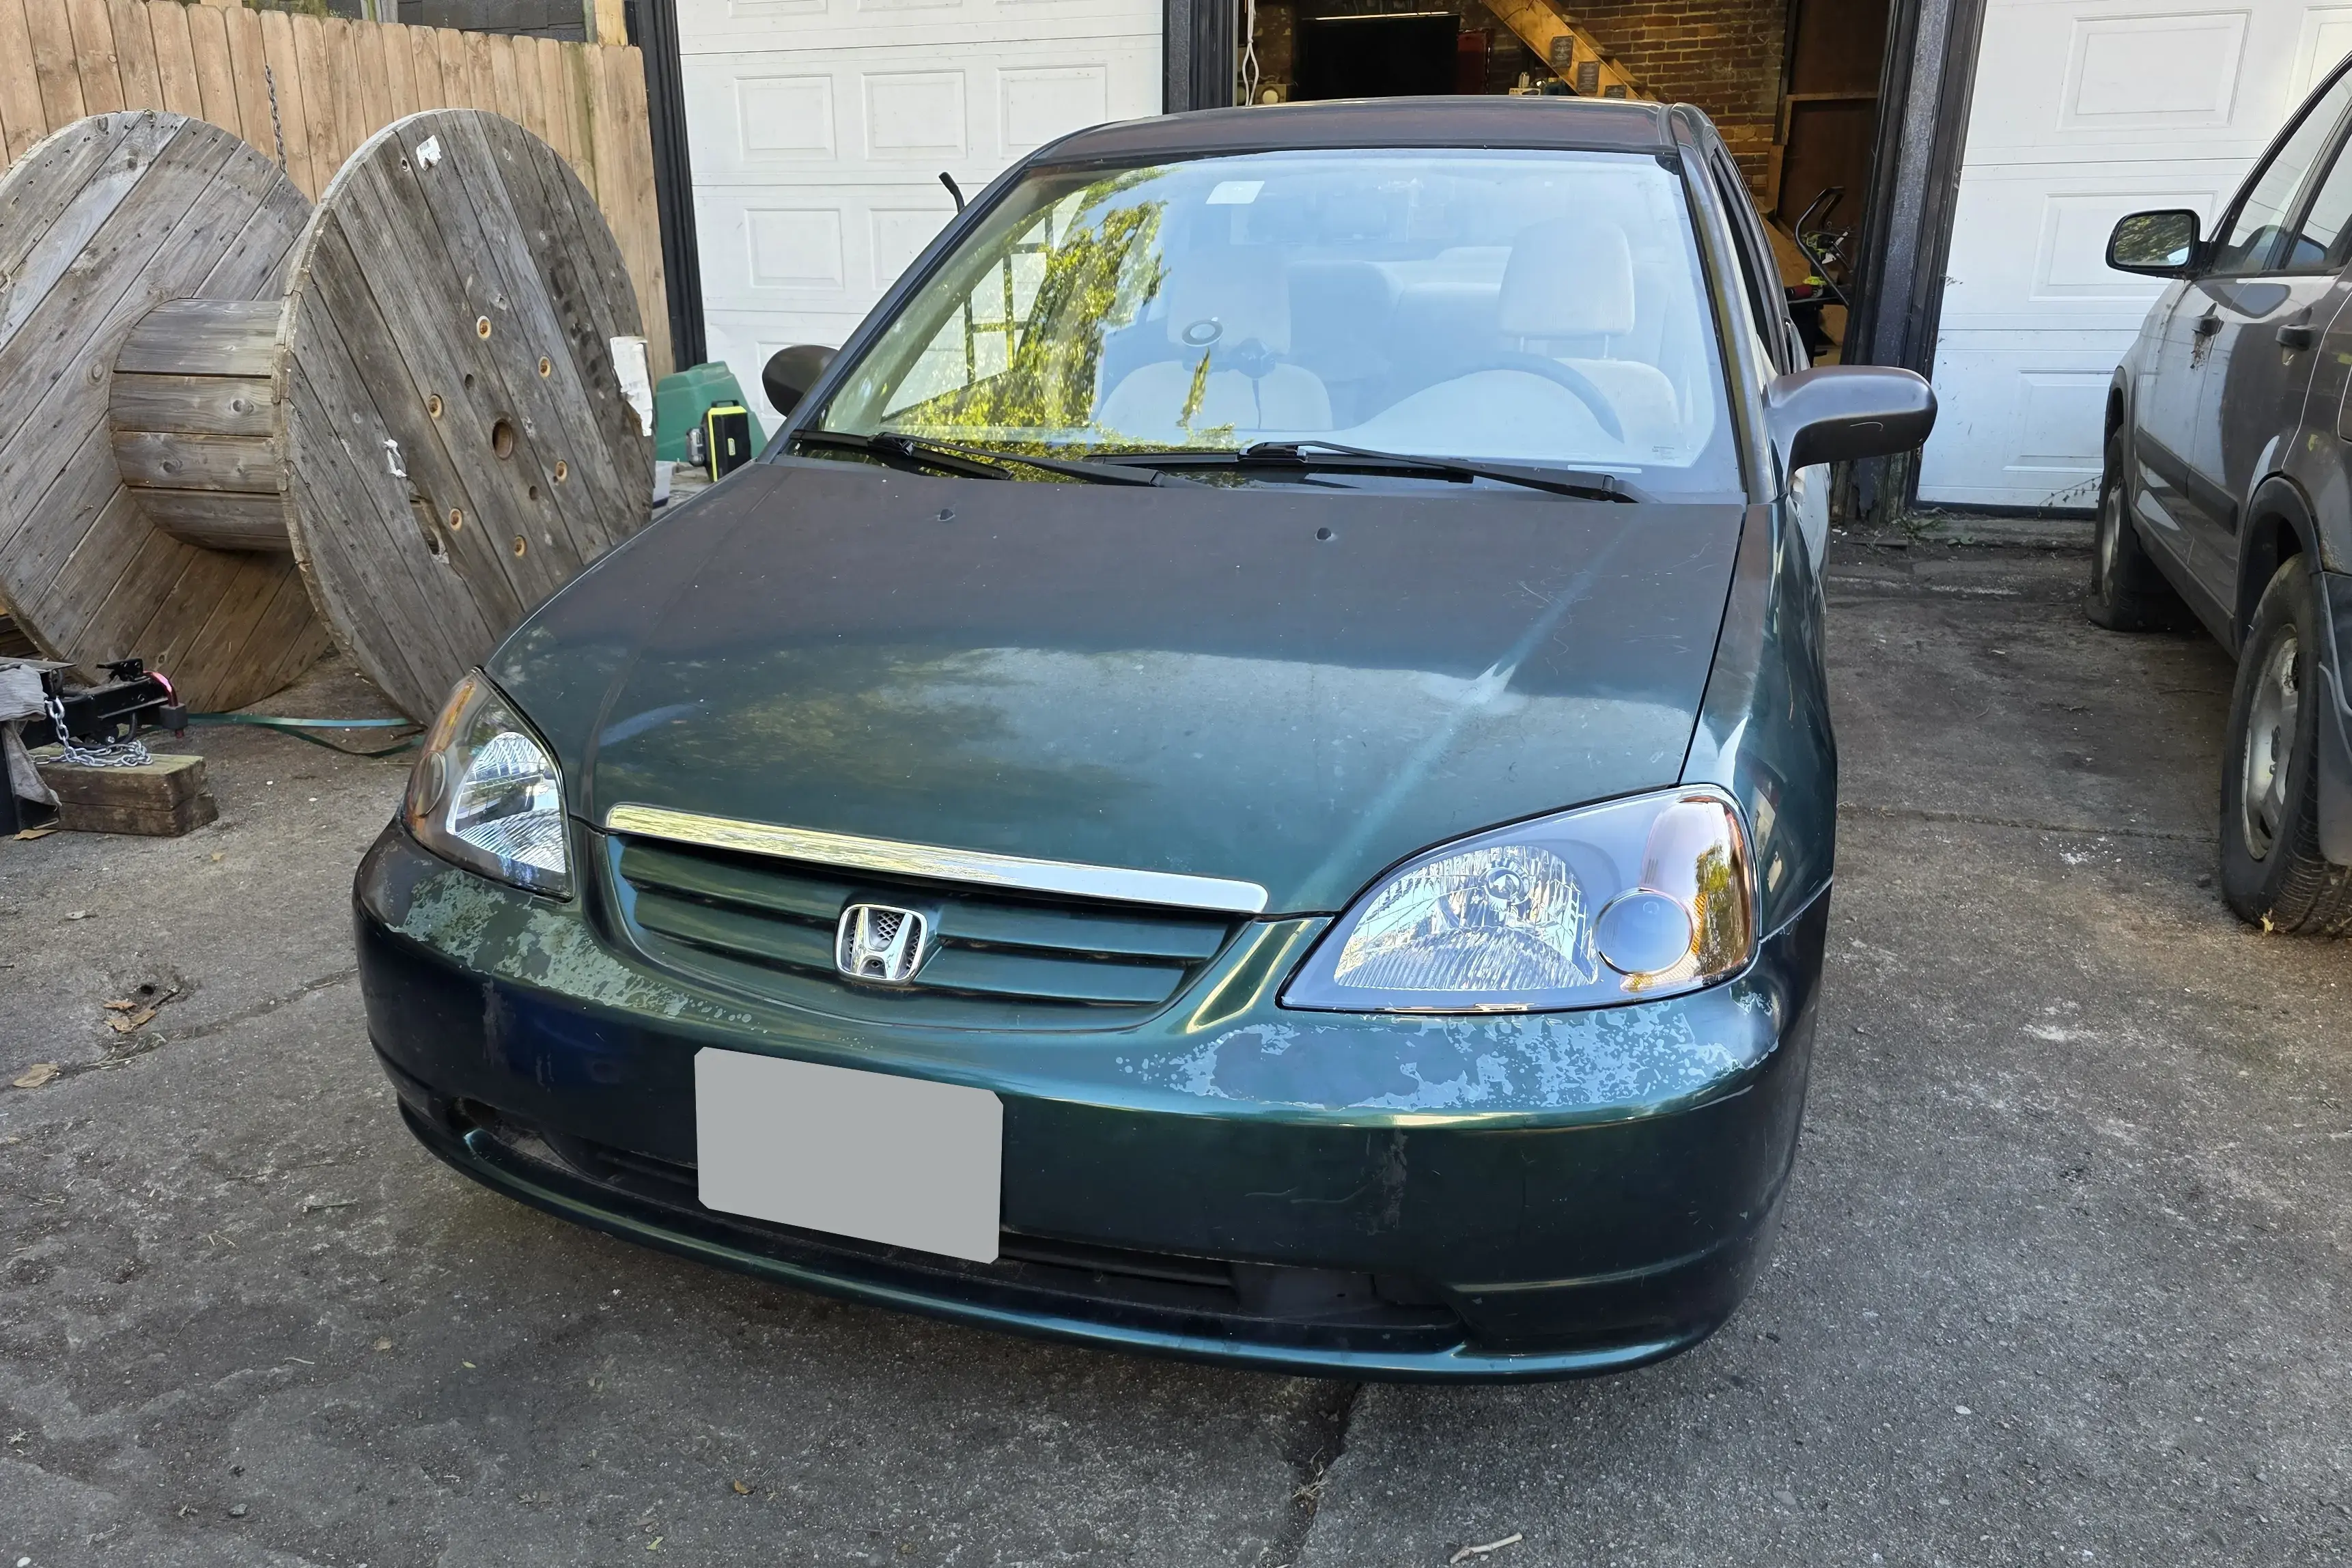
The Civic with new headlights
The drive back was a lot easier than the drive down. Although, ten minutes into the trip the engine threw a P0740 Torque Converter Clutch Solenoid Circuit error. The transmission still shifted just fine, so I drove the few hundred miles back home, stopping for gas, and to fix the fender liner issue that one time.
I pulled into the driveway and breathed a sigh of relief, but work on the Civic had only just begun.
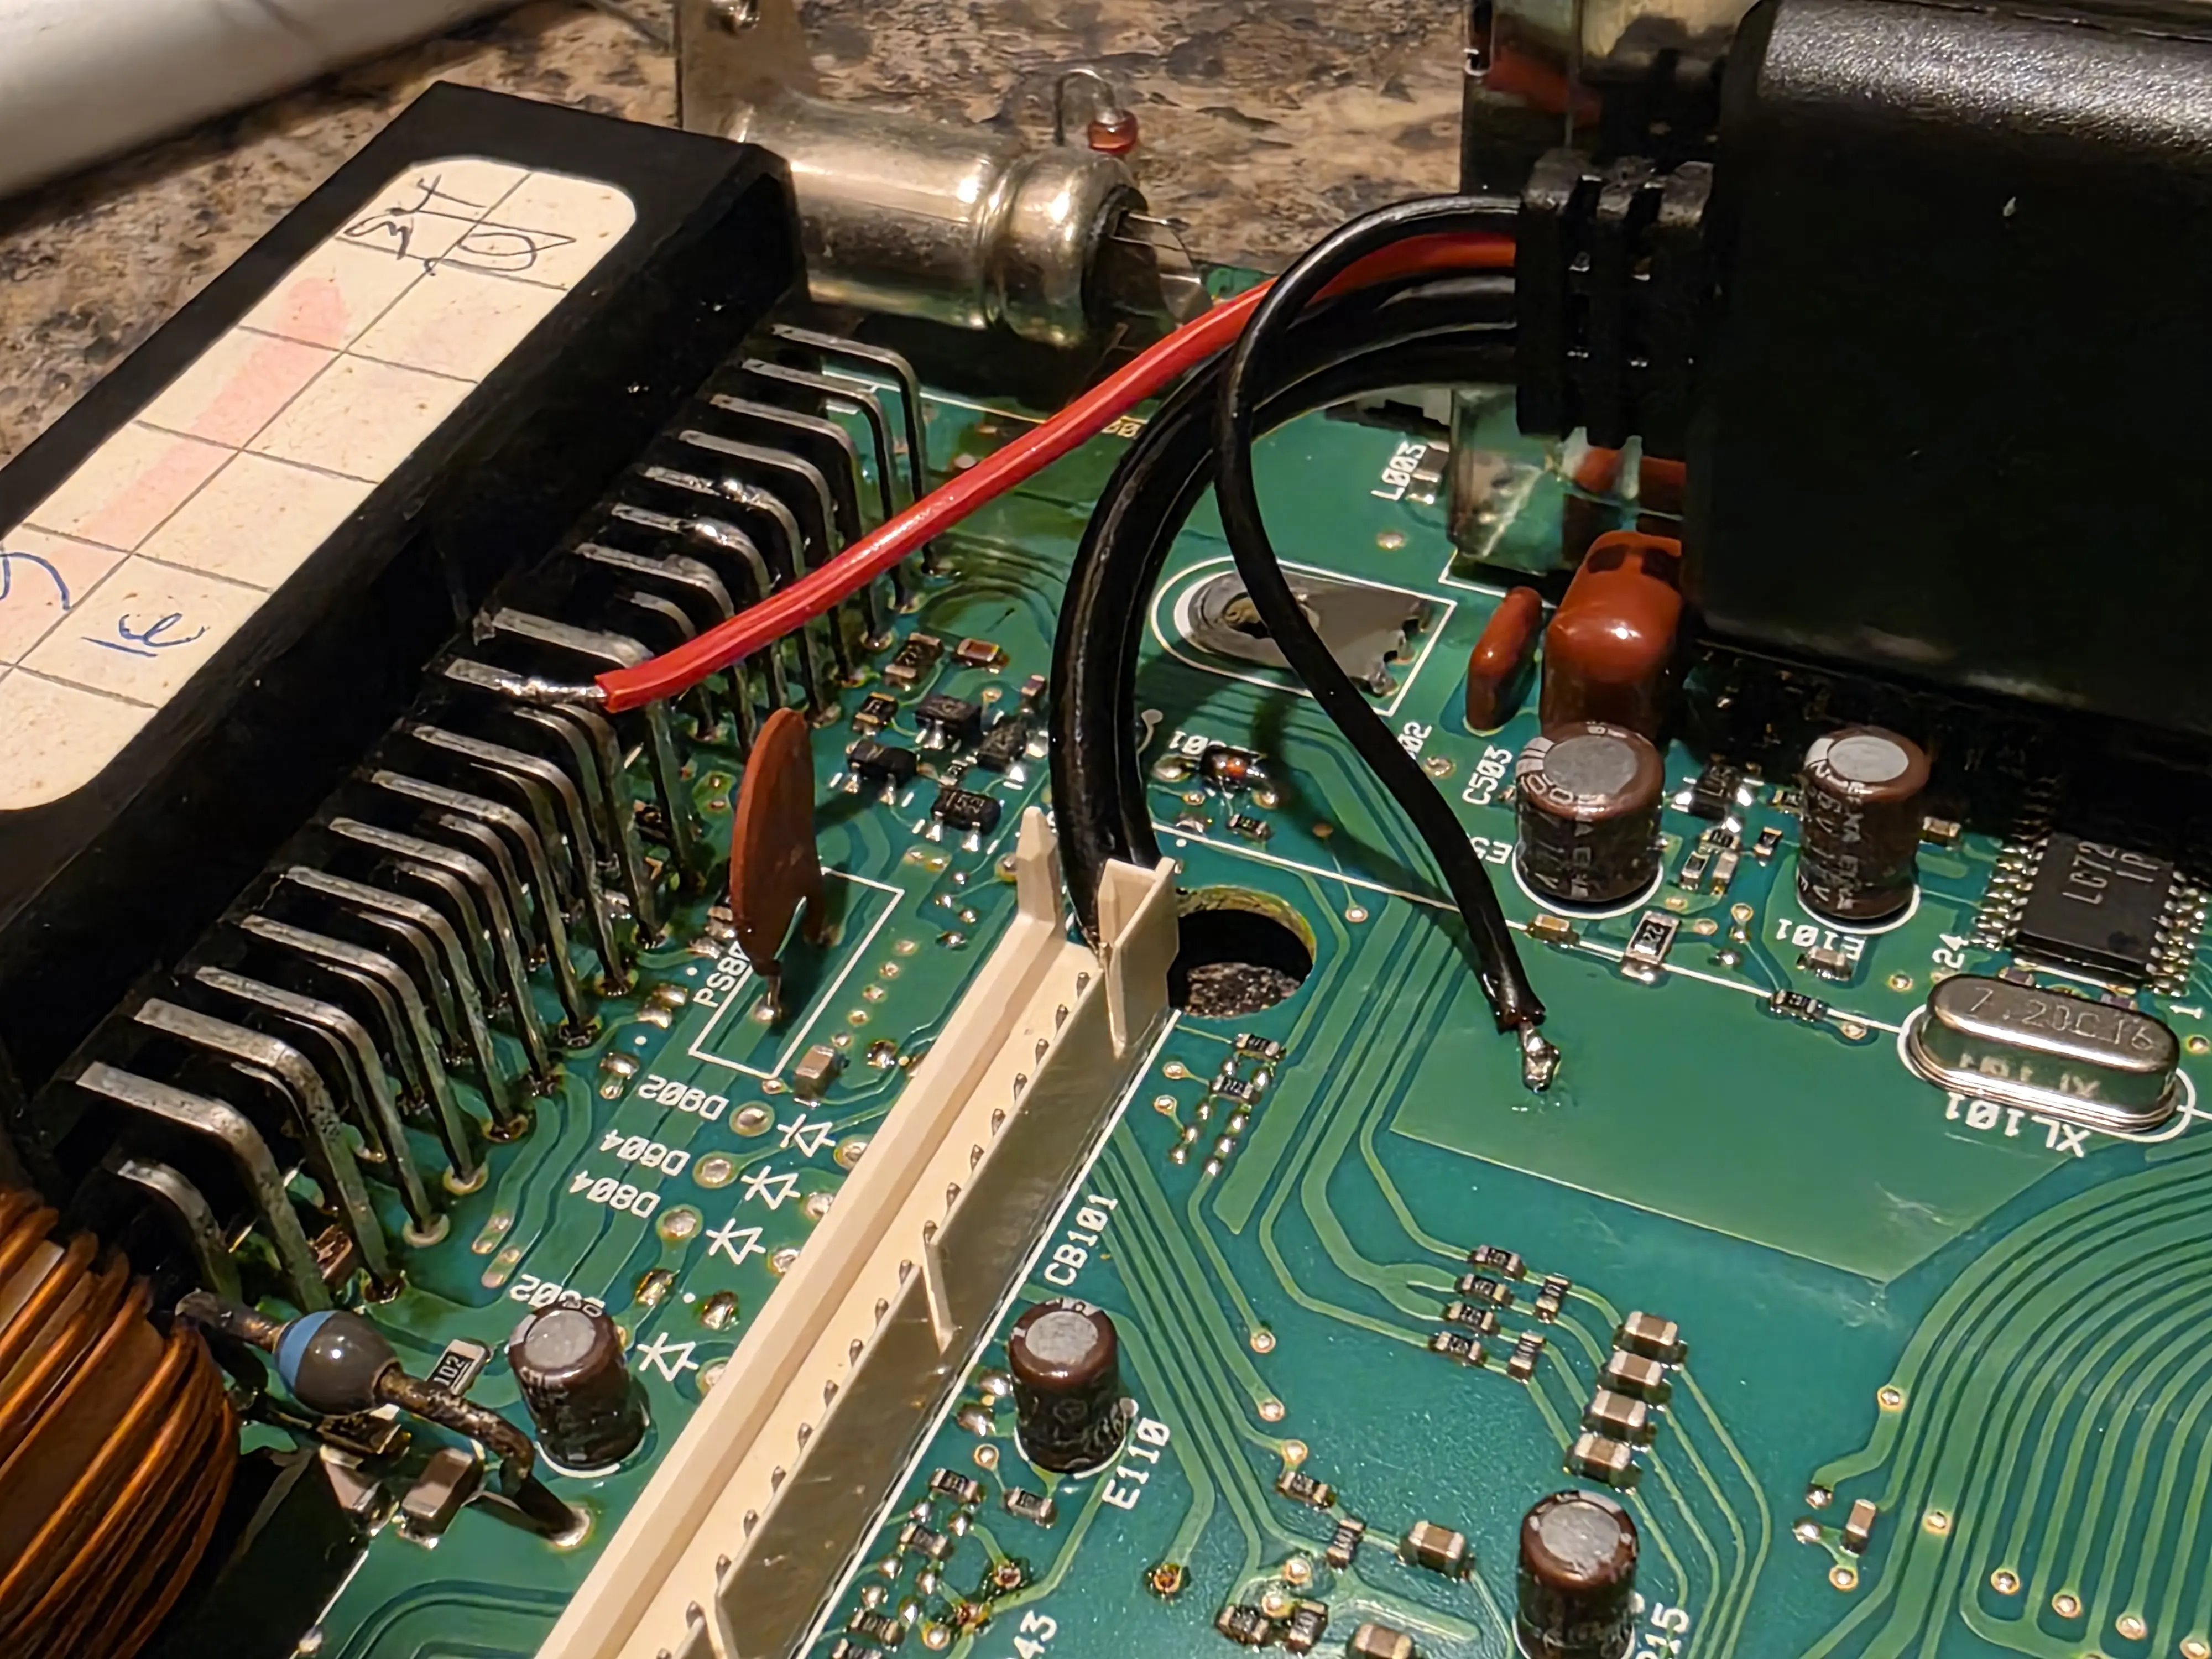
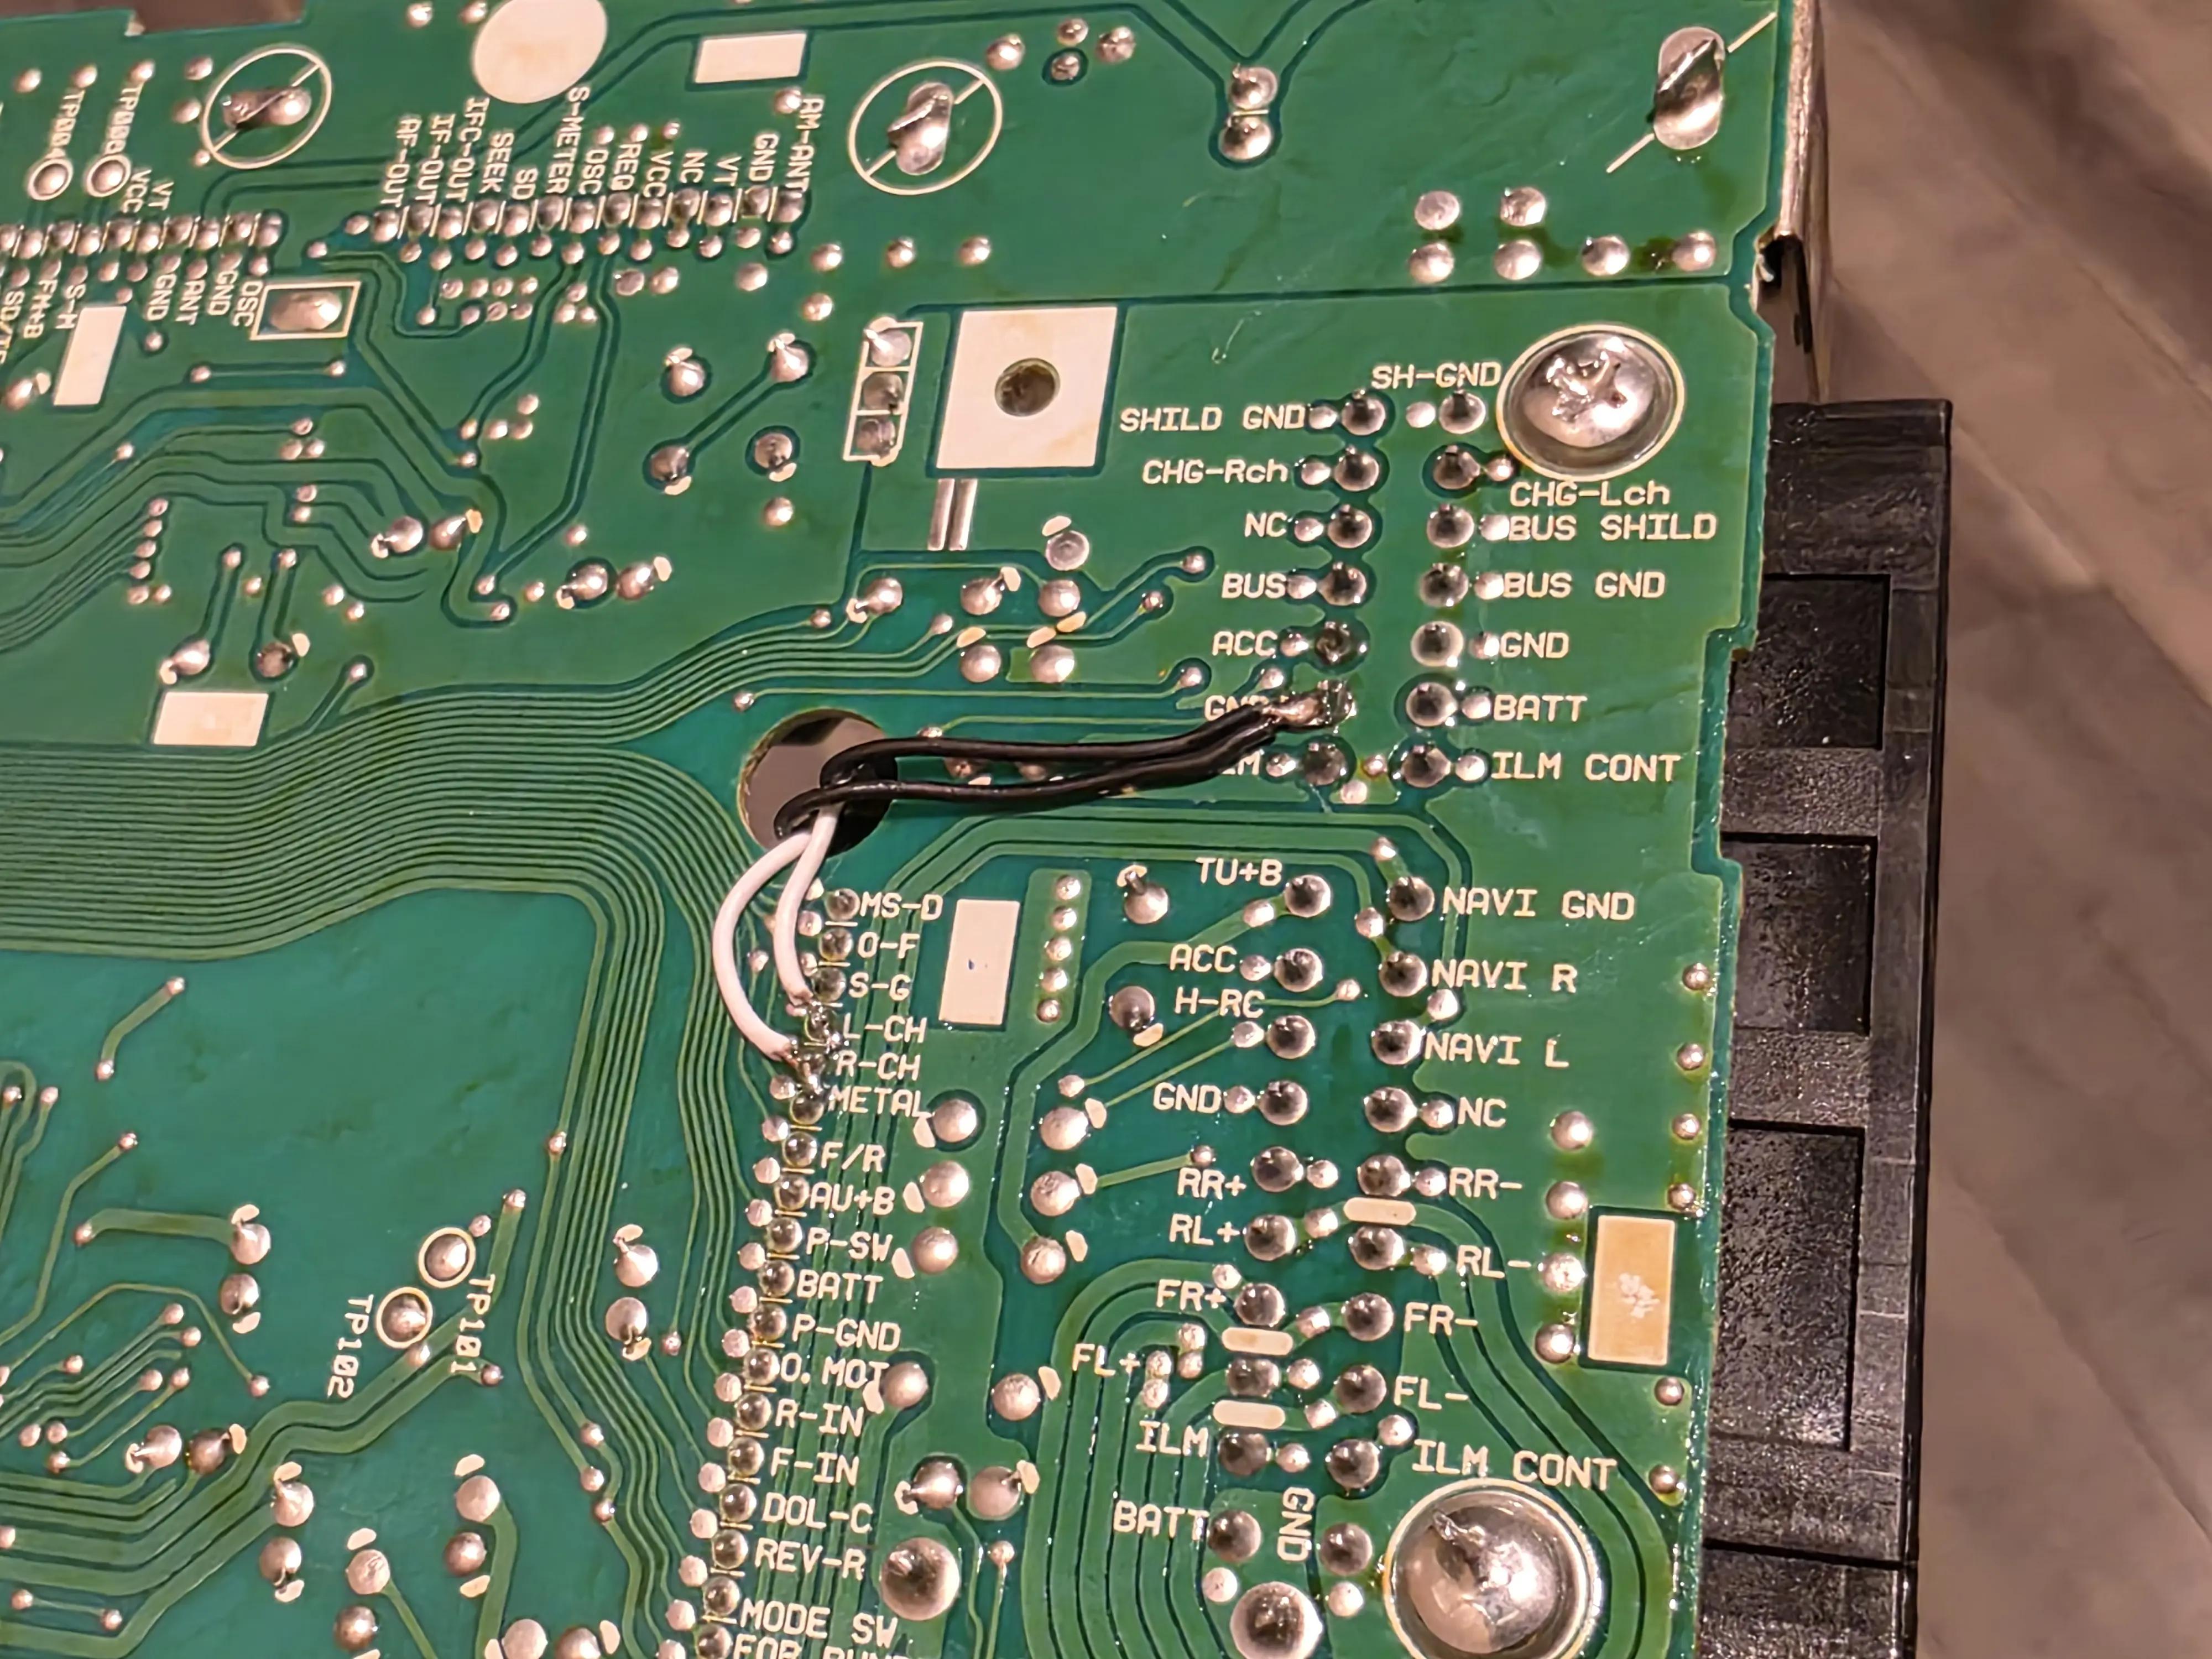
The Bluetooth module installed into the Civic's radio (If you can't find a ground, make one!)
The contacts that I hijacked for the BT signal to use
My first thought was to simply add Bluetooth to the existing stock radio. This would add some modern functionality while retaining the stock design. I accomplished this by purchasing a universal Bluetooth module for about $8, stripping the RCA connectors off, and wiring it up to the tape deck circuitry inside the radio.
This worked, but the deck was smart enough to not output sound from the tape circuitry without a tape present. I popped in a dummy tape and that sort of solved the issue, but the whole-time music is playing I can hear that tape spinning. The audio quality wasn't amazing and it was rather quiet, but it worked for a short while. I ended up going back to using one of those Bluetooth FM transmitter devices instead.
A few days later, I found a silver Civic radio from a Hybrid 2003, cleaned it up, and popped it in the dash. It looks good and sounds good too.
The whole Civic was covered in shitty tint that has long gone bubbly and brittle. I spent a few hours scraping it off with a razor blade, but I found out that—at least for the rear window—I could vacuum it off with a strong enough shop vac. This helped me get the rear window about 80% clear before I stopped for the night. I still have some of the other windows to do.
With the radio situation solved, my attention turned to the speakers in both front doors as well as the two under the rear window. I swapped all four with a set of KENWOOD KFC-1666S 6.5" speakers that took some creativity to install since aftermarket speaker brackets for the 7th Gen Civic seem to not exist for some reason. I eventually got them all screwed (or zip-tied in the rear) in and connected to the system using some adapters.
With the doors and rear reassembled, I was able to test out the new sound system and it was leaps and bounds above the old paper drivers that came with the car.
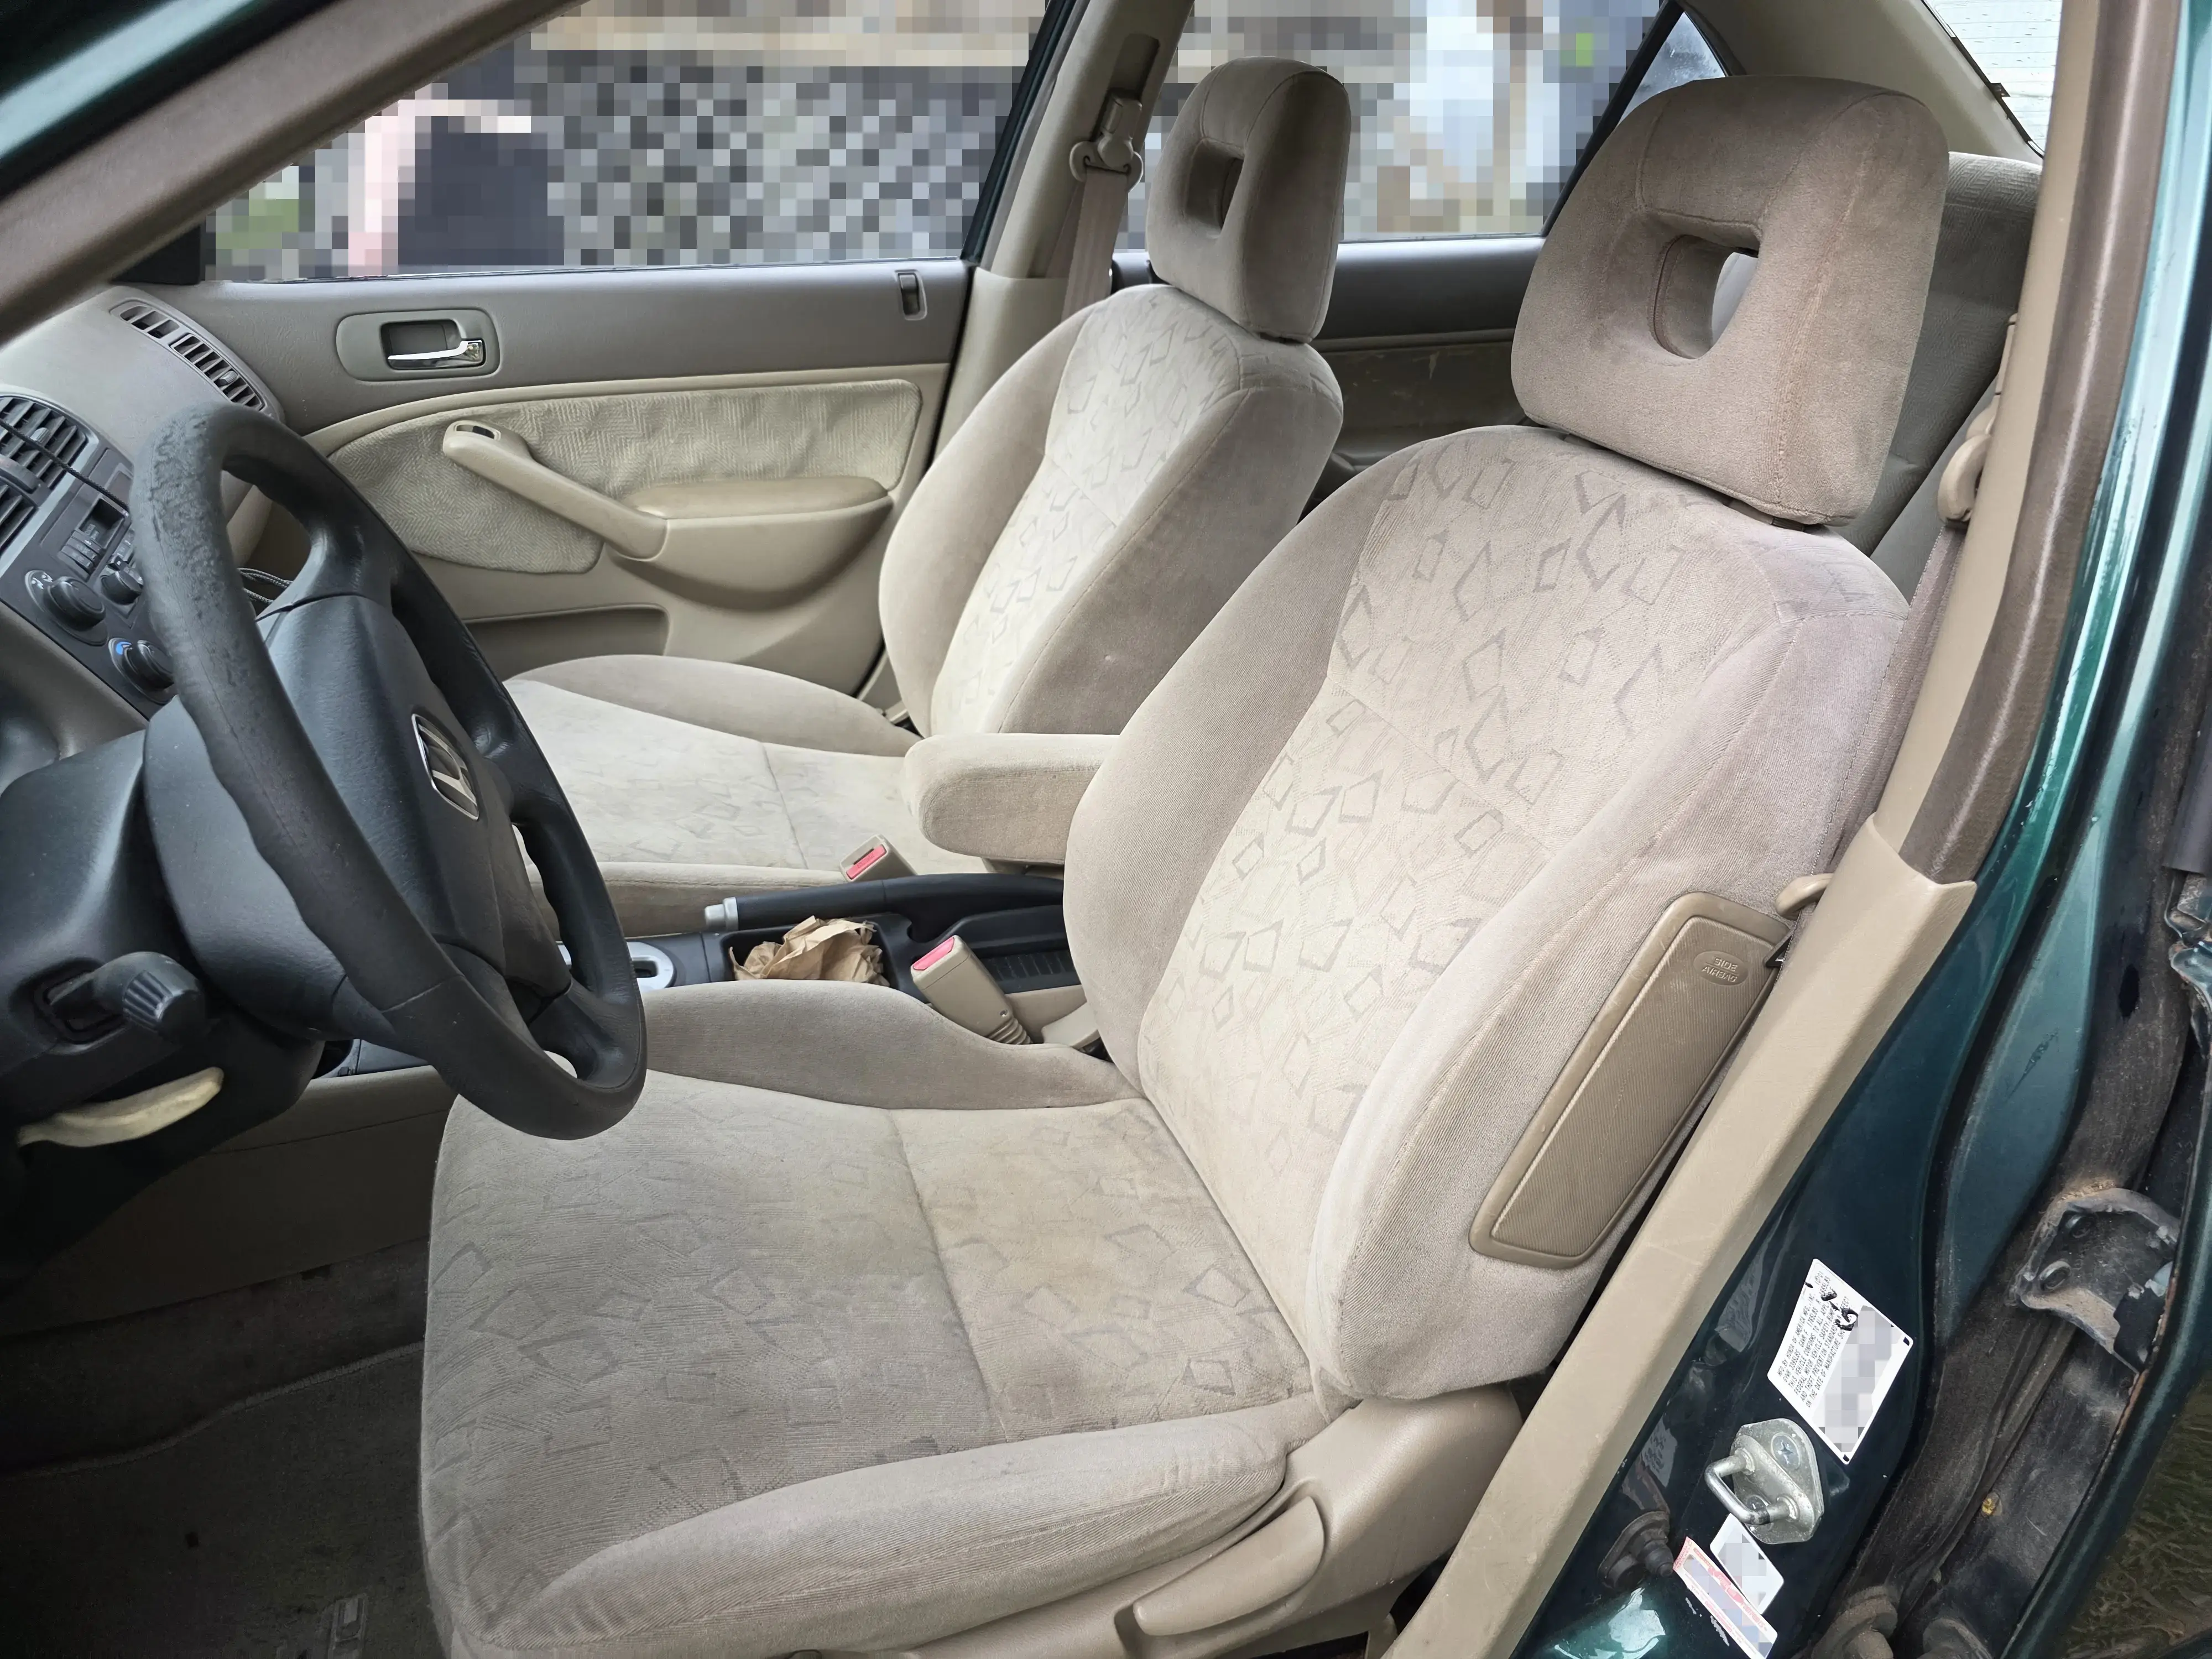
After my many-hour drive to get the transmission swapped, I found the stock seats to have very little back support in particular and to be rather uncomfortable in general. This led me to search for some replacements that wouldn't break the bank (or my back).
I did some cursory searching online for some drop-in replacements but I couldn't really find anything appealing. When I took my next trip to the car pickyard however, I found just what I was looking for; A set of tan, 2001 Civic coupe seats with that fun '90s-esque square pattern, and relatively clean upholstery. The yard charged $100 for the pair and I soon had a complete 2nd set of seats.
As an aside, the yard charges like $100 per airbag and these seats both had side airbags. I removed the airbags, placed them inside of the seat beneath the fabric, and snuck them clean out of the yard. They charge $50 for a complete seat and I wanted my money's worth. There is also a small issue of rust on these seats, however. The metal frames beneath them are quite rusty and I am holding onto the old seats so I can swap the metal frames between them someday.
I spent an afternoon cleaning the seats with a small furniture wet-vac and once they were clean and dry, I installed them into the Civic. They look nice and they are much more comfortable.
The small pool of oil on the top of the engine, just beneath the valve cover seemed to be due to a leaky cam plug (my mechanic pointed that out). I spent like $11 and bought a new OEM plug, pulled the old one out, scraped off the RTV that the previous owner thought was necessary, and placed the new plug in place. This seems to have resolved that particular leak.
There are some grommets around the valve cover bolts that seem to be leaking oil as well, but I don't want to replace the grommets until I change the valve cover gasket, which I don't want to do until I change the timing belt, which I don't want to do at all.
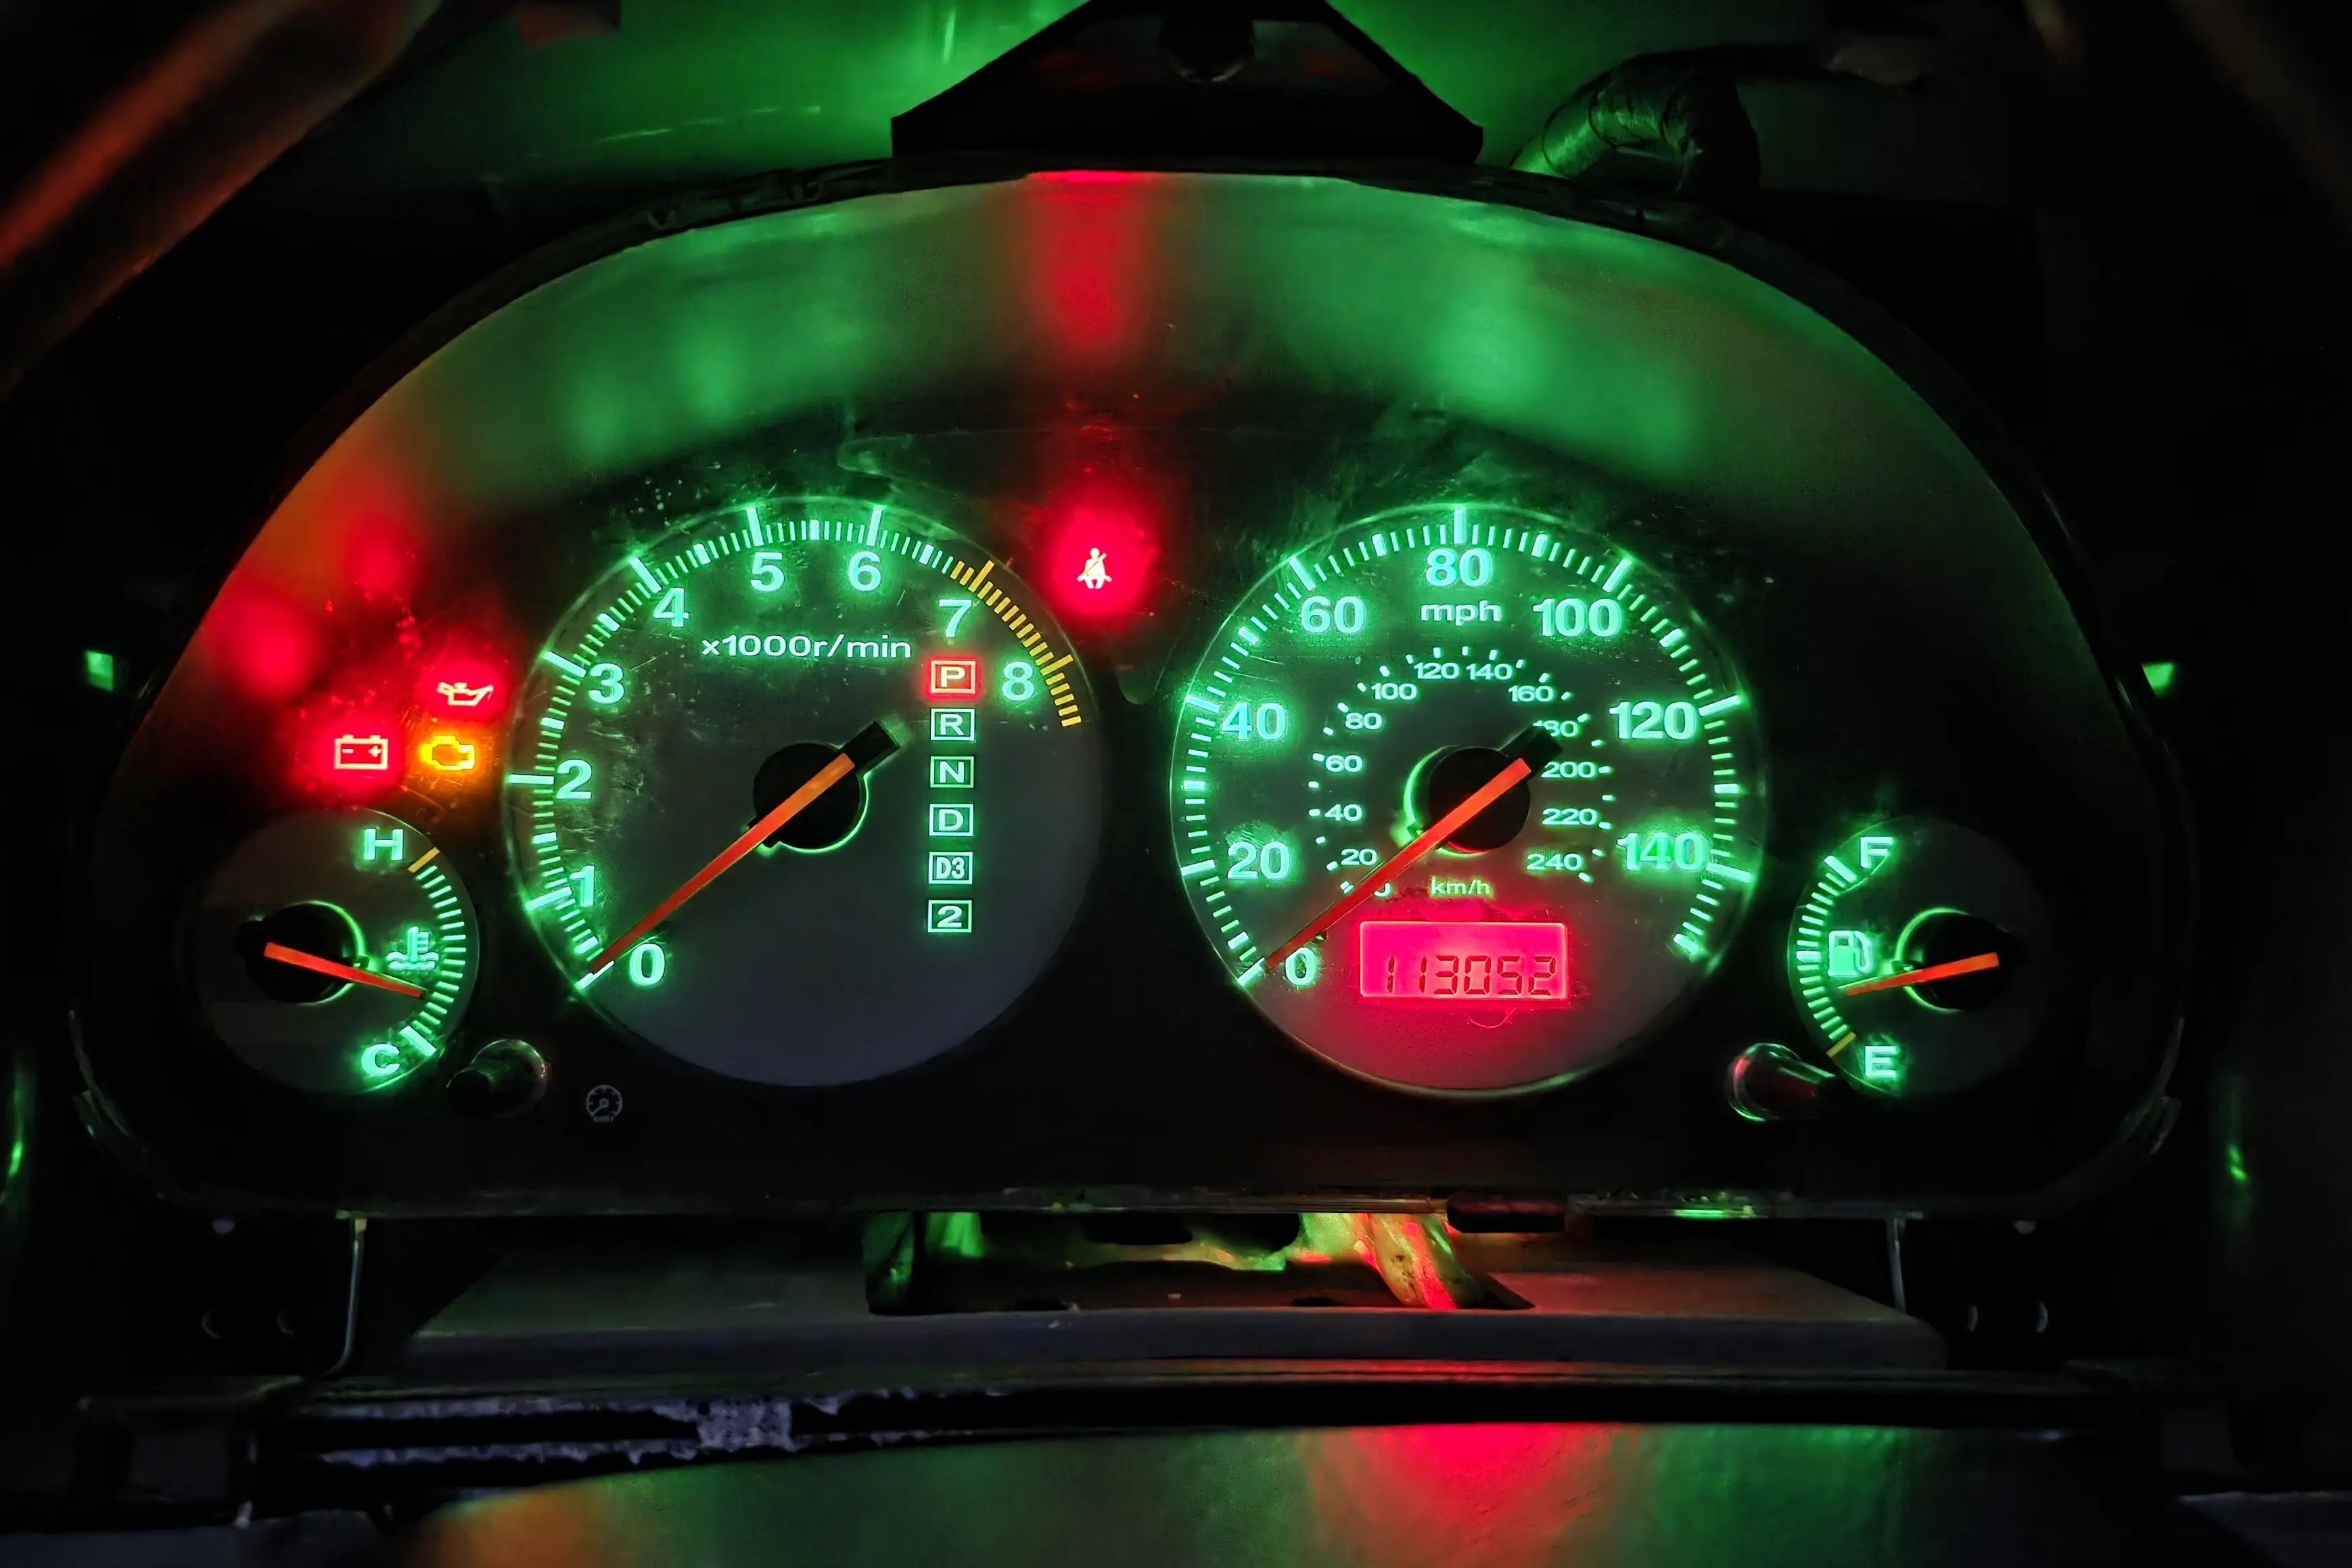
The Civic with red and green instrument cluster lights
In all my cars, I like to have the instrument cluster lights to be colored in some fashion, usually to match the car. For instance, my 2003 SOP (Sunset Orange Pearl) Element has orange cluster lights to match the paint color. The Civic is no different. I considered a Christmas-like theme for it as the car is green and I wanted to put some red carpet in it (maybe soon?), but in the meantime, I figured the lights would be easier.
In my cluster, all the lights were the little T5 bulbs that are available in LED form as drop-in replacements. I bought these red ones for like $7. It takes some trial and error to swap them all as the incandescent OEM bulbs don't care what direction they are installed in, but the LED ones only work in one orientation. So you need to swap a bunch around to get them all working after installation.
I actually ended up using green for the dials and red for the indicator lamps and other spots. This accomplished the Christmas look without making it harsh in dim lighting or ugly to look at in general.
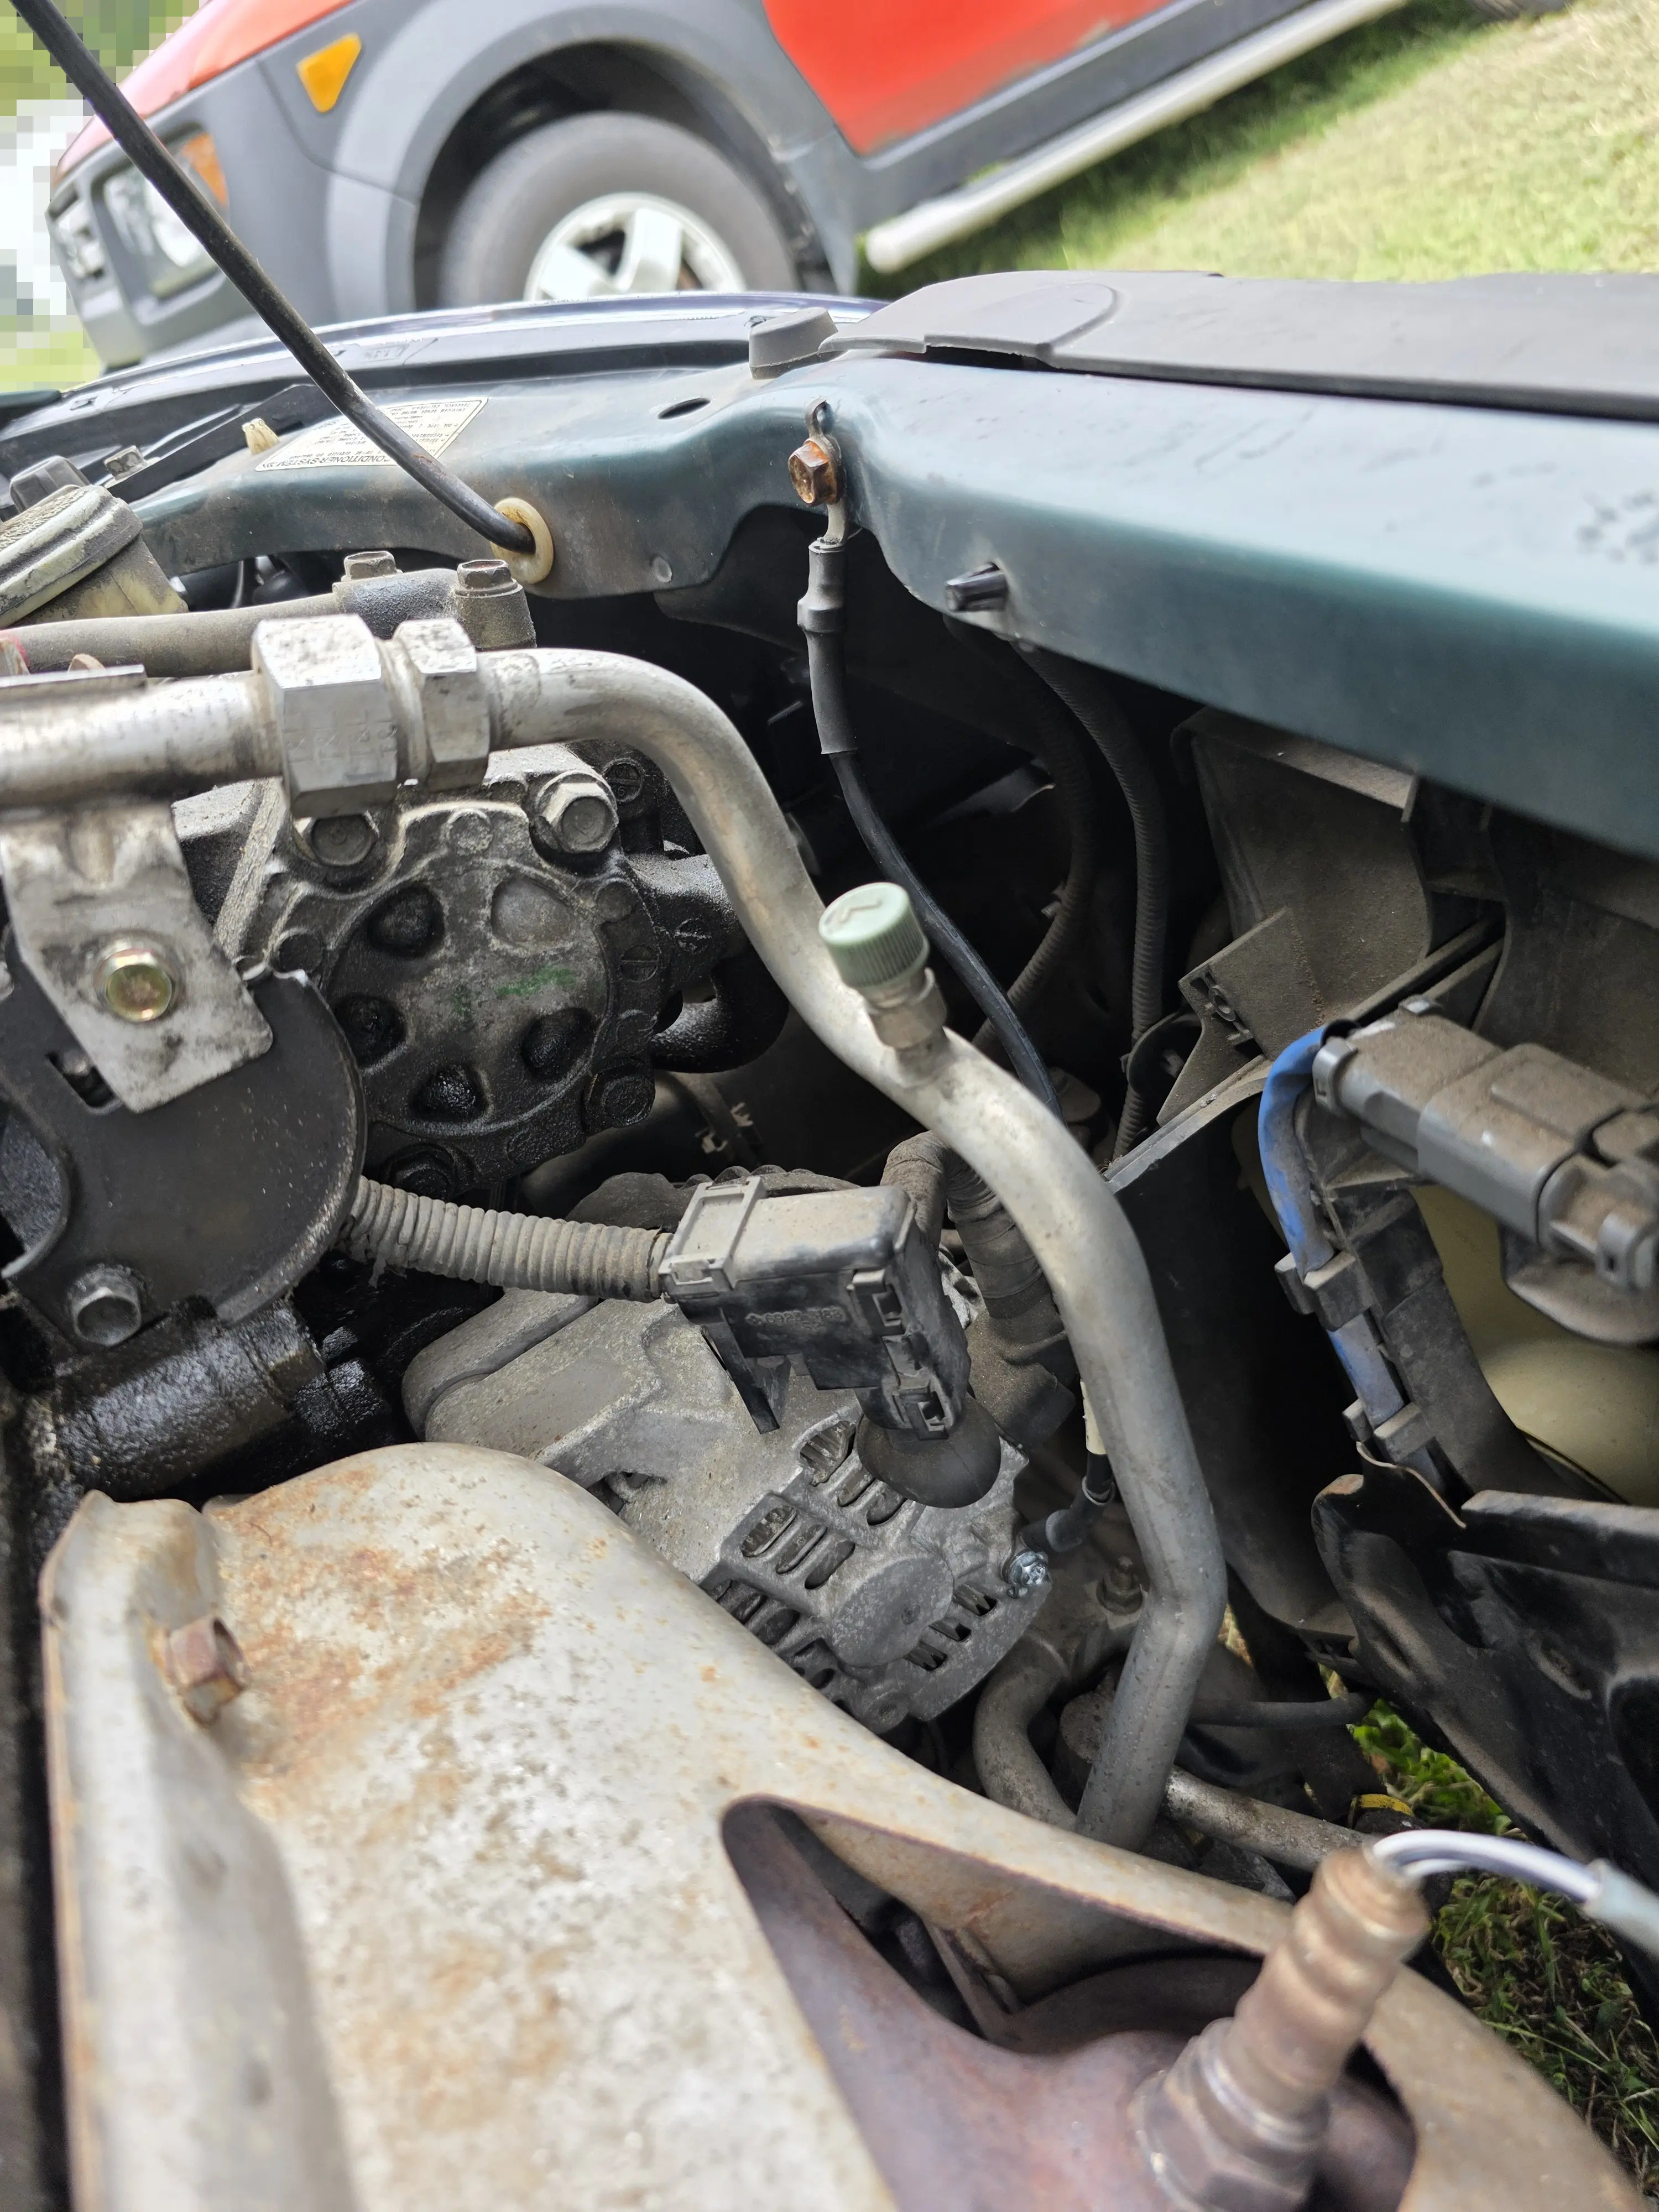
Earlier I said, "There is apparently a design flaw with this generation of Civic where if the alternator gets loose, it can ground out on the interior of the engine bay and fry the computer.", and while I resolved the PCM issue, I want to prevent this from happening in the future. On one of my trips to the car pickyard, I picked up a small grounding cable from some other Honda and figured I'd fashion it to the alternator and ground it to the chassis.
The alternator has a small bolt hole that is unoccupied on the bottom and there was some easy to reach metal nearby. I wire brushed off some of the paint, bolted the cable to the frame, and bolted the other end to the alternator. I checked continuity with a multimeter, and called the job done.
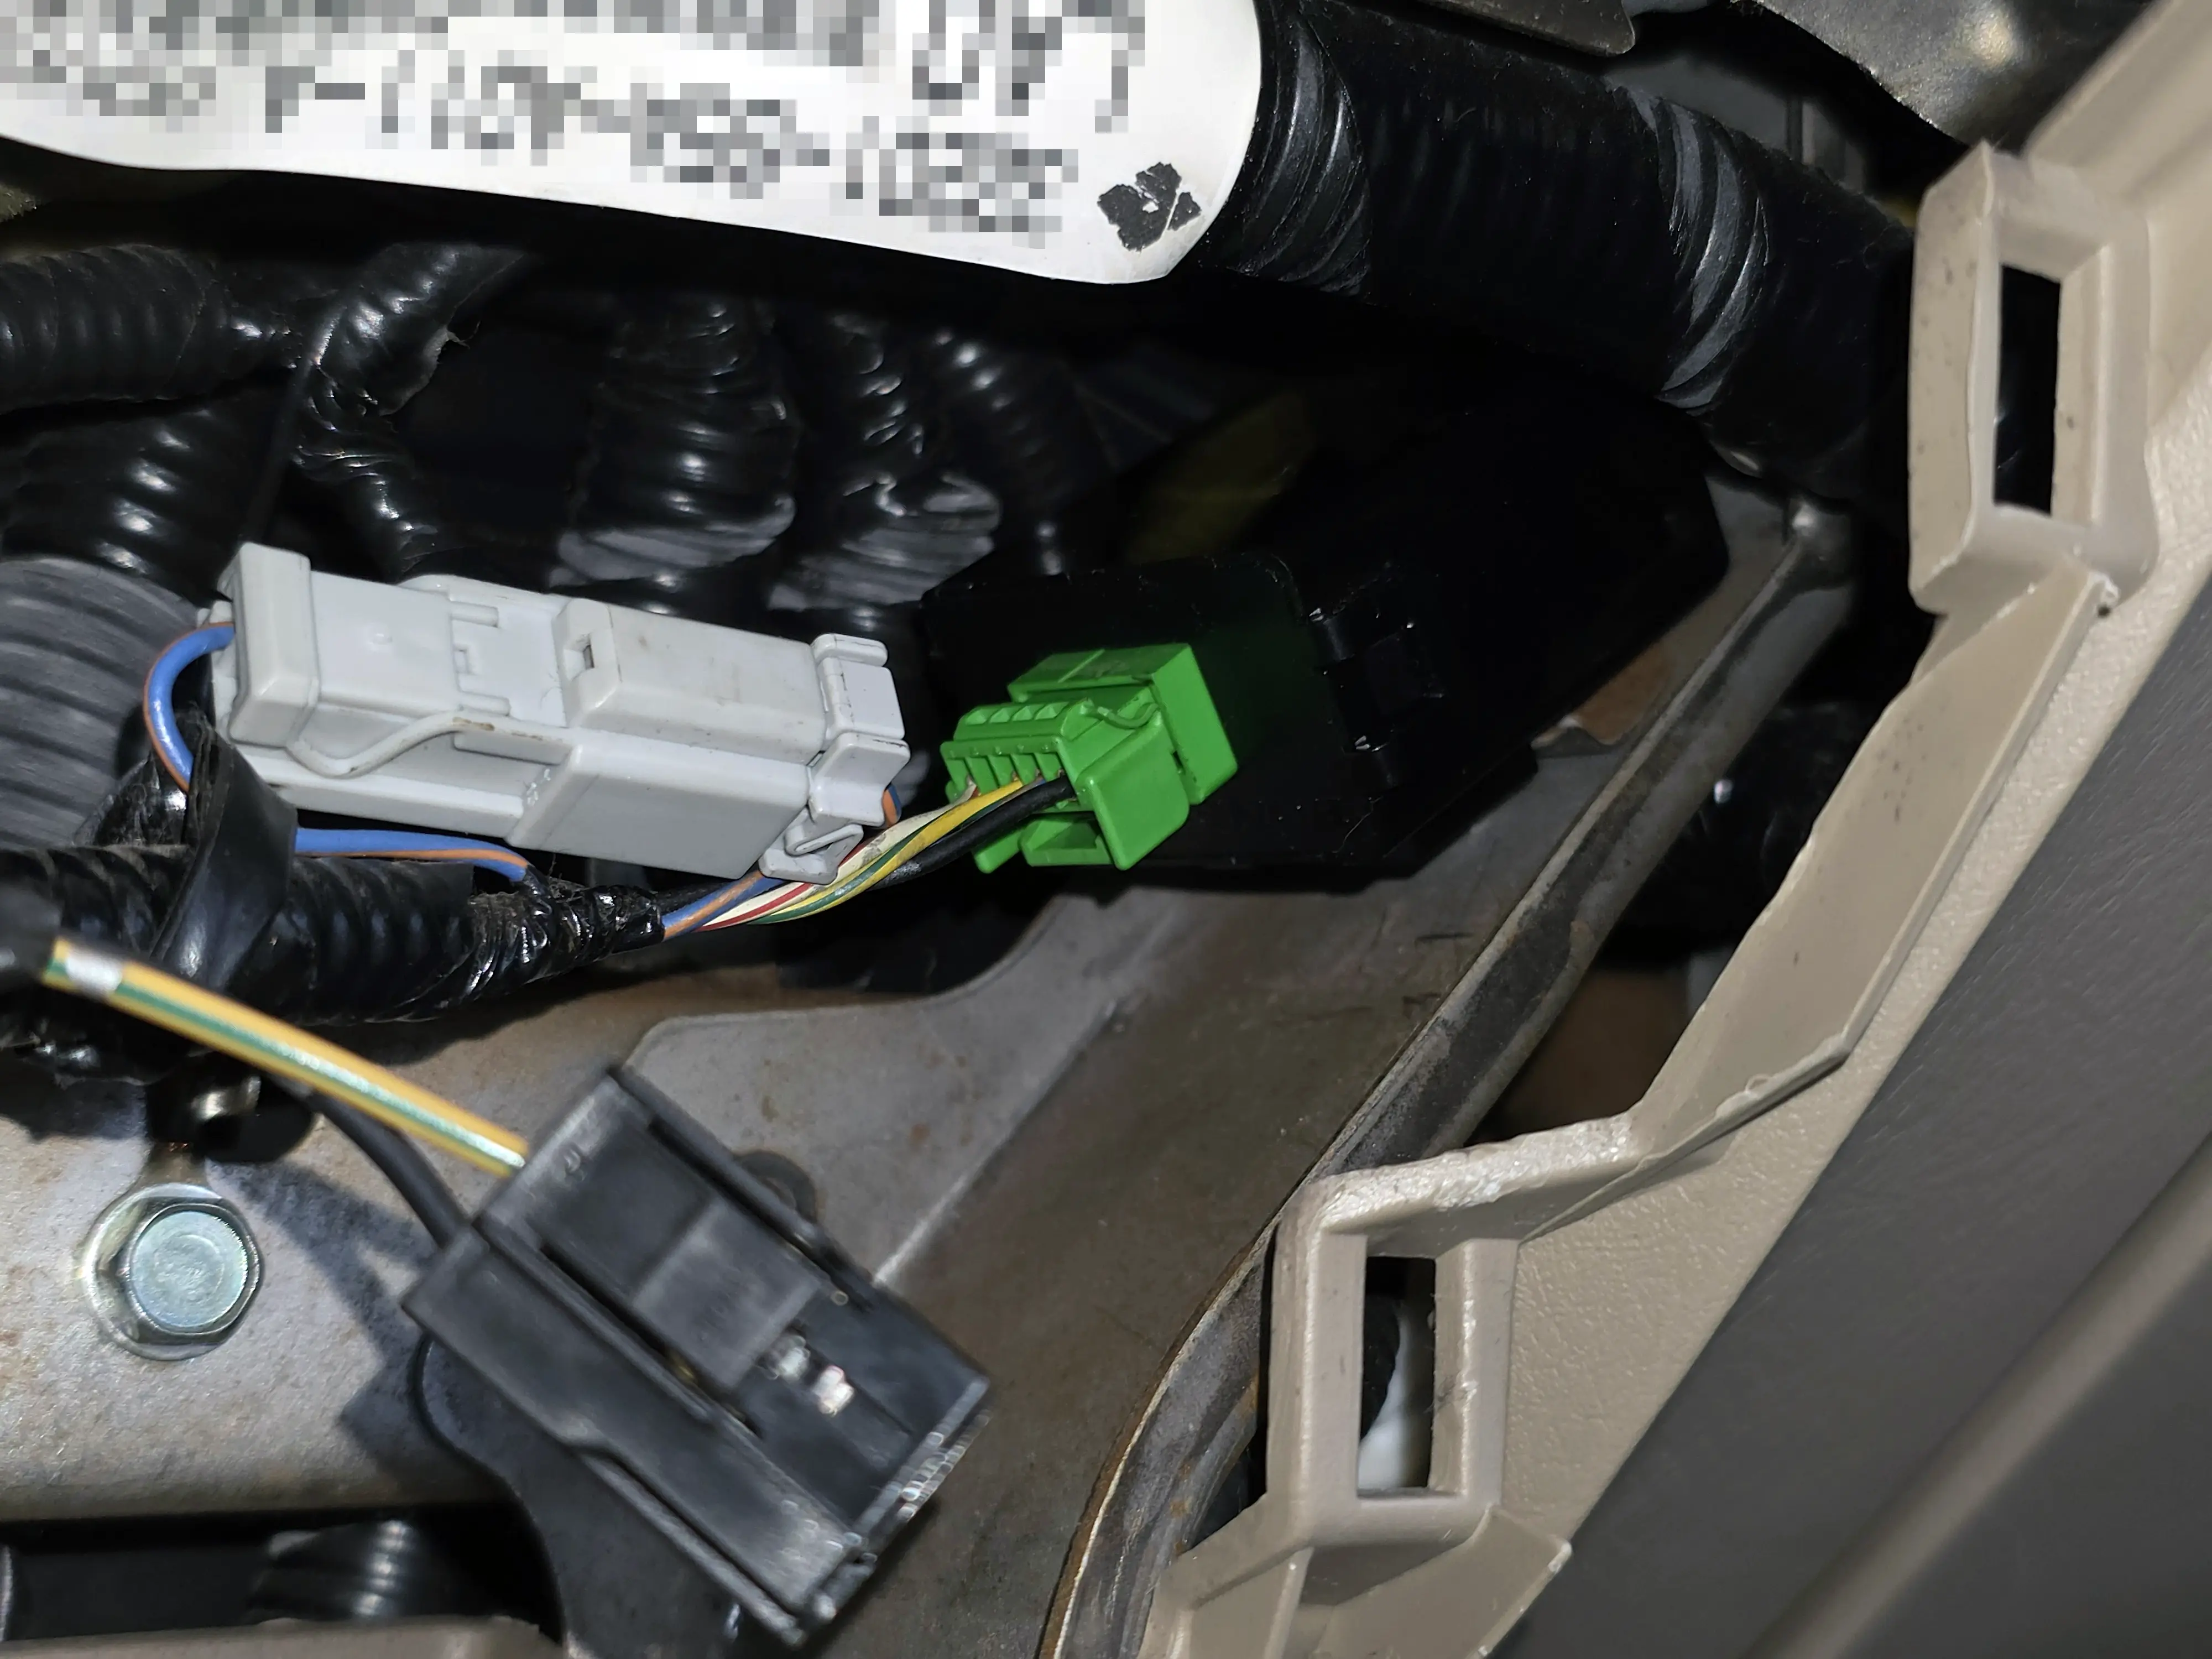
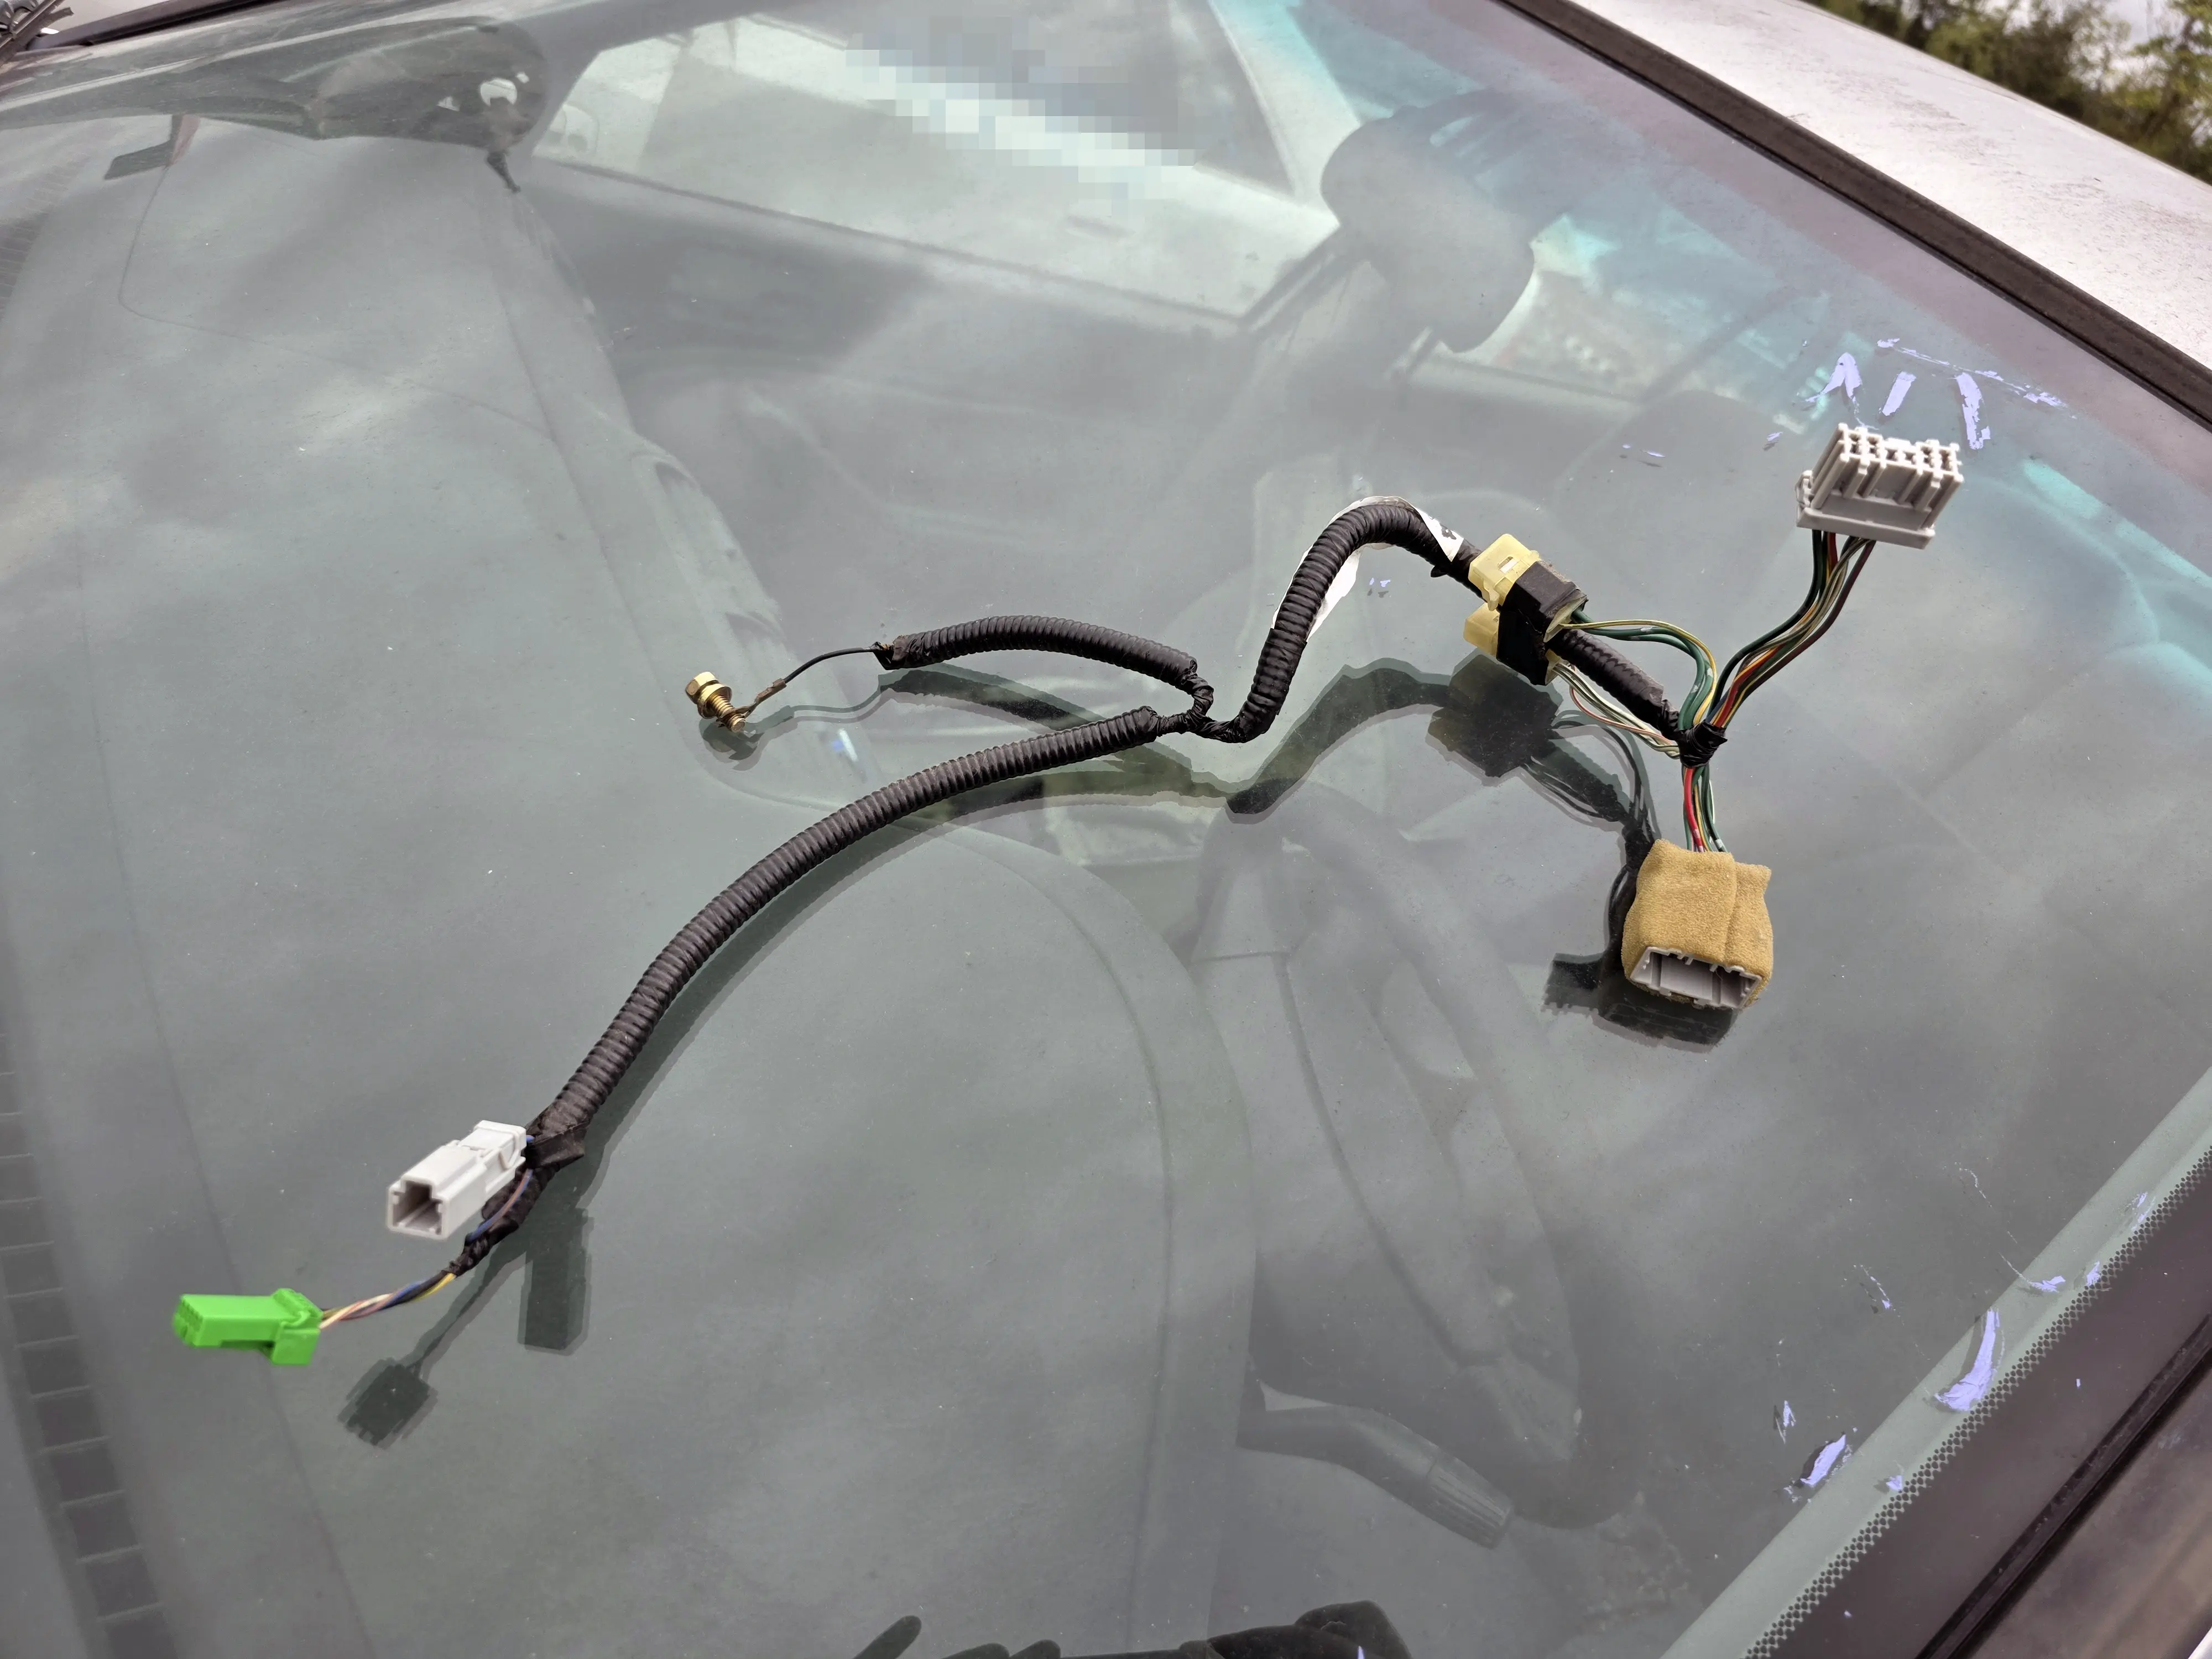
One of the many convenience features that is mandatory on new cars is keyless entry (the ability to (un)lock the doors with a remote instead of a key). This Civic is 23 years old and of a lower trimline, so it doesn't have this feature from the factory. Through many trips to the car pickyard and through some research, I discovered that keyless entry was an option on some similar year models, the hard part was finding one at the pickyard!
I was able to find some Civics with keyless entry, but these all had a different wiring harness from what my Civic had. The plug needed for the keyless entry module was just not present on mine. After failing to find one that fit my car without modification, I decided to wire one up myself. I took another trip to the pickyard and figured I'd get some of the wires and connectors that I need so I can create my own harness. Luckily, I discovered a single 2002 Civic in the lot with keyless entry AND my style of wire harness.
The rare 2002 Civic keyless entry wire harness
This was strange and I hand't seen that setup on the dozens of other Civics that I had looked at previously. Upon closer examination, I found a supplementary harness that adapts the '02 Civic's wiring to support a keyless entry module. I grabbed the harness (pictured above), spent ~$50 on a keyless entry module and matching fob from ebay, and snapped it all together. This was all plug-and-play and my old Civic just learned a new trick.
The rare 2002 Civic keyless entry wire harness
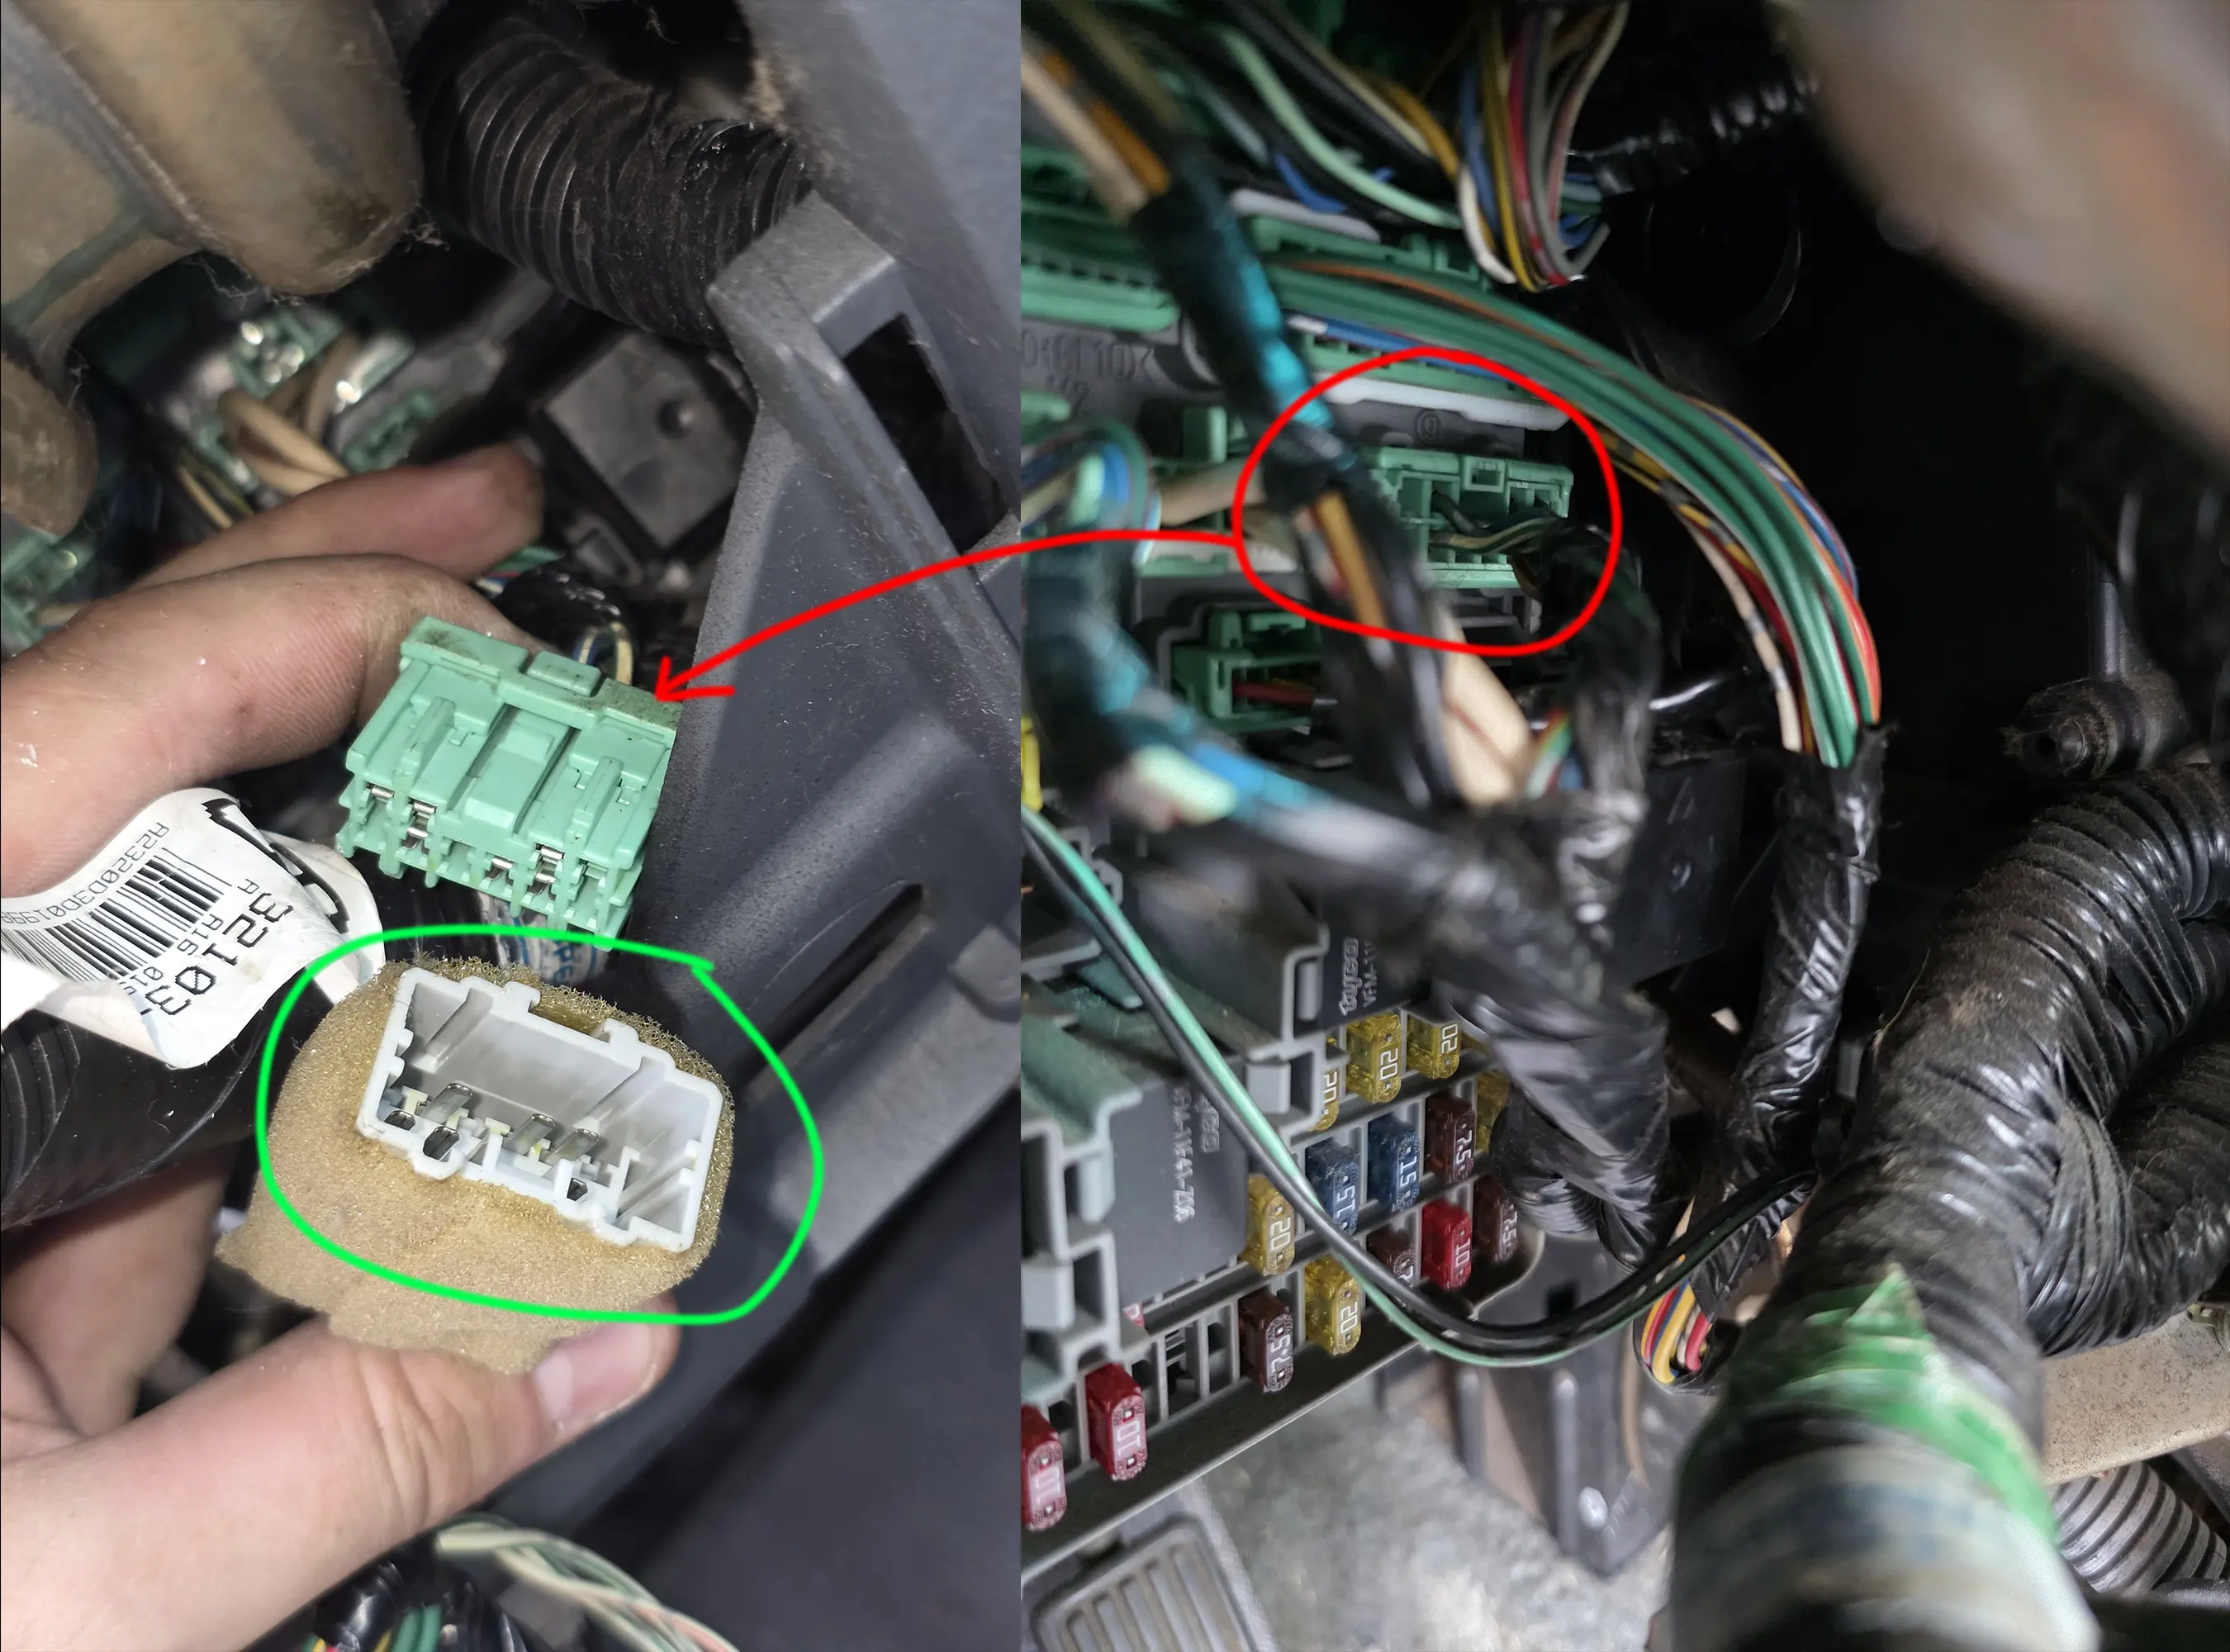
To install this harness in your Civic, start in the fuse panel in the cabin under the steering wheel:
Unplug the green connector marked with a lower case "g" in the top right corner (red circle in above image).
Connect it to the white female connector on the keyless entry harness (green circle in above image).
Plug in the white male connector from the harness into the green "g" connector socket on the fuse panel.
Route the rest of the harness into the area where the keyless entry module connects to the car.
This is behind where the 12v socket is, beneat the radio.
Connect the module to the car (if you haven't already).
The module clips to a small metal tab on the right side.
Connect the green plug to the keyless entry module.
Connect the grey plug to the grey connector with the single wire coming out of it (it may be taped to the rest of the wire harness).
Connect the ground screw to any available, bare metal location.
There is a dedicated spot for this screw, but I don't have a picture of the location. If you removed this harness yourself, then you'll know where that goes.
Done! Test your new keyless entry system.
The cable's part number is: 32201-S5A-A01
The module's part number is: 38385-S9A-A01
I performed this install without disconnecting the battery of the vehicle. You probably should disconnect the battery before doing this though. I also would not recommend buying just the module, try to find one with a paired fob as well. I'm unaware of any method of pairing a new fob (if all are missing) without going to a dealer. If you have at least one good fob, you can pair up to four I believe. I added some to the one that came with my Element. I'll provide the pairing sequence for that below. I haven't tested this on my Civic, just my Element, but here it is:
I haven't addressed this issue yet since it is so minor. Basically, the power lock functionality is not working on the front passenger door. It is probably due to a faulty lock actuator thingy or maybe it just isn't connected right (it does make a sound when you click the lock button). The door still opens, shuts, and locks fine with a key, so I'm not worried about this for the meantime.
As of writing this section, my wife's car has been at the dealer "getting repaired" for over 30 days now. I didn't get to drive the Civic much after getting it mostly fixed up as she has been borrowing it for commuting to work. I did finally get the dealer to replace the airbags however, but the AC, peeling clearcoat, and new wheels I bought for it have yet to be addressed.
A 2003 Civic Hybrid
I have an appointment this afternoon to get some new tires mounted on the used wheels I bought and once that is taken care of, I'll mount the assembled wheels on myself. I don't have a picture of the wheels on hand, but they are from a 2003 Civic Hybrid and are the same as those in the above image.
I also put this fun sticker on the back windshield.
Need for Sneed sticker on the rear window of the Civic
I'll start daily driving the Civic after the wife's car gets back from the shop, then I'm sure I'll have some new and exciting mechanical adventures to share with you all. Thanks for reading.
This article was originally written for NewSaint.org
Back in December, I learned about NeoCities and their goal of bringing back the personal, pre-WEB 3.0 / 2.0 feel of the early internet. I thought this was a great idea and immediately signed up for my free website. I then quickly did nothing with it and sat on it for six months.
About a week ago, I got the idea to host a small, online art gallery of the works that I've made—both with and without AI—to show them off and to make use of my free website slot. It's been a lot of fun to write the HTML, CSS, and JS to make the site look somewhat good and be pretty functional. ChatGPT has been very instructive on what to change and how to make my vision of the site come to fruition.
The HBM Art Gallery is a digital exhibition featuring a collection of generative artwork, experimental edits, and traditional compositions. This site is also a personal project created to show off what I find interesting about the world in general and art specifically. Most of the displayed works are parts of small themed series', but some are simply one-off projects or half-baked ideas. This gallery serves both as an archive and an evolving showcase.
One thing I've always appreciated about social media is the block functionality. I don't like to have private accounts or channels or whatever, I like to have my stuff free and open for anybody to look at. But, whenever someone comes across my path that I find annoying or ugly or just bothersome, I block them and then poof they're gone and I don't have to see them and my ramblings won't grace their eyes again.
Someone posting stuff I don't agree with?
Blocked.
Someone being annoying?
Blocked.
Some "protected class" whinging about something or other?
Blocked.
Someone virtue signaling about some bullshit that they are parroting?
Buh-buh-blocked!
I dislike anonymous / internet arguing as it leads nowhere and doesn't change anyone's minds. People—en masse—are too stubborn for discussion online and with the rampant use of irony, how can you tell if someone is being serious or not? I prefer to just erase them from my sight. I don't like to argue or leave negative comments or engage in any way. I just block them.
On the flip side, I am blocked from commenting in like a dozen Telegram channels for previous anti-(((Abrahamic-religion))) comments. That's the price I pay and I don't really mind.
Also, every platform that has a like button should have a dislike button. Unlike those Meta platforms, YouTube, and the like, we need a way to show our disapproval without going into the comments. Reddit almost has it right, but the vote system still focuses on the positive interactions most of the time. Interestingly, Itch.io got this right and has a visible like and dislike counter for their comments section.
Lots of content creators hinder their audience's ability to inter-/react with the posted content by disabling comments, hiding likes, or otherwise limiting engagement, usually when the general opinion on the posted material is negative. That's why I leave the negative emojis enabled on my Telegram channel. I'm not afraid of that guy that vomit reacts to my homemade meatballs or my desire to make videogames in my free time.
Perhaps my approval of blocking and my disapproval of a creator restricting responses is a double-standard. I could see that argument, but I don't care!
I'm gonna finally give Pixelfed a try. Not too hopeful, but seems to have a good foundation.
Feel free to give me a follow or just take a look at my posts if you're on the fediverse: pixelfed.social/hbm
Update: I have disabled my Pixelfed and I'm thinking about just deleting it. It's just as annoying as the big social media platforms, but with 0.1% of the content. Lots of virtue signaling and whining about politics. I knew it was a lost cause when I found myself blocking basically every account I saw on the explore page.
In just 250 pages, this book consolidates an incredible span of time and a very dense history into quite the digestible format. My feelings about the author aside, I found Aryanity to be an informative introduction to dozens of more niche topics on the subject of the Aryan race, mankind's history, National Socialism, historical curiosities, lost civilizations, and much more.
Are all of the facts 100% accurate to historical events? Probably not. Is some of the content in here akin to schizo-tier esoteric Hitlerisms? Yeah, definitely. Would I read it again? Absolutely!
If you know nothing of "the cause", haven't been in "the movement" long, or are just starting down the path of racial enlightenment, then this book is probably not for you. It makes a lot of wild claims and I get the feeling that the reader should not open this book empty-handed as it were. I was somewhat familiar with almost all of the topics discussed in the book before I read it, so when the author mentioned White indians on a Spanish island chain, Nordic alien UFOs, and a particular Austrian politician being the godlike man-of-all-men, I didn't bat an eye. I look forward to his other two books and while I'm not sure if there is a hidden race of supermen guarding the secret entrance to Agartha in Antarctica, I would very much like to believe so.
This short book reminds us that there were White, stone-age, "indians" still living in their traditional ways on a chain of islands only a few hundred years ago and that they were fought / bred out of existence by the invading Spaniards in the 15th century (or thereabouts). I found it quite interesting to read and I think I'll recommend it to those interested in the complete history of White culture and society. It doesn't seem that the indians described in the book were particularly remarkable or different from their ancient kinsmen, but they were a look into that distant past that we all share. Luckily, some scholars and explorers took notes of their civilization before it was erased.
This is now the 2nd or 3rd book that I've come across that makes the explicit link between some form of advanced, ancient culture and the supposed "myth" of that group transporting the seeds of their civilization to different communities all over the world. Graham Hancock wrote about it in Fingerprints of the Gods and Magicians of the Gods, so did "Orion Starfire" in Aryanity: The Forbidden History of the Aryan Race. I tend to believe this notion as it helps account for the many similarities between separate cultures; most notably their myths, customs, and structures. A lot of these groups seemed to be stagnant or uncivilized (however one perceives such a word) before these mythical pale men with beards sailed over the horizon and brought light into their dark worlds. Don't get me wrong, I disagree with colonialism; I believe it is not in the best interest of any culture to spread their customs and accomplishments to other groups. It is better to spread the group as it were, but even though their gifts were shared with other people, we can now see in retrospect that those efforts were essentially wasted.
I'm not usually one for fiction books in general (or sci-fi books in particular), but this exception became known to me via a coworker's suggestion. He, myself, and a 3rd coworker decided to read this in throughout November as a sort of book-club for us in the office.
I didn't know much going in, but I did know that the book was originally serialized online over the last decade or so and that the published version had just been released. The version I started reading was the 2021 self-published edition and while many of the story elements and characters were the same, I came to learn that a lot had been changed and added to the story.
For the most part, it was a fine read; there were some interesting characters, nifty plot devices, a reasonable "full-circle" moment at the end, and a somewhat tidy conclusion. I wouldn't really go so far as to recommend it however and I don't believe that I will bother reading it again. There are some moments where it seems the author is phoning it in, not really doing the setting justice, and recapping some old Vsauce videos to pad out his story that really could have been half as long.
Furthermore, it seems the British author threw in a "muh Nazis bad" line in there purely to virtue signal. It just came off as lazy writing.
This short book—which I happened to get for free, fittingly enough—is one I'd recommend to anyone with Libertarian leanings (as I have). Kinsella argues that intellectual property (IP) laws restrict the free use of one's property and stifle innovation. I find his reasoning persuasive, and I tend to believe that a genuinely free market could address most of the issues that would arise from abolishing IP altogether.
Key points I took from the book:
Patents are often arbitrary and sometimes granted for absurd ideas.
Ideas and thoughts are not tangible or scarce, and therefore cannot truly be considered property.
A book is a physical object containing ideas—the pages are property, but the words themselves are not.
My understanding of property—whether physical, digital, or conceptual—is still evolving, and I expect my views will continue to develop over time.
Sebastian Wang put it well in his review here, a paragraph from which is reproduced below:
The book's main argument is simple but powerful: property rights exist to deal with scarcity. Land, food, and cars are scarce—if one person takes them, someone else goes without. But ideas? Ideas aren't scarce at all. If I copy your invention or your book, I haven't taken anything from you—you still have it.
If you'd like to read this book. It is freely available here: StephanKinsella.com
I had a pretty good grasp on what Ben Klassen's book was about before reading it as I have been reading books from "the movement" for a few years now, I've talked to people who knew him personally, and I've even been to his Necropolis—tombstone—in North Carolina.
Klassen lays out a solid and well researched platform for bolstering the strength of all White people by rejecting Jewish influence, religion, and control; improving your financial standing by breaking away from corporate work and becoming self-employed; and teaching us about the past, making us aware of the present, and preparing us for the future.
The 648 pages are well spent critiquing Christianity, Judaism, and Islam by breaking down the fundamentals of these (((Abrahamic))) religions and showing how they are a means of control and enslavement of all races in general and the White race in particular. He speaks on biology and evolution and how these systems can break down if nature's laws are ignored and transgressed against. He also makes a thousand good points about how the Jew is a crafty, sinister, and malicious one and their many books and rituals reflect this nature.
I agree with Klassen on the vast majority of his opinions as expressed in NER, however his understanding of biology and evolution definitely has some 1970's-era issues. All in all, great book and I look forward to reading more of his work.
This seems to be a shortened version of Hostetler's much longer work entitled Hutterite Society—which I have a copy of and plan to read—but what it lacks in length, it definitely made up for in content. This booklet gave me a decent understanding of the fundamentals of Hutterite life, their struggles in previous centuries, and their differences from other "plain people" like the Amish.
Totaling no more than four dozen pages and two dozen pictures, this work is but a glimpse into the hidden life of these plain people. I appreciate their resourcefulness and willingness to adapt to technological change while maintaining their staunch beliefs (even if they are Christians). Perhaps there will soon be similar communities of non-Christian White folks living in a similar manner.
I've probably read a dozen of Sowell's books at this point and while they do feel a little samey at times, they really do a good job of hammering home important topics relating to society in general and the economy in particular. My favorite books of his are Black Rednecks and White Liberals and Basic Economics, while I haven't read the former in a number of years, I've read BE once all the way through (It's very long) and some chapters of it here and there.
Economic Facts and Fallacies focuses on a few different fallacies that are often held by those who study or speak about economics and their real-world effects when put into practice. It's too much to get into here—and I don't remember most of the finer details—but the book is engaging and I enjoyed it quite a bit, as I do with most of Sowell's writings.
This was the first of Ballard's books that I've come across and I enjoyed the leading half of it much more than the trailing half. It's a not-so-long story about a rich man who gets stranded on a forgotten concrete structure in the middle of a busy city in just the wrong way, making him invisible to the other civilians. The initial struggle of the main character was interesting and felt realistic, but his behavior at the end seemed like it was chaotic and dramatic just for the sake of it.
I also find the trope of the dumb brute paired with the thin, smart character to be a bit overdone. I read Of Mice and Men in school and that kind of character pairing always reminds me of that. I read this book very slowly over the course of 165 days. I will not be reading it again, but I am open to his other works.
On the Jews and Their Lies seems to be one of those "required reading" books that is often mentioned in White-forward circles. While it is rather unpopular with modern Lutherans, this book clearly shows how disdain for Jews has only ebbed 'n flowed throughout time and how most of the modern talking points against them are centuries old (yet we seem to have cyclical amnesia about them). A lot of the sentiments expressed by Luther sound like they could come right out of the 20th century—even though they are from the 14th!.
I listened to this book as read by the late, great Alex Linder via the Learning College. While the book was very strange in verbiage and nature as well as leaning pretty heavily into "true" Christianity, I think it was dead-on for a lot of the criticisms of Jewry that are still very serious issues in the modern world. It's not a good primer, but it makes a good reinforcement to existing beliefs.
Stefan Molyneux is a wonderful writer and the patron saint of 21st century philosophy. He leans rather libertarian—as do I—and has written a number of free books about different philosophical topics; ranging from general anti-government sentimentality to familial relationships, and most recently, parenting.
Molyneux breaks down the facade of modern parenting being the "correct" way to bring up children in the 21st century and instead proposes that reasoning, patience, and treating your children as fellow humans is the best way to develop and secure a strong, lifelong relationship with them.
As someone who didn't have very emotionally supportive parents, I resonated with his message in this book as well as the other half-dozen or so books of his that I have read. I plan to have children of my own soon and I want them to be strong, healthy, and mentally sound adults someday. I deeply, truly hope that you will read this book.
While I don't remember most of the finer details of Dr. Yates' book—as I'm writing this review many months after reading it—I do recall that the approach to topics around sexual development and the nature of reproduction are forthright and practical. The author doesn't approve of the disguise-and-disregard "method" that many parents seem to employ with their children; often refusing to answer questions about these most important topics and berating / belittling their children when they attempt to make sense of it all.those who need it most
SwS was written in the 1970s and certainly suffers from age in some obvious ways, but I wouldn't reject it outright just for that. I think it's a good start to thinking about how sex is an important topic and one that should be approached dutifully and respectfully.
Years ago now, I started a small Telegram micro-blog called Overall Enthusiasm. I basically used it as a place to share memes, random thoughts, and pictures of the projects I was working on at the time. I abandoned it a while back and spun up this website for longer content and for my Element Spotting series that I enjoy so much.
Telegram is an instant messaging application with a good amount of social media features. If you're familiar or want to check it out, my page is located here: t.me/newsaint.
I plan to post there more-regularly than I do here, but the content won't be nearly as collected. Thanks for reading and Element Spotting (6) is coming soon!
— HBM
Update: I have discontinued the Element Spotting series as the honeymoon effect for my car has long passed. I still waive to every E I see when I'm driving mine, take pics of them when it's convenient, and park next to them when possible.
In the last few weeks, most of my attention has been put into my 1st car—my daily driver since 2017—a 2005 Chrysler PT Cruiser (Non-Turbo, Touring Edition). This car has been fairly reliable, if not a little quirky (to say the least). It leaks power steering fluid, it eats tires, I've rebuilt the frontend suspension, and the current KBB on it is $256. In just under eight years, I ran over a crate, hit a guardrail, and my roommate accidentally backed over my bumper and ripped it off (he had a late 90's Toyota Land Cruiser at the time). The brakes are new, the muffler is rusting off, the car is painted a few different colors, and it gets about 23 MPG.
Since my recent interests have leaned toward backyard auto-mechanics and my bills have been low, I've spent much of my time and money on tools and parts for both of my cars. With the Element mostly fine, my focus has been on the Cruiser as it is getting up there in years and has not been maintained nearly as well as it should have been.
Back in May, I replaced the camshaft position sensor on the Cruiser as the engine started shuddering and misfiring before throwing a relevant code. I grabbed a new sensor, slapped it on, and went about my day. Last week, my car shuddered and misfired again. I pulled over, scanned the ODB, and got the verdict: Bad crankshaft position sensor. Generally, shops replace both at the same time if one goes out, they're cheap hall-effect sensors and fairly easy to replace, I'm just lazy and put it off until it was an issue.
This turned out to be quite the project and replacing this simple sensor took around four hours for two reasons: There was a support bracket in the way and the sensor itself seems to have deteriorated. I got the Cruiser up on ramps, got the three 15mm bolts out of the bracket, then the 1st 18mm bolt came out without much fuss, but that 2nd one took a very long time. The bolt is long, tucked away at the top of the bracket, and sandwiched between the radiator, radiator hose, and engine block. After trying half-a-dozen tool combinations ranging from simple extensions, to universal joints, to power tools (not enough room), I landed on a combination of a breaker bar, 10" extension, and 1/2" universal joint socket.
Many, many turns later, the bolt was free and the bracket came loose. Problem #1 solved. Next came the sensor itself.
I removed the connector, loosened the tiny bolt holding the sensor on, and gave it a tug. The sensor came free, but didn't look right. Turns out it partially broke-off inside of the engine and needed to be extracted. This left me with few options as space was scarce and as it was a smooth, plastic tube stuffed into a purpose-made hole; it didn't want to budge. I eventually stuffed a flathead screwdriver in there and walked it out. I felt around the hole and confirmed that there weren't any other pieces in there nor were there any scoring marks in the chamber.
I popped in a new sensor, bolted it in, and put back the three 15mm bolts, the 1st 18mm bolt, and struggled all over again—but in reverse this time—to put the 2md 18mm bolt back.
I cleared the codes, fired up the engine, and I haven't had any issues since.
While brakes are (arguably) the most important aspect of car functionality, it seems a lot of people ignore them until a problem has developed. These big problems tend to be the result of ignoring or not noticing small issues and the monetary cost of them tends to snowball with time. I did a brake pad and rotor swap for the Cruiser a few months ago without issue. I even wire brushed the calipers to clean them up a bit, but I didn't replace them as they aren't leaking and I'm getting to the point where I don't want to dump too much money into it.
I knew it would be a good idea to at least check the shoes on by rear brakes. I still have no idea why any car chooses to have both disc and drum brakes on a single car, but that's not important now. I bought new shoes, drums, and a hardware kit for the springs and whatnot. When Saturday came around and all the parts were in, I got to work. I then was swiftly roadblocked as when I took my wheel off, I discovered that the drums were seized in place and I wasn't getting them off by hand. I tried hammering, penetrating oil. more hammering, adjusting the brake shoes, more hammering, and even hammering from behind with a screwdriver. When these all failed, I broke down and spent $40 on a 12" gear puller on Amazon. It was on my porch Sunday morning, I positioned it on my drum, hit it with the impact, and it popped free.
A wave of relief washed over me, but my work was just getting started. I took lots of pictures of the spring assembly and noticed how paper thin my brake shoe material was. Glad I changed them when I did!
I removed the assembly, cleaned up the dust shield, greased up some wear spots, checked the cylinders, and put the new shoes in place. I confirmed that the new drums fit on the shoes and that all the functions work as expected. I took the new drums off, spray painted them bright red, put them back in place, tested the brake friction, torqued the wheels on top, and went for a test drive. Braking was not great, definitely needs adjustment. I found some time a few days later and got them to brake a little more evenly, albeit probably looser than they should be. I can stop fine in the rain, so I should be good.
I felt kind of listless last weekend and thought it was about time to wash and polish the orange beast. I scrubbed it top-to-bottom, ran some plastic trim restorer over the grey bits, popped all the wheels off to hit them with some wheel cleaner, and covered the paint with some once-a-year car polish. She's nice and shiny now (until it rains and gets muddy again) and the plastic restorer should help keep the grey trim from turning white.
Update: I'm not sure if it was the polish or the trim restorer, but it has started turning white again just a week or so after the initial application. I plan to try this Solution Finish product soon, perhaps changing my grey trim to a black. Going from the stock color scheme to a more Halloween-type theme.
HRG Offroad makes a set of metal molle panels that affix to the rear door and quarter panel windows. These add a neat style to your E as well as a sorta-functional matrix that you can mount military-themed stuff onto. I currently have some little 4" square velcro patch panels on them that I plan to put some of my morale patches on (eventually). They are fairly destructive to install, requiring that one drill holes into the plastic trim and the inner metal of their car. I did this for my rear doors, but I may eventually get the rear quarter panel set as well (driver's side and passenger's side). It's around $500 for all four panels which is steep, but if you're interested, add them to your ebay watchlist and you may get lucky if the seller offers a slight discount offer (like what happened to me, I think I got mine for $9 off).
Not a lot going on repair-wise on the E. I have some ideas in the mix to finish painting my PT Cruiser; it is currently black and gold (tan), but I plan to maybe paint something on it. Graffiti? Camo? Not sure yet, I'll make another post when I have some more pics to share. Until then, enjoy some new Element pics!
Recent E Pics:
A Sunset Orange E
A Blue E that I almost missed
A Blue E G3
A Sunset Orange E
A Citrus E G3
A Tango Red E G2
A Silver E at a Gas Station
My E (Left) next to another Sunset Orange E from my town (Right)
The engine sighed with relief as the man shifted into park. It was an older model—they all were—but it started when needed and it handled well-enough on the unkempt streets leading to the city outskirts. With the engine off, the cold began to set in and the man gathered his pack, keys, and ID badge.
The thud of the car door echoed quickly off the walls of the parking garage. Even though there were no other vehicles in sight, he always parked at the rear of the lot. I suppose he enjoyed the brisk walk to the tram that would take him into the city. The car ride was only a few minutes, but the tram took at least twenty. The man didn't mind however, he liked to look out from the cabin hanging high above the withered city and silently wonder what it must have looked like in its prime.
The tram reached the next station, steadied itself, and slid its doors open. A mechanical voice calmly identified the next station and the estimated arrival time as the vessel shuddered and picked up speed. The man didn't bother to look around as he was always the only person onboard, this time was no different.
Through frosted windows the man could see his destination. A massive, chiefly concrete structure that spanned multiple blocks and sat squarely in the center of the city. No windows, lights, or life could be seen. Just some water vapor from a few scattered vents on the roof.
***
The doors opened, the man exited, and the tram retracted itself from the building's station and continued its lonely itinerary. In a few seconds, the man covered the length of what was called "The Gate". It was a small cutout on the corner of the enormous building with metal shutters that opened and closed when a tram approached, but otherwise sat idle, just filtering the dim morning light onto the polished concrete floor. Faded yellow lines used to usher employees to the correct entrance, or to the guard station if they were a visitor.
That station was little more than a small room with a square window, a thin slot for handling paperwork, and a narrow door, all tucked into the wall next to one of the entrances. The man assumed the door was locked, although he never actually bothered to check. Through the dark window he could, however, see a desk, two chairs, a camera monitor, and a pile of visitor badges. The black anti-fatigue mat sits a few feet from the door, slightly chewed by rodents and faded by the checkered sunlight that fills this small landing in the evening.
The man tapped his ID badge to the black square on the wall, a little red light turned green, and his entrance opened with a burst of slightly-warmer air. Dim yellow lights lined the hallway but turned a brilliant white as he passed beneath them. The man walked his usual route to his post and he felt the darkness creep behind him as the lights dimmed once more.
***
The man's job wasn't complicated, but it did require a fair amount of skill and a keen eye. He had never met his employer and didn't seem to have any coworkers. The man received an offer through a blank envelope slipped under his door just hours after reporting his recent furlough to the local employment office. He was expecting notice of a job opening of some kind, but these communications are typically delivered via phone or electronic mail.
The envelope contained a single piece of stationary listing an address, tram number, a date, a list of duties, and a more-than-reasonable salary. The man only had the weekend to contemplate the offer. Monday came, he followed the directions to the tram, then to "The Gate", then to his office. That was years ago now.
Through his scrupulous saving and frugal living, the man was able to afford a slightly nicer apartment a few minutes closer to the tram station after only a few months‘ work. This afforded him the rare luxury of getting home a little earlier and sleeping in a little later. He felt this extra time was well spent.
***
The man approached his office door and once-again tapped his ID to the black square next to the door. After the short beep and familiar click the man heard from within the wall, the door was unlocked and he made his way inside the dark room.
A sensor picked up his presence and the lights rose to full power over a few seconds. The man placed his pack in a locker, trading it for a plastic suit that covered him head-to-toe, a full-faced respirator, and an exposure monitor. Now within his expected dress-code, the man approached his station and began to draw a pale red liquid from one of a dozen taps along the rearmost wall.
Once a sample has been collected, it is analyzed for contaminants and clarity. Light red was the desired hue, free from any inconsistencies or impurities. The man held the vial up to a bright inspection light, rotating it slowly. Satisfied, he placed the sample in a small pneumatic tube, pressing a button to send it off into the depths of the facility, or perhaps even further.
The rest of his shift continued in much the same way. Tap, fill, inspect, send. Occasionally, his exposure monitor would beep, indicating a stray particle had reached unsafe levels, but the air filtration system would quickly whir to life, clearing the contamination before it could pose any real danger.
He had long since stopped wondering where the liquid came from or where it was going. Early on, curiosity had gnawed at him—what exactly was his role in this grand machine? The closest thing to an answer had been the day he found a scrap of paper wedged into a vent near his station. On it, a few smudged words stood out: "Keep the balance."
At first, he thought it might have been a note from a previous worker, but the paper was too clean, the ink too fresh. He had looked around then, half expecting someone to be watching from the dim corners of the facility. But, as always, he was alone.
The end of his shift came as it always did—with a sharp, mechanical chime. The man returned his equipment, checked his exposure levels, and left his office. The hallway remained as empty and silent as when he arrived. His footsteps echoed softly against the smooth floor, the lights brightening only long enough to escort him out.
When he reached "The Gate", he hesitated. Outside, the night had fully settled over the city, casting long, cold shadows between the skeletal remains of old buildings. The tram station sat empty, waiting for its single passenger.
Something felt different tonight.
He turned his head slightly, his breath catching in his throat. For the first time in years, there was another set of footprints in the dust outside the guard station. Fresh, distinct.
And they weren't his.
This is a short story that I wrote over two separate days: 2024-08-28 and 2025-03-10. If you enjoyed this, the PDF version is available here.