One thing I've always appreciated about social media is the block functionality. I don't like to have private accounts or channels or whatever, I like to have my stuff free and open for anybody to look at. But, whenever someone comes across my path that I find annoying or ugly or just bothersome, I block them and then poof they're gone and I don't have to see them and my ramblings won't grace their eyes again.
Someone posting stuff I don't agree with?
Blocked.
Someone being annoying?
Blocked.
Some "protected class" whinging about something or other?
Blocked.
Someone virtue signaling about some bullshit that they are parroting?
Buh-buh-blocked!
I dislike anonymous / internet arguing as it leads nowhere and doesn't change anyone's minds. People—en masse—are too stubborn for discussion online and with the rampant use of irony, how can you tell if someone is being serious or not? I prefer to just erase them from my sight. I don't like to argue or leave negative comments or engage in any way. I just block them.
On the flip side, I am blocked from commenting in like a dozen Telegram channels for previous anti-(((Abrahamic-religion))) comments. That's the price I pay and I don't really mind.
Also, every platform that has a like button should have a dislike button. Unlike those Meta platforms, YouTube, and the like, we need a way to show our disapproval without going into the comments. Reddit almost has it right, but the vote system still focuses on the positive interactions most of the time. Interestingly, Itch.io got this right and has a visible like and dislike counter for their comments section.
Lots of content creators hinder their audience's ability to inter-/react with the posted content by disabling comments, hiding likes, or otherwise limiting engagement, usually when the general opinion on the posted material is negative. That's why I leave the negative emojis enabled on my Telegram channel. I'm not afraid of that guy that vomit reacts to my homemade meatballs or my desire to make videogames in my free time.
Perhaps my approval of blocking and my disapproval of a creator restricting responses is a double-standard. I could see that argument, but I don't care!
The engine sighed with relief as the man shifted into park. It was an older model—they all were—but it started when needed and it handled well-enough on the unkempt streets leading to the city outskirts. With the engine off, the cold began to set in and the man gathered his pack, keys, and ID badge.
The thud of the car door echoed quickly off the walls of the parking garage. Even though there were no other vehicles in sight, he always parked at the rear of the lot. I suppose he enjoyed the brisk walk to the tram that would take him into the city. The car ride was only a few minutes, but the tram took at least twenty. The man didn't mind however, he liked to look out from the cabin hanging high above the withered city and silently wonder what it must have looked like in its prime.
The tram reached the next station, steadied itself, and slid its doors open. A mechanical voice calmly identified the next station and the estimated arrival time as the vessel shuddered and picked up speed. The man didn't bother to look around as he was always the only person onboard, this time was no different.
Through frosted windows the man could see his destination. A massive, chiefly concrete structure that spanned multiple blocks and sat squarely in the center of the city. No windows, lights, or life could be seen. Just some water vapor from a few scattered vents on the roof.
***
The doors opened, the man exited, and the tram retracted itself from the building's station and continued its lonely itinerary. In a few seconds, the man covered the length of what was called "The Gate". It was a small cutout on the corner of the enormous building with metal shutters that opened and closed when a tram approached, but otherwise sat idle, just filtering the dim morning light onto the polished concrete floor. Faded yellow lines used to usher employees to the correct entrance, or to the guard station if they were a visitor.
That station was little more than a small room with a square window, a thin slot for handling paperwork, and a narrow door, all tucked into the wall next to one of the entrances. The man assumed the door was locked, although he never actually bothered to check. Through the dark window he could, however, see a desk, two chairs, a camera monitor, and a pile of visitor badges. The black anti-fatigue mat sits a few feet from the door, slightly chewed by rodents and faded by the checkered sunlight that fills this small landing in the evening.
The man tapped his ID badge to the black square on the wall, a little red light turned green, and his entrance opened with a burst of slightly-warmer air. Dim yellow lights lined the hallway but turned a brilliant white as he passed beneath them. The man walked his usual route to his post and he felt the darkness creep behind him as the lights dimmed once more.
***
The man's job wasn't complicated, but it did require a fair amount of skill and a keen eye. He had never met his employer and didn't seem to have any coworkers. The man received an offer through a blank envelope slipped under his door just hours after reporting his recent furlough to the local employment office. He was expecting notice of a job opening of some kind, but these communications are typically delivered via phone or electronic mail.
The envelope contained a single piece of stationary listing an address, tram number, a date, a list of duties, and a more-than-reasonable salary. The man only had the weekend to contemplate the offer. Monday came, he followed the directions to the tram, then to "The Gate", then to his office. That was years ago now.
Through his scrupulous saving and frugal living, the man was able to afford a slightly nicer apartment a few minutes closer to the tram station after only a few months‘ work. This afforded him the rare luxury of getting home a little earlier and sleeping in a little later. He felt this extra time was well spent.
***
The man approached his office door and once-again tapped his ID to the black square next to the door. After the short beep and familiar click the man heard from within the wall, the door was unlocked and he made his way inside the dark room.
A sensor picked up his presence and the lights rose to full power over a few seconds. The man placed his pack in a locker, trading it for a plastic suit that covered him head-to-toe, a full-faced respirator, and an exposure monitor. Now within his expected dress-code, the man approached his station and began to draw a pale red liquid from one of a dozen taps along the rearmost wall.
Once a sample has been collected, it is analyzed for contaminants and clarity. Light red was the desired hue, free from any inconsistencies or impurities. The man held the vial up to a bright inspection light, rotating it slowly. Satisfied, he placed the sample in a small pneumatic tube, pressing a button to send it off into the depths of the facility, or perhaps even further.
The rest of his shift continued in much the same way. Tap, fill, inspect, send. Occasionally, his exposure monitor would beep, indicating a stray particle had reached unsafe levels, but the air filtration system would quickly whir to life, clearing the contamination before it could pose any real danger.
He had long since stopped wondering where the liquid came from or where it was going. Early on, curiosity had gnawed at him—what exactly was his role in this grand machine? The closest thing to an answer had been the day he found a scrap of paper wedged into a vent near his station. On it, a few smudged words stood out: "Keep the balance."
At first, he thought it might have been a note from a previous worker, but the paper was too clean, the ink too fresh. He had looked around then, half expecting someone to be watching from the dim corners of the facility. But, as always, he was alone.
The end of his shift came as it always did—with a sharp, mechanical chime. The man returned his equipment, checked his exposure levels, and left his office. The hallway remained as empty and silent as when he arrived. His footsteps echoed softly against the smooth floor, the lights brightening only long enough to escort him out.
When he reached "The Gate", he hesitated. Outside, the night had fully settled over the city, casting long, cold shadows between the skeletal remains of old buildings. The tram station sat empty, waiting for its single passenger.
Something felt different tonight.
He turned his head slightly, his breath catching in his throat. For the first time in years, there was another set of footprints in the dust outside the guard station. Fresh, distinct.
And they weren't his.
This is a short story that I wrote over two separate days: 2024-08-28 and 2025-03-10. If you enjoyed this, the PDF version is available here.
Author's Note: This is a short rant written in 2022 in response to an argument I had about the best method for keeping records of time. I have lightly adapted it for this format and made minor changes where appropriate.
For those in the US, you're probably used to the MDY (Month, Day, Year) date format, along with using a 12-hour clock. This system is bad and is rife with confusion. Most other systems are even worse (I'm lookin' at you DMY).
If we're gonna make it to the glorious techno-future then we're gonna need to get on the same track about dates and times... but if we're destined for nuclear hellfire / apocalypse, then I guess this rant won't matter.
Anyway, the only useful and correct date / time format is Year > Month > Day > Hour > Minute > Second. Big to small. Old to new.
In a computer system—or even a paper-based system—this format will sort files in perfect chronological order. Let's take a look at an example.
You have three files that need to be sorted and three methods to do so:
This system has the files in order by the day of their respective month. The day in which something occur is almost always less important than the chronology of its occurrence in relation to other events. This system is bad.
This system has the same issue as the previous method. The month in which something occurs is helpful, but the October of one year is very different than the October twenty years hence. This system is bad.
This system solves the chronology issues of the above two methods. Dates are grouped with those that are closest together in time and go from the past, to the present, to the future.
1999-12-31.txt
2013-03-04.txt
2019-08-11.txt
2024 Update: I was well aware of the International Organization for Standardization by this point, but didn't bother to look into their suggestions for time keeping. Turns out ISO 8601 covers the above completely and should be adopted worldwide galaxywide immediately. If you're curious, another resource you can reference is Wikipedia's list of date formats by country.
2025 Update: Furthermore, I suggest completely abolishing the concept of time-zones. The date and time should be the exact same all over the universe. "But what about business hours or my alarm clock??? WhO wAnTs To Go SeE a MaTinEe At 22:00 UTC??" Those remarks could only be writted by the utterly deranged and altering the concept of time to fit a human store's business hours—not to mention someone's personal schedule—is an absolutely insane thing to suggest. ALSO, how the hell us Coordinated Universal Time abbreviated to UTC? ALSO ALSO, DAYLIGHT SAVINGS TIME.
I use a gamepad when I play PC games, at least in the majority of 1st Person games. Between annoying keyboard layouts, a decade of console gaming before I ever built a PC, and sheer laziness, I find it to be the easiest and most comfortable way to play most games.
My first few years of playing games were spent primarily on the PS2 and PS3. They were okay consoles with a good library of games, but a ton of technical problems that I won't get into here. However, one thing I absolutely hated about both consoles were the controllers.
DualShock 3 controller
The DualShock 3 was uncomfortable, cheap feeling, and basically unusable on a PC. The layout of the controller was awful, it was too small, and the shape wasn't ergonomic, but the DS3 had one redeeming feature that I'll mention below.
Later, I would buy a used Xbox 360 from a pawn shop. The controller was quite different from a DS3, but light years better. It felt alright in the hand, buttons made more sense, had a good feeling of weight and solidity to it, an all around 6/10. AA batteries, a weird proprietary data cable, and shit windows support kept it from going into regular use in my setup.
DualShock 4 controller
When November 2013 rolled around, I ended up buying a PS4 a few weeks before Christmas, which entered a new contender in the ring: Sony's DualShock 4. This controller was much, much better than the DS3. It was solid, felt great, had a fun light bar, a rechargeable internal battery, and wasn't using a proprietary connector. BUT, four major flaws put this controller in the garbage where it rightfully belongs;
A stupid button / stick layout
That retarded touch bar that ate up 20% of the controller face
Almost nonexistent Windows support
God-damned Micro-USB
Last-generation's DS3 controller had a sharp advantage over the DS4 however: Mini-USB. This connector is older, but far better than Micro-USB for one reason, it (almost) never wore out. Mini-USB cables are just as useful in 2006 as they are in 2022, they just keep going.
I can't even begin to express my utter and unquenchable hatred of Micro-USB. It's insane how much disdain and loathing I have for such a small, shitty USB interface. Micro-USB male connectors use a small, mechanical clip mechanism to hold the connector in place. This serves to secure the cable when inserted into a controller, cellphone, etc. This is good in theory (think DisplayPort, which I also hate), but in practice this "feature" introduces an artificial lifespan to any given cable. These clips wore out so fast your head would spin, especially with repeated connect / disconnect cycles (i.e. with a phone or some sort of peripheral device).
DS4 controllers also suffered from a few design flaws beyond the ones mentioned above. For instance, the left thumbstick and accompanying button (L3) would wear out fairly quickly with the stick easily losing the ability to track forward movement, especially within the Call of Duty game franchise. I've had L-Stick problems on every DS4 controller that I've played CoD on and I'm not heavy handed or hard on my controllers.
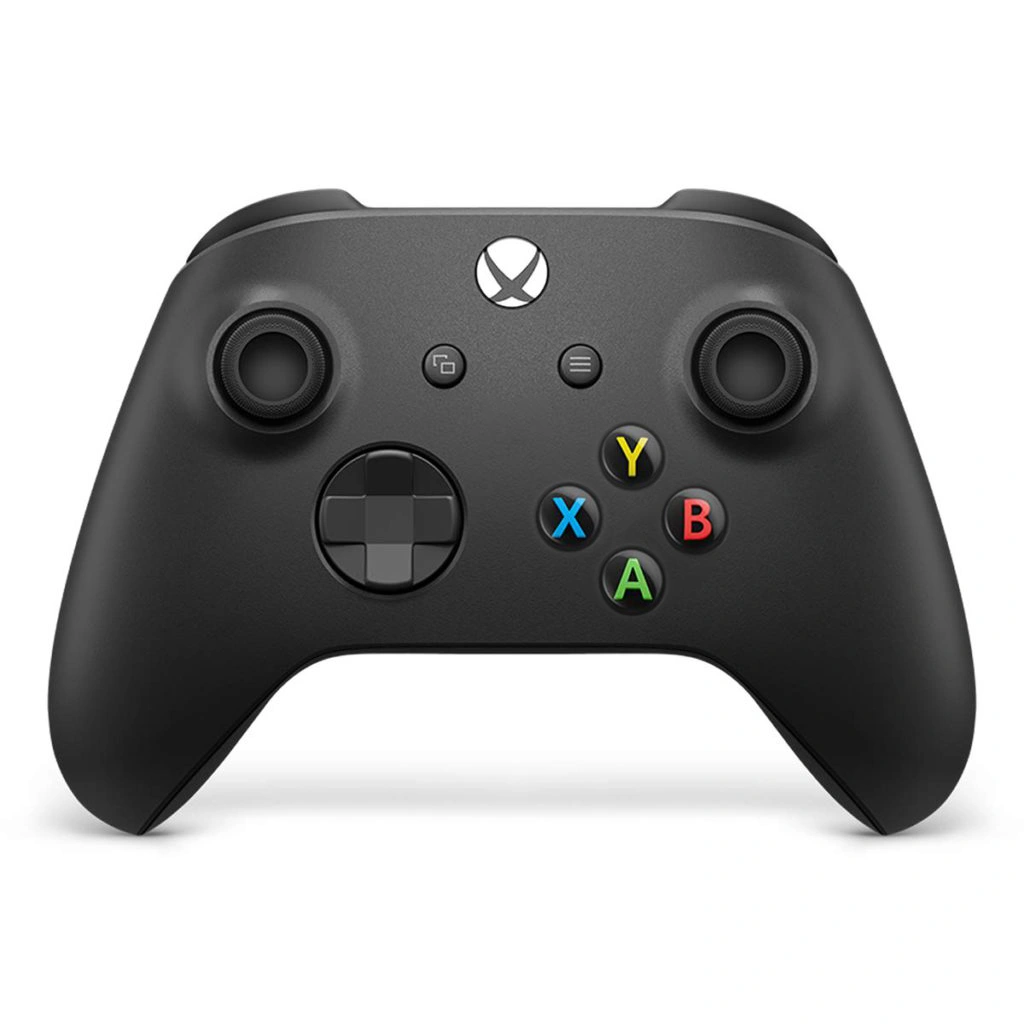
Xbox One controller
Alongside the PS4, came the Xbox One as well. With it came a new controller and Microsoft actually did some good work this time. The controller was solid, comfy, had a halfway-decent button layout, a standardized connector, and good Windows support. Only a few problems still remained;
AA batteries (again)
Offset thumbsticks (again)
Micro-USB (again)
I settled on an Xbox One controller and went about my life for a number of years. MS eventually replaced the original, chunky controller with a sleeker and all-around better model a few years later with the release of the Xbox One S. Later still, the Xbox Core controllers entered the market, this time packing the much more acceptable USB Type-C connector. Finally, some good features. I grabbed a Blue core controller for $65 (yikes) and a rechargeable battery pack and lived happily ever after.
Until about a year into the controller's lifespan when my thumbsticks started drifting. Both DS and Xbox controllers suffer from pervasive thumbstick problems. They're easily the largest weak point on a game controller. They're incredibly prone to wear, misalignment, dead-zones, sticking, ghosting, drifting, and a million other verbs that I can't remember. The design of thumbsticks for both brands are largely the same; a left / right potentiometer and a button, simple. Problem is, they're finicky and fragile.
This wouldn't be an issue if the thumbsticks were user replaceable though: pop open the controller, fish out both sticks, put in some new ones, and you're off to the races or battle or whatever (kinda like how some Cherry MX switches are swappable). This isn't the case however. There are fourteen (!) solder points for each of these thumbsticks and for someone like myself who isn't the best solderer, this proves troublesome to remedy myself. Furthermore, replacement potentiometers need to be live-aligned, which is a tedious and frustrating task in itself. That mechanism I mentioned was also designed so poorly as to never really read as centered. Apparently, the controllers just sort of tare the factory alignment so you never notice a difference. That is, until the original thumbsticks wear and you go to replace them yourself.
With all of that out of the way, here is the core position I hold in this discussion. Controllers need to be fixed, and luckily there are really only a few fixes that need to be made.
Firstly, the layout. Gamepads have sort-of landed on a set layout (except for Sony), this layout consists of two thumbsticks (+ L3 / R3), four face buttons (A, B, X, Y), L / R bumpers and triggers, a D-Pad, Start, Select, and a Home button. I excluded Sony because they seem to be straying from this standard with the DS4 and DS5 controllers' notable lack of Start, Select, (trading them for Options and Share for some dumb reason) and the inclusion of that useless touchpad.
This layout is typically accomplished with the face buttons, D-Pad, and thumbsticks sharing real estate on the front of a controller, with the bumpers and triggers on the back or top (depending on your perspective). PlayStation accomplishes this with both thumbsticks on the lower plane, while the D-Pad and face buttons share the upper plane. Sony almost has it right with this layout, but not quite. Microsoft has the left thumbstick and face buttons on the top plane, with the D-Pad and right thumbstick on the lower. Again, this is close, but not optimal. There is actually only one controller that I know of with their thumbsticks and buttons in a sane and ergonomic position: The Nintendo Wii U Pro controller.
Wii U Pro controller
This unlikely candidate does the incredible, it actually has the D-Pad, face buttons, and thumbsticks in the correct orientation. At rest, the human thumb is in line with the bones of the forearm. This means, at rest, the thumb wants to sit over the top plane of a gamepad. Sony controllers have both thumbsticks on the lower plain, meaning you have to strain your thumbs down to interface with those sticks. While Microsoft has it half-right with just the left thumbstick in this position, the right thumb still needs to be bent to utilize the right thumbstick.
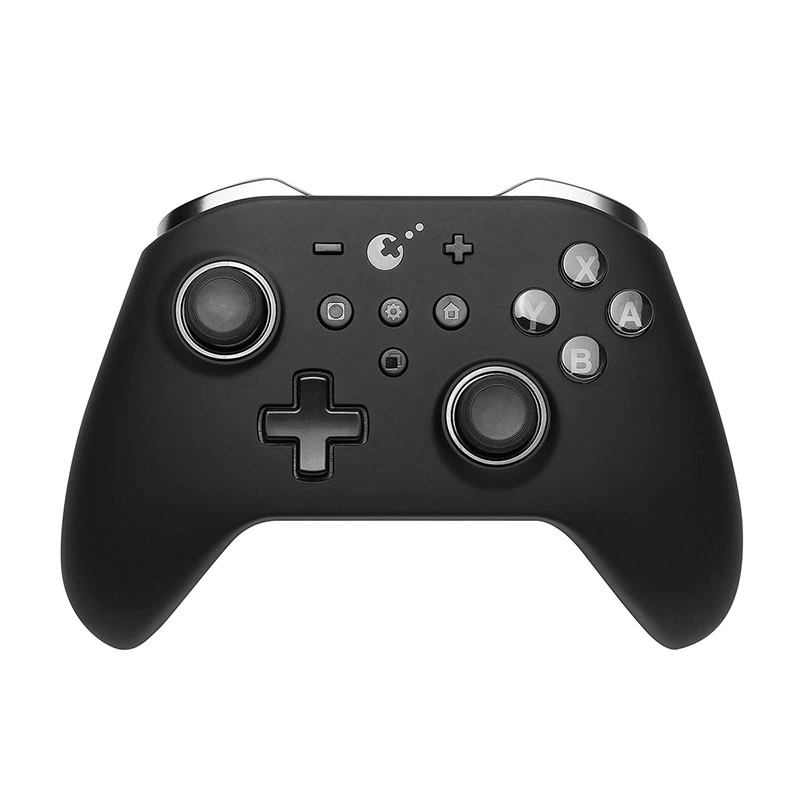
Gulikit Zen Pro controller
Update 1: Since writing the above section, Gulikit, a 3rd Party, Chinese controller manufacturer has become popular among those of us who share the above gripes about carbon potentiometers in game controllers. Their new design retains much of the old thumbstick design, but with electromagnetic potentiometers that should last significantly longer and retain their calibration to a much tighter tolerance. I just purchased one of their Zen Pro controllers ($50 on eBay) and one of their wireless controller adapters. I'll probably also 3D print some trigger stops for it as I have become accustomed to using them on my Xbox Elite Series 2 controller that I bought broken – which I then repaired – a few months ago. That controller is starting to have other problems and I think a replacement is in order.
My mockup controller
To further illustrate how possible it would be to create such a perfect controller, I created a mockup Xbox controller in Photoshop that displays this ergonomic layout as I have envisioned. Put both thumbsticks are on the same upper plane, replace the plastic thumbstick caps with aluminum ones (as I do on my controllers), pair this layout with Gulikit's electromagnetic potentiometers, and some adjustable trigger-stops like the Elite Series 2 and you have a perfect controller that should last a very long time. If only such a controller existed...
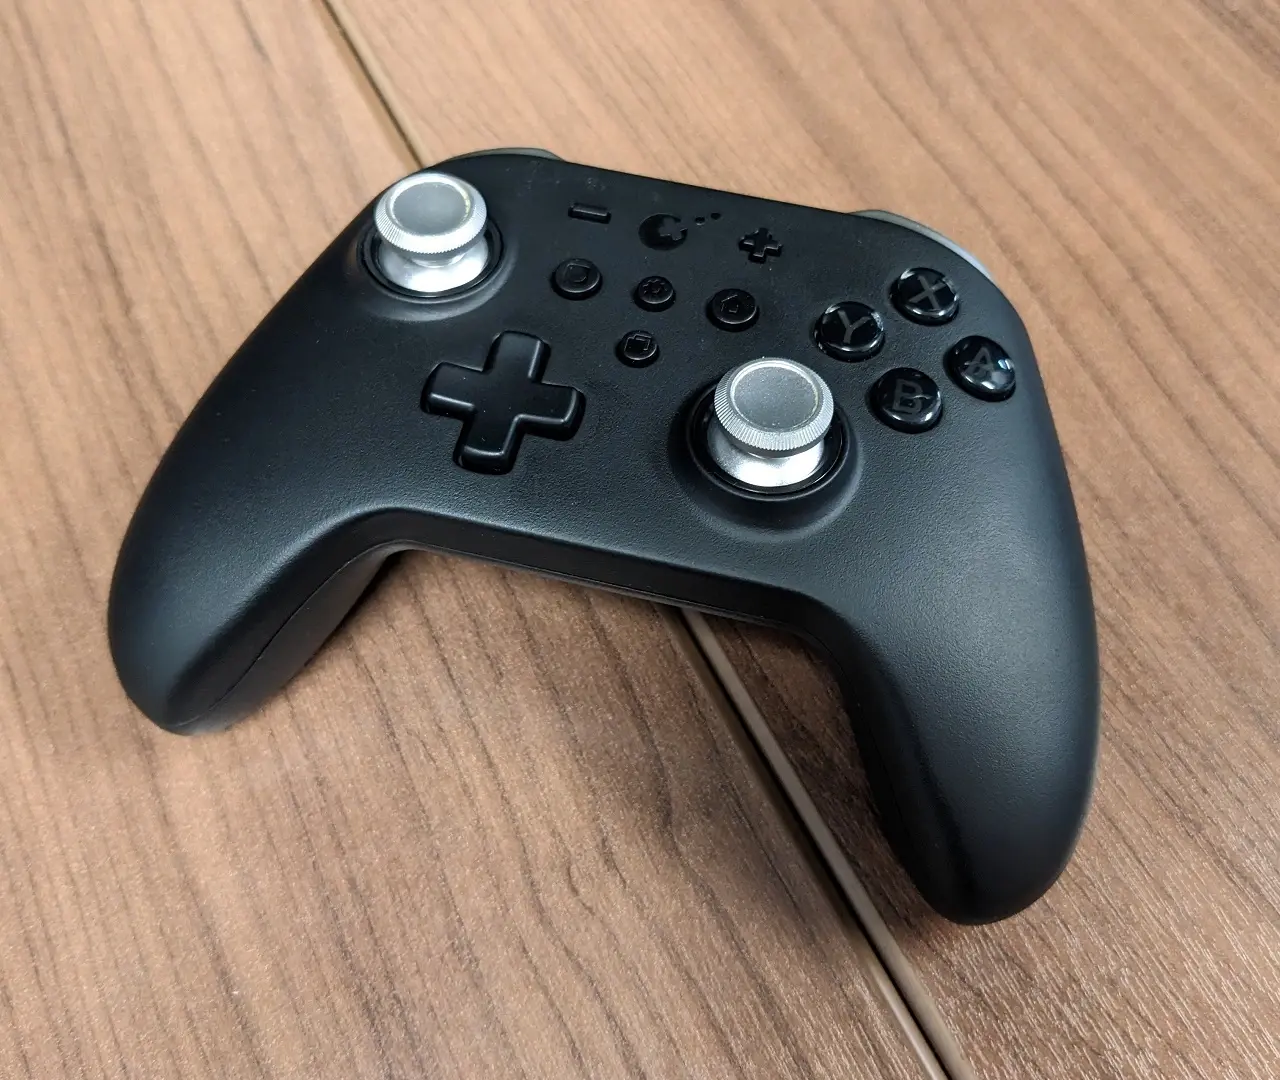
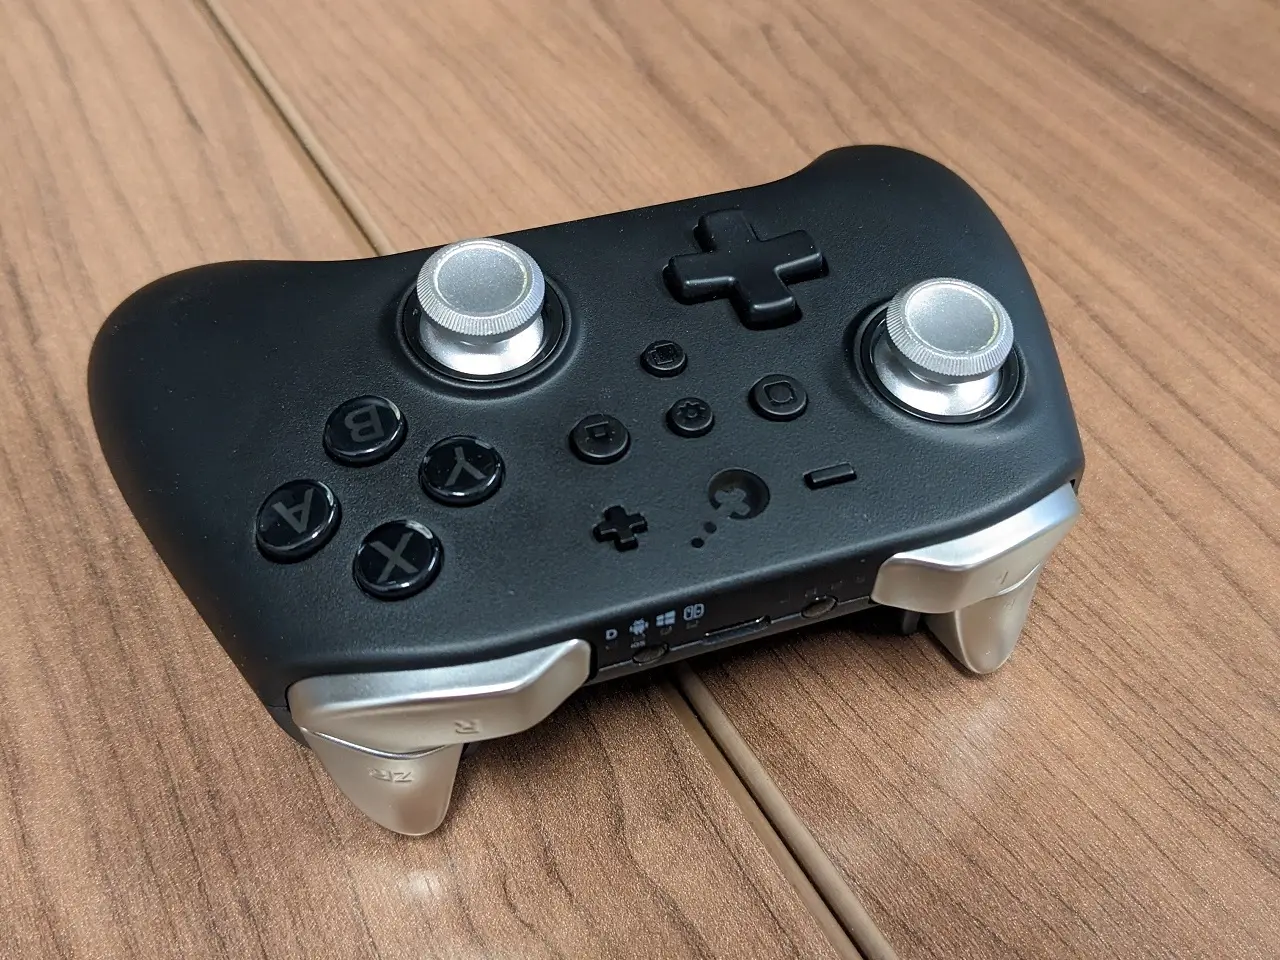
Update 2: I have received the controller and swapped the plastic thumbstick caps for silver aluminum ones. I think it looks pretty slick and it feels butter-smooth. The build quality is about 75% of the way there compared to a standard Xbox Core controller, but it still feels fairly solid and seems to be easy enough to repair. The unit is only held together by four phillips screws and some clips. I'll play some Vermintide 2 tonight and see how it performs. In the meantime, here are some pics of my controller.
My Zen Pro controller - Obverse
My Zen Pro controller - Reverse
2024 Update: After about seven months of use, the left thumbstick has started giving me trouble when sprinting in CoD (pressing forward on the thumbstick and clicking the L3 button at the same time). This failure is very common among OEM Xbox One Series X/S controllers, as well as original Xbone and DualShock controllers. I'll see about trying to repair it myself and if not, perhaps I'll invest in the next generation of Gulikit controller.
2025 Update: I have basically stopped using my Zen pro controller. It doesn't seem to be as sturdy as my Xbox Core controllers and the left trigger started failing alongside that thumbstick. When I do play games, I usually stick to the Core controller or a keyboard and mouse. I plan to keep using my Core controller until Microsoft produces one with hall-effect thumbsticks. I also haven't played games much in the last two years due to work and home life taking up more of my free time.
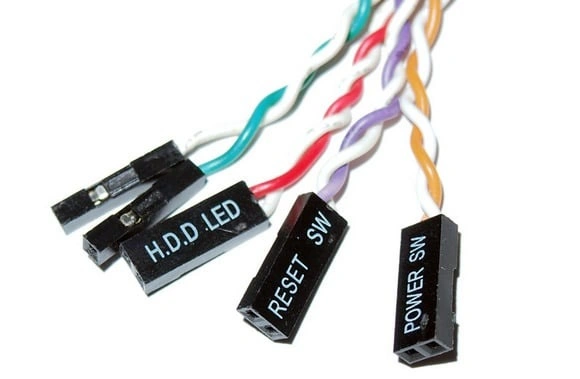
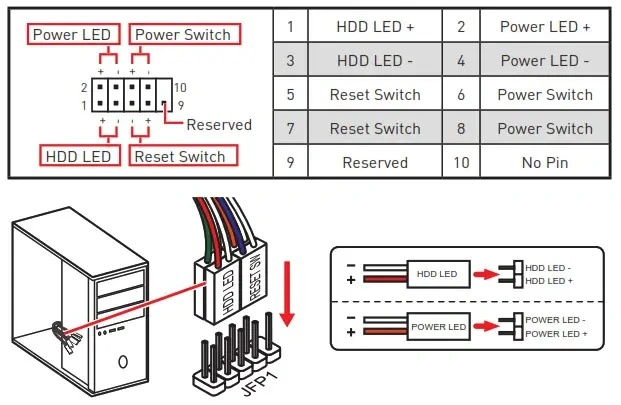
JFP1 (Jumper Front Panel 1) is the name for the header that connects a motherboard to the power switch, reset switch, Power LED, and HDD LED of the chassis. The cables can be quite annoying to connect in small cases and the motherboard doesn't always label them, so I find myself referring to a pinout diagram often, such as the example below.
JFP1 Pinout Diagram
I dislike the implementation of this connector and I think PC case manufacturers should start using a single connector instead of four or five separate cables.
These cables use "DuPont connectors" to interface with the chassis and motherboard and they seem to be used in a lot of electronics and hobby applications. As an experiment, I ordered a set of 2x5 DuPont connectors to see if I could accomplish this unification myself. Referencing a JFP pinout diagram, I removed the wires from the case's connectors, attached them all to the new DuPont connector, plugged it into a motherboard, and pressed the power switch.
It worked as expected and I now plan to outfit all of my desktop cases for the next century with this single connector. No more orientation guesswork, no more looking up "PC front panel pinout" or checking manuals. Some motherboard companies have tried to mitigate this problem by using labeled riser cards to make cabling easier, but my solution will permanently fix whatever case I apply it to.
Note: Since writing this section, I have applied these new DuPont connectors to half-a-dozen cases with great success. I will do it to all future cases I own.
Over the last month or so, my poor co-workers have been my captive audience for many hours of discussion and rambling about my desire to upgrade / rebuild / replace my NAS (Network Attached Storage) solution at my house. Currently, I have three NASs: a Synology DS216j, a Synology DS418, and a homemade AMD Ryzen based system in my Fractal Design Define 7 case.
Synology DS216j NAS
The DS216j was my first NAS purchased in the mid-late 2010s. Before this I primarily used an array of external hard drives, flash drives, and whatever else I could scrounge up to keep my stuff relatively straight and findable. With the DS216, I purchased two 4 TB Seagate IronWolf NAS hard drives for around $130 a pop. The 4 TB of usable space the RAID 1 setup provided was incredible and I quickly made use of this newly available digital real estate.
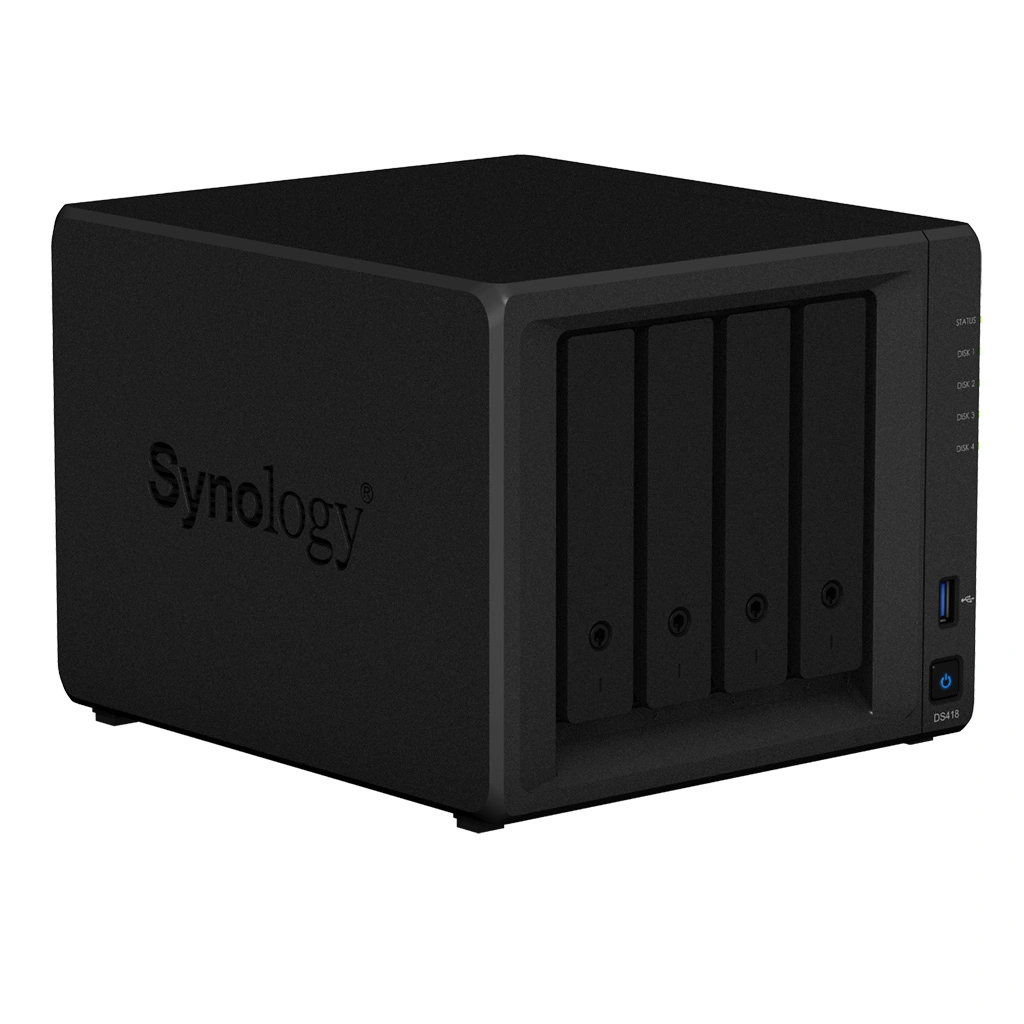
Synology DS418 NAS
About two years after that, I got my first IT job and began to make some real money ($7.80 an hour), allowing me to buy NAS No. 2. Around 2019, my DS418 made its way into my home and into my heart. I backed up the DS216j, removed the RAID 1 array, formatted both drives, and slapped them into my new four bay enclosure. I picked up two more Seagate 4 TB drives (for around $115 each) and completed my first RAID 5 array. Now with 12 TB of usable space.
Four years later and the time has come for me to upgrade once more. I actually purchased a new set of four 8 TB IronWolf drives ($160 a piece this time) around six months ago, even going so far as to build my own NAS out of spare parts and some Unbuffered ECC DDR4 that I picked up on eBay. This system seemed to work well, but in the Define 7 case, it was just too unwieldy and cumbersome to implement in my small house.
I almost took the lazy route of cutting my losses and buying a QNAP TS-462 enclosure and calling it a day. But this unit is (at the time of writing, $470). This is too much for my tight budget so I decided to stick to the DIY path and build one on my own. This venture will require a bit of planning and some thrifty shopping, spanning a few different online retailers and continents.
CW-N5105-NAS Motherboard
Firstly, I need a motherboard. Something with an SOC and at least four SATA ports, a NIC, and preferably in an ITX form factor. I decided to go with an off-brand Intel Pentium SOC board similar to the unit pictures and that NASCompares brought to my attention in this video. The unit I went with was about $130 on AliExpress.
This MOBO has six SATA ports, four 2.5G NICs, two DDR4 SO-DIMM slots, and two M.2 NVMe slots. This should be way more I/O and connections than I need for my setup, but I'll take it and consider it room to grow into.
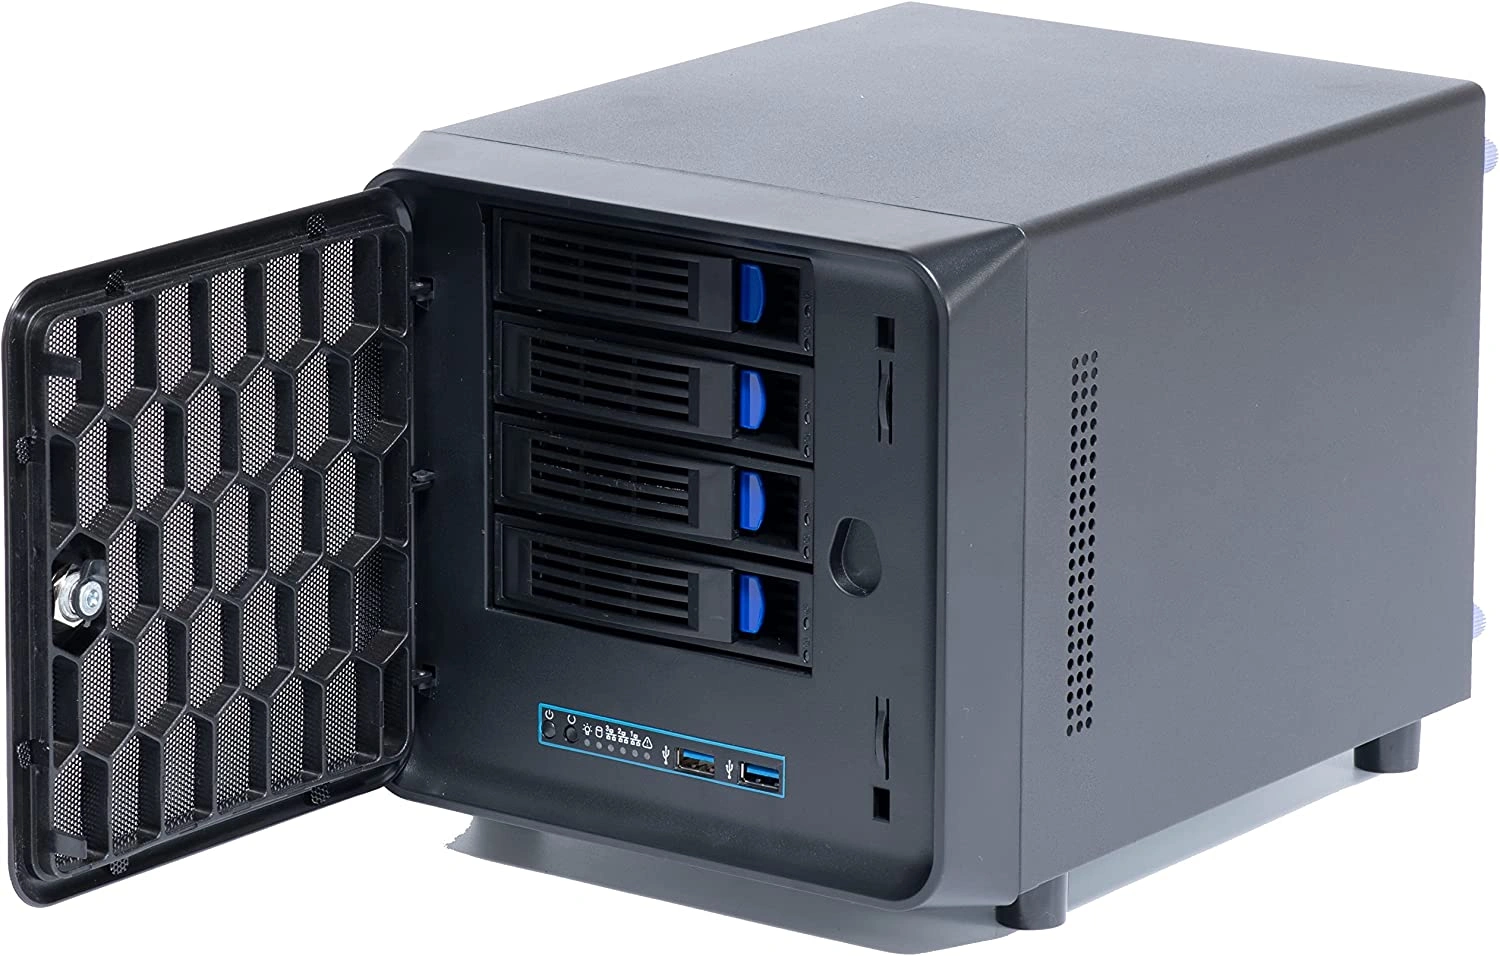
Unbranded 4-Bay NAS Enclosure
Secondly, I need an enclosure. My Define 7 is a great case, sturdy, and with more 3.5" bays than I can afford to fill, but it's very heavy and imposing for the small amount of components I planned to stuff into it. The perfect case for my needs would be rather small and closer to the form factor of a standard 4-Bay NAS, preferably with four or more 3.5" hot-swap bays, support for a standard Mini ITX board, and cost less than $100 (I'm not made of money).
I found the above no-name case that really fit the bill and for around $80 new on Amazon. Along with that case, I grabbed a Noctua 80mm case fan to replace the stock exhaust and four left-angle (?) SATA cables to better suit this chassis.
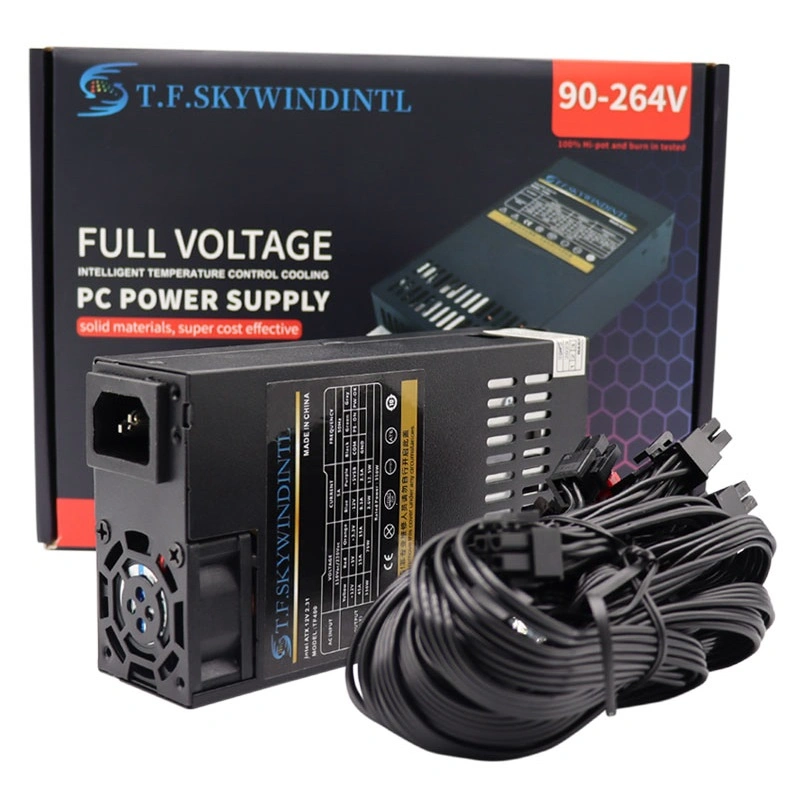
T.F. SkywindIntl Flex ATX PSU
Thirdly, I need a Flex ATX / 1U power supply. This is turning out to be the most difficult component to obtain, at least for a reasonable price. Silverstone has a reputable unit, but I can't justify spending another hundred dollars on yet another PSU to add to my collection. With a reputable brand out of the question, I'll resort to a less-reputable source to obtain a PSU. With slim options, I'm leaning away from the cheap Apevia unit that is usually at the top of search results and toward some even less well-known brand named T.F. Skywindintl that I found on AliExpress, Amazon, and eBay.
The unit pictured seems to cover all my bases and (assuming it doesn't blow up) should serve this build well. I'll probably go with this unit on eBay for around $50, the 60-day return window offered by the seller is a plus too.
Once all these components come in, I may make a follow-up post that details any weird aspects of the build that may materialize.
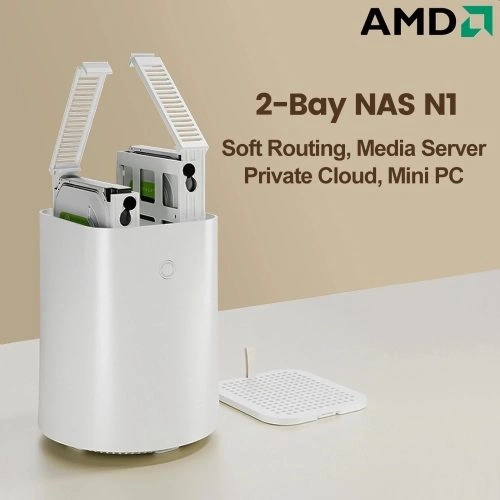
Topton NAS N1
2024 Update: I sold both of the Synology NAS enclosures to a coworker, bought and assembled all of the parts I specified above for a custom NAS, and even purchased another NAS enclosure, the latest one being a Topton NAS N1 (shown above). This Topton NAS is fairly cheap and often sold as a white label enclosure through various different brands on sites like AliExpress (where I got mine). It has an AMD APU, 2x DDR3 SO-DIMM slots, 2x NVMe M.2 slots, and 2x 3.5" HDD bays. I replaced the generic fan with a Noctua branded one, but I had to zip-tie it on as the fan screws weren't compatible with it.
The custom NAS has been working well, it's pretty quiet, and was fairly easy to build. I started off the project with four 8TB Seagate Iron Wolf drives, one of which died right away and I sent it off in July to be RMA'd (six months later and I have still not received this drive back). I set this NAS aside until around October, then I spent a good chunk of change on four 16TB WD UltraStar drives. These drives in a RAIDZ2 gave me about three-dozen Terabytes of storage which should last me quite a while.
Currently, I'm using just these latest two NASs for storage; The Topton NAS N1 for media and a Jellyfin server and the custom NAS as general storage and backups.
Assuming that life doesn't get inexplicably better before I'm old, I plan to retire my body (when the tech has arrived) and my consciousness into the silicon (or other future material) world.
I'm not terribly concerned about the cosmic, "SOMA" questions about whether you could actually move or merely copy a consciousness into a digital medium. Humans don't know what a consciousness really is or what happens after death and I sincerely doubt that will change in sixty years. I'll take my chances with the cybergods (and I'll be one of them soon enough).
So while you meatbags are rotting in the ground, I'll be in cyberspace; surfing the net, playing Minecraft, and reading all the books that I can cram into my flash chips.
Assuming I don't get murdered, imprisoned, or wheeled into the county morgue by any other untimely means that is.
I grew up in a rural part of the US in the early 2000s. I didn't have much in the way of technology for most of my younger years. At the age of eight or so, my family got a Dell Inspiron 530S for my siblings and I to play on. We still didn't have much in the way of internet however, most of the time on the computer was spent playing old PC games (Zoo Tycoon was the family favorite). My Dad's blackberry was used as a tethered hotspot for the family desktop for quite a while. Eventually, we upgraded to a 3G hotspot from Verizon with a 5 GB data limit each month. This was great as we could start to use the internet in a more stable and regular manner.
After using this desktop for a number of years and getting well acquainted with Windows Vista, my Dad noticed my growing computer proficiency. One day, around the age of eleven, he sat me down and said something like this:
"Son, you are more gifted with using a computer than I will ever be. I've worked with my hands all my life, but computers, they are the future. I want you to build your own computer, I'll help you buy the parts, but you've got to do the rest. I know you don't know much about how they work, but I want you to learn."
So I did. I spent many months reading, asking questions, and watching videos about how computers work, what they're made of, and why anyone would build their own computer when they could just buy one. Level1Techs, Linus Tech Tips, Bitwit, and The Tom's Hardware forum (just to name a few) were all tremendously helpful for someone who knew next to nothing about computers at ten but was able to build their very own desktop by age twelve.
That desktop did not last forever, as no computer will, and after a number of years of service, there had been an issue with the power supply that led to the death of the machine. Looking back, it was probably easily fixable, but no matter. The desktop was given to me to take care of and I disassembled it for what parts I could take. The 120 GB hard drive (iirc), the few gigs of DDR2, CPU, and Motherboard all made their way out of the device and into my possession.
I held on to the chassis as well, but as I learned more about computers, I realized that this chassis didn't have a removable I/O shield. In its stead was a fixed plate, for only the original motherboard. This wouldn't do, so I cut out the plate with some tools and I was eventually able to fit an aftermarket motherboard in that case. Later, I realized what a terrible cut job I had made, so I trashed the whole thing and moved on.
After doing months of research and a lot of reading on the matter, I was confident that I could pick the correct parts to build a functional computer. My Dad and I sat down, we navigated Amazon and eBay and Newegg, eventually settling on a selection of parts. Most notably, an MSI GeForce GTS 450 graphics card. This card was terrible, even for the time. But it was inexpensive and was compatible with the parts I had. Some of the needed parts (a chassis, power supply, and disk drive) I had on hand from an old PC that my Dad's boss donated to my project.
A few weeks later (before the time of 2-Day shipping) my parts had arrived and I got to work. With the new GPU installed, my desktop idled on my Windows Vista desktop in crisp 1680×1050. As a bit of incentive when I was planning my computer, a friend of mine gave me his old copy of Fallout 3 to play once my new PC was assembled. I quickly installed it and fired it up to test my new digs. The green haze of the Capitol Wasteland glowed brightly on my shining face.
I wholly enjoyed the experience of building, installing, and playing a game on my new-ish PC, but the machine was slow, loud, and I'm pretty sure I didn't make sure my PSU had a high enough wattage rating to support playing a game. I knew I needed to upgrade parts eventually, but my Dad wasn't an ATM, so every computer I've built or bought since has been funded solely by myself. I also knew I needed to build something better, with new and current parts, and build I did.
By high school, I had built several computers, I became the go-to "IT Guy" in my class, and I assisted a lot of teachers and students with their computer questions and problems. I even built a few desktops for my teachers, taking a small profit of course.
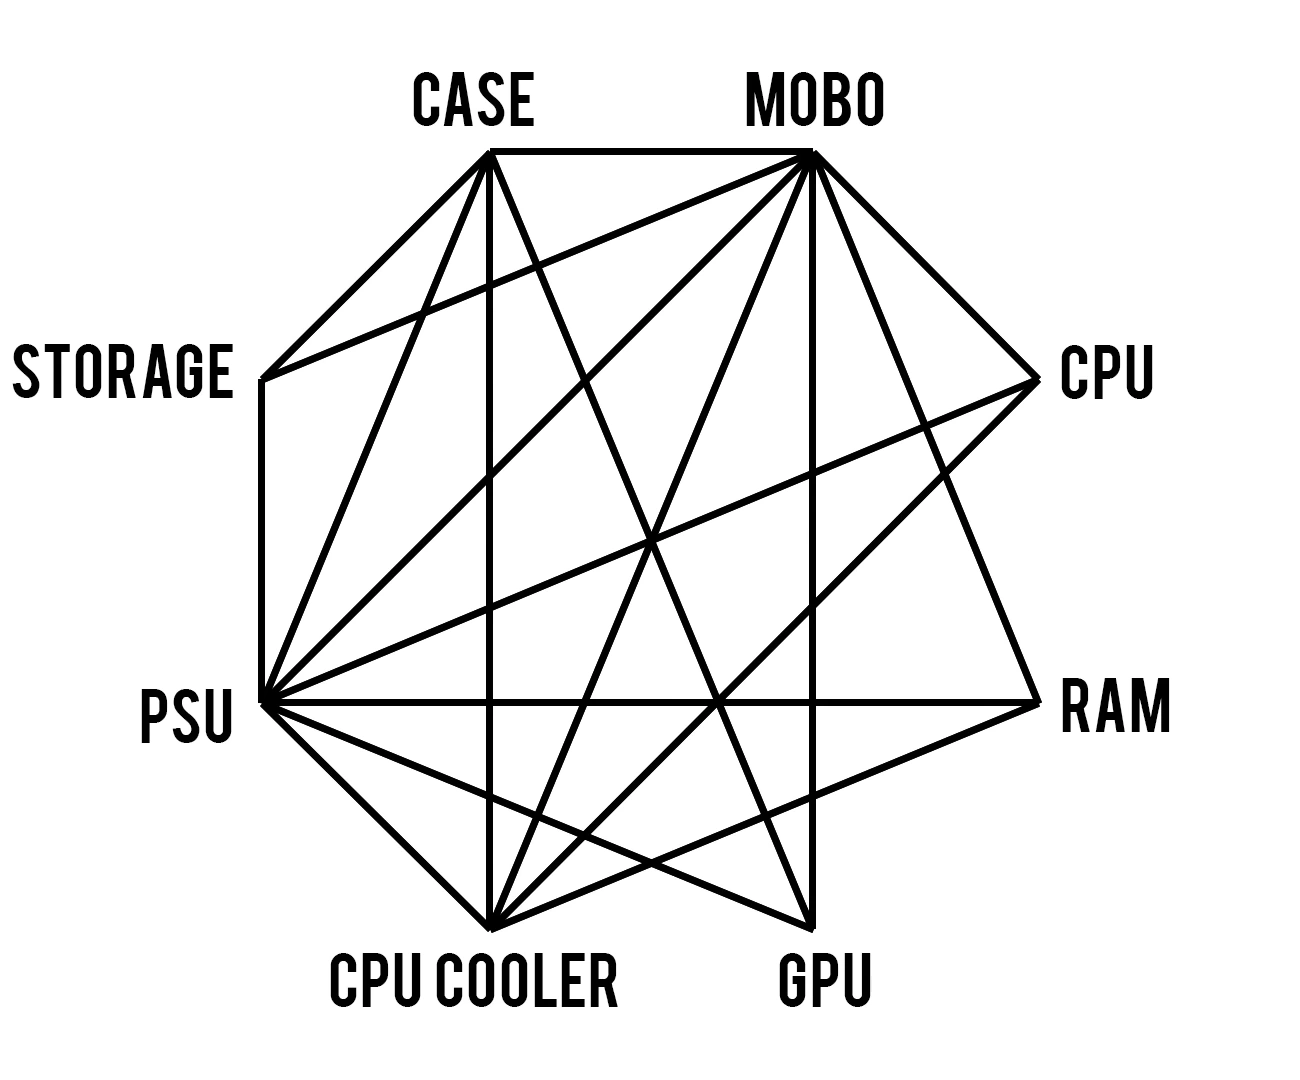
There are generally eight different computer parts that one needs to keep in mind for solid compatibility when building a desktop from scratch. As illustrated, the chassis or case has a compatibility relationship with five of the eight components. I found this graphic in a Bitwit YouTube video >> How to Choose Parts for a PC! The Ultimate Compatibility Guide!
Note: Although there are usually eight general categories of components, specialized systems may have a larger number of interacting components, requiring more detailed consideration to avoid conflicts.
In most cases and in most cases (pun intended), there will be some level of tolerances marked to ensure the builder is aware of a particular case’s limits on what can and can’t be installed into it safely. These are usually provided in the product's description, in a user manual, or stamped into the frame of the case. This information can help determine what motherboard standoffs go where, what size fan(s) can be installed, and maximum CPU cooler height.
There are also various standardized sizes for computer cases. These range from gigantic E-ATX cases all the way down to the rarely seen, super-small Pico-ITX cases. Most PC enthusiasts seem to flock toward Full ATX, Mid ATX, or Micro ATX. These are mostly standard sizes that make up the vast majority of aftermarket computer cases.
My personal preferences are between Micro ATX and Mini ITX. As I never use more than one graphics card at a given time and store >90% of my data on my 16 TB Synology NAS, I rarely need a very roomy chassis. My current build is housed in a Fractal Design Define Mini C. This is a steel-bodied, Micro ATX case, with noise dampening foam, fan filters from all sides, and zero RGB. It’s a silent black box that sits in the corner and that’s just the way I like it.
Note: In the two years that have passed since I wrote the majority of this essay, I have changed cases a number of times: usually switching between the above Define Mini C; a Cooler Master Elite 120 Advanced; and a Thermaltake "The Tower" 100.
I don't always use the "black box in the corner" style of case. As I noted above, I own a variety of cases that stray slightly from this format and into a slightly more stylish territory (depending on your definition). I'll also often switch between some of these cases for my
Some large E-ATX custom made aluminum case I was gifted
Some unbranded, steel test bench
The Elite 120 fits in my backpack; the Define 7 is enormous and can fit over a dozen 3.5" HDDs; the Define Mini C is a manageable size and solid as a rock; the Tower 100 has a vertical design and is good for showing off; the Core V21 is cube shaped and I have my guest gaming PC in it currently; and the last two are mostly used for testing purposes.
- Usage: "Twonce" is used to describe an action or event that occurs in two distinct but concurrent instances, emphasizing simultaneity rather than repetition.
The unpleasant condition of the mouth after a full night's sleep, characterized by dryness, stale breath, and a general sense of oral decay. Broader in scope than morning breath, as it refers to the entire mouth rather than just odor.
- Ex: Camping without water gave me quite the case of all-night mouth.
Diagnostic Silence - n. - 2024-12-21
A deliberate pause or period of quiet used to observe, detect, or confirm a sound, signal, or anomaly within a system.
(by extension) Any intentional moment of stillness employed to gain insight into a complex process or environment.
- Ex: The mechanic held a diagnostic silence, listening for the rattle that only appeared when the engine idled.
Formotypicality, -ies - n.
The state of being formotypical.
Hyper-Lottery - n. - 2025-04-01
A game or venture of extreme risk and reward, in which participants stake something of immense or irreplaceable value for a chance at extraordinary gain. Unlike an ordinary lottery, where losses are trivial or expected, a hyper-lottery involves disproportionate stakes—the potential loss is catastrophic, while the prize is almost unimaginably great.
(figurative) Any situation in which someone wagers their reputation, future, or well-being on an outcome of vast uncertainty.
- Ex: Investing your life savings in that startup was a hyper-lottery, not a business plan.
Jaden Bait - n. - 2020-06-25
Overly stylized or gaudy consumer electronics, usually with RGB lights or excessive flair.
Kennedy Defense - n. - 2025-03-30
A dubious or bad-faith legal argument in which the defendant attributes an injury or fatality to spontaneous bodily failure—especially of the victim's head or body—rather than to any external cause or their own actions.
(informal, ironic) Any attempt to dismiss clear causation with implausible explanations that defy logic or physics.
- Ex: The lawyer's claim that the victim's skull "just did that" was a textbook Kennedy Defense.
Late Night Sleep Crazies - n.
A semi-dreamlike state, typically occurring while drifting into or emerging from sleep, in which the mind generates rapid, intricate streams of information or thoughts that seem logical in the moment but dissolve into incoherent fragments upon later reflection.
- Insight: I usually notice this phenomenon when I am asked a question and my response is nonsensical and off-topic.
Nuts and Bolts & Rocks and Sticks - n.
Superfluous or intrusive additions to an otherwise complete or straightforward system, project, or recipe.
Unwanted embellishments or complications that distract from the main purpose or degrade simplicity.
- Ex: This app's interface is full of nuts and bolts—animations, pop-ups, and menus no one asked for.
- Ex: Don't ruin the potato salad with rocks and sticks; just keep it simple.
Oddservation - n. - 2023-05-06
A curious or peculiar observation; the act or result of noticing something unusual, humorous, or out of place.
A term for a witnessed or remarked-upon event that defies ordinary explanation or expectation.
Pocket Cost - n. - 2025-04-16
The physical or practical burden of carrying an item in one's pocket, especially in terms of size, weight, shape, or comfort. A lower pocket cost indicates ease of carrying; a higher pocket cost suggests inconvenience, bulk, or discomfort.
(by extension) Any small but persistent inconvenience associated with keeping or maintaining something on one's person.
Scanner's Folly - n. - 2023-10-04
The mistake of disposing of an original document before verifying the accuracy or completeness of its digital copy.
(figurative) Any act of premature trust in technology that leads to irreversible loss or error.
Yawning Gap - n.
A conspicuous opening in an otherwise closed or sealed structure, often large enough to compromise its integrity or intended function.
A breach or separation in a surface, joint, or enclosure that was designed to remain airtight, watertight, or otherwise sealed.
- Ex: The inspection found a yawning gap between the door and the frame, letting in cold air.